Home Workout: Saturday, February 22, 2025
Home Workout: Saturday, February 22, 2025
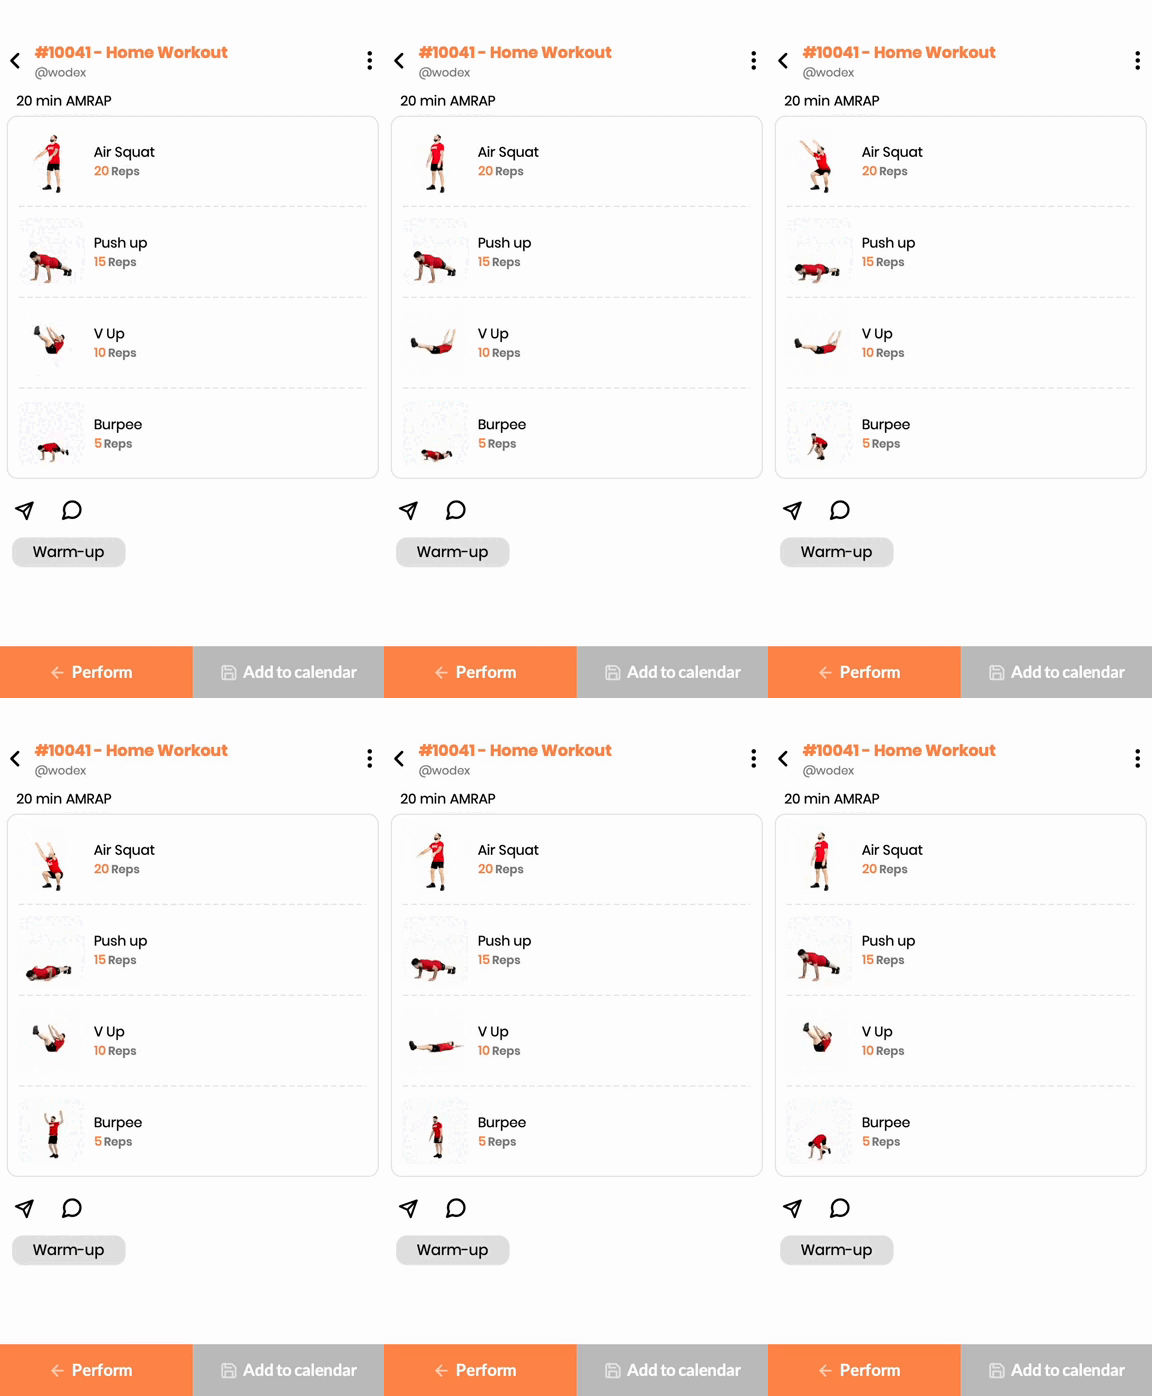
This bodyweight AMRAP workout enhances muscular endurance, cardiovascular fitness, and overall body control.
Movement Analysis:
✅ Air Squats: Strengthen the lower body, particularly the quadriceps, hamstrings, and glutes, while improving mobility.
✅ Push-ups: Develop pressing strength in the chest, shoulders, and triceps while activating the core.
✅ V-ups: Build core stability and coordination, engaging both the rectus abdominis and hip flexors.
✅ Burpees: A full-body exercise that improves explosive power and endurance.
Energy System:
🔋 The workout primarily utilizes the glycolytic and oxidative energy systems, as it requires sustained effort with short transitions between exercises.
Workout Goals:
🎯 Improve bodyweight strength and muscular endurance
🎯 Enhance aerobic and anaerobic conditioning
🎯 Develop movement efficiency and coordination
Training Tips:
✔ Maintain a steady breathing pattern throughout.
✔ Control the eccentric phase in squats and push-ups to maximize muscle activation.
✔ Avoid early burnout by pacing the first few rounds.
CrossFit Workout: Saturday, February 22, 2025
CrossFit Workout: Saturday, February 22, 2025
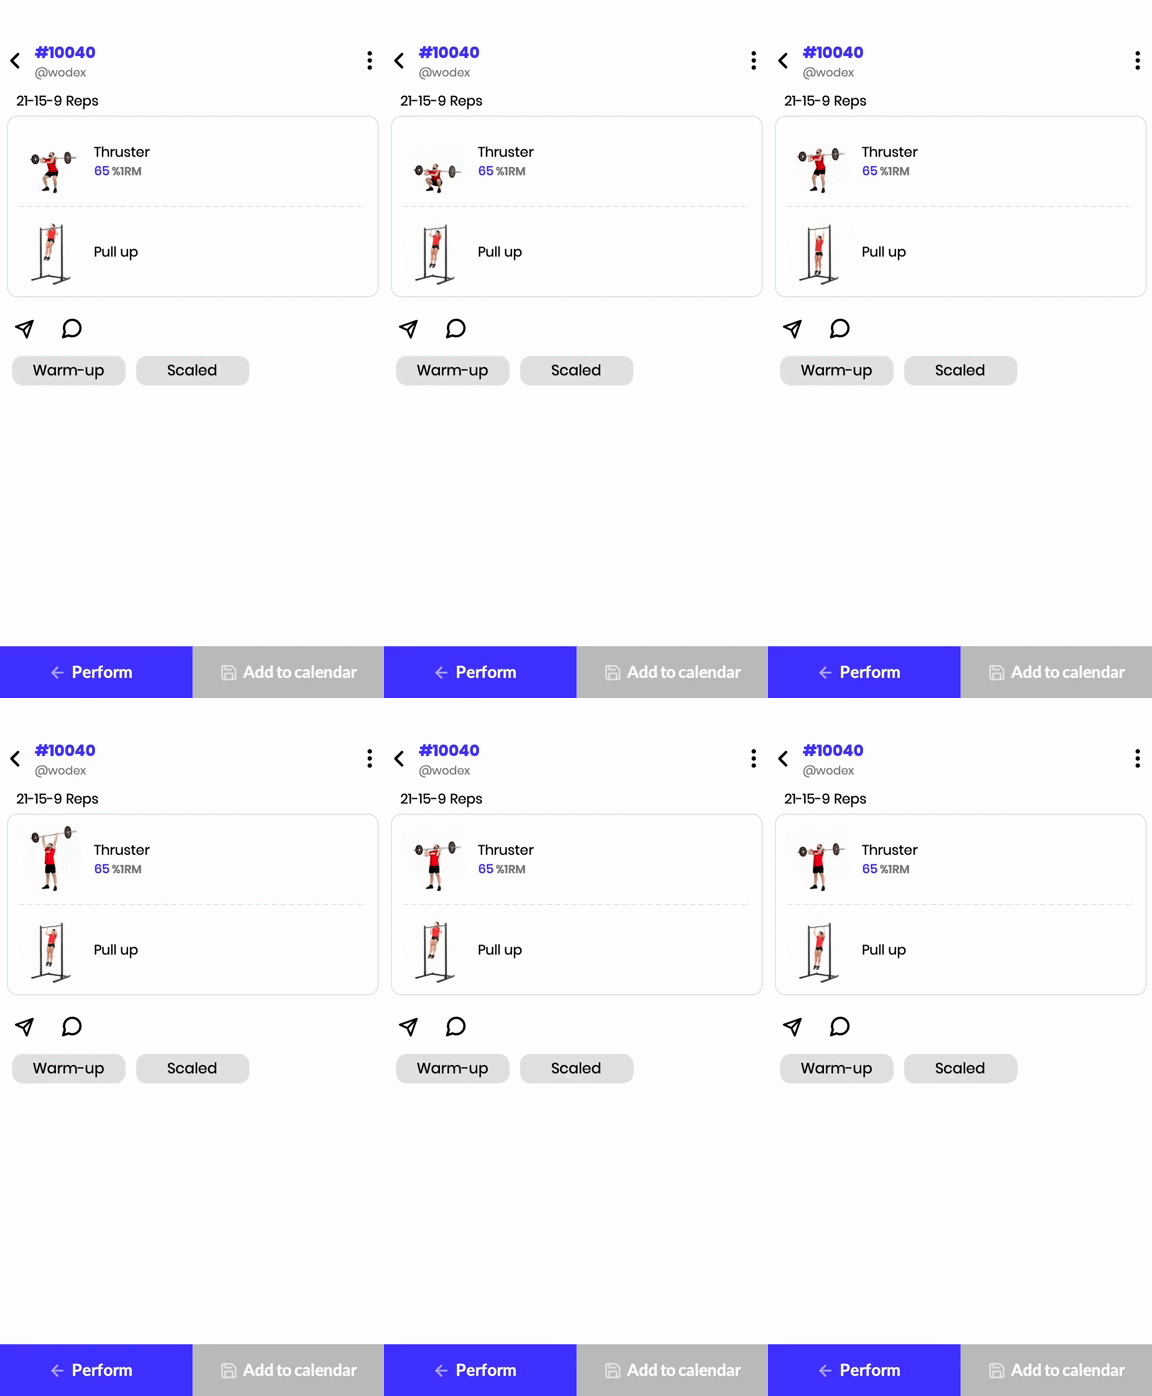
This high-intensity couplet tests power output, muscular endurance, and gymnastics capacity. The 21-15-9 rep scheme is designed to push athletes through decreasing volume while maintaining intensity.
Movement Analysis:
✅ Thrusters: A full-body compound movement that combines a front squat and overhead press, requiring leg drive, core stability, and upper-body strength.
✅ Pull-ups: Engage the latissimus dorsi, biceps, and shoulders while improving grip strength and overall pulling power.
Energy System:
🔋 The phosphagen system is dominant in the early reps, transitioning into the glycolytic system as the workout progresses.
Workout Goals:
🎯 Improve barbell cycling efficiency and breathing control under load.
🎯 Build upper-body pulling strength and endurance.
🎯 Develop mental resilience under fatigue.
Training Tips:
✔ Break thrusters into strategic sets (e.g., 12-9, 8-7, 9 unbroken).
✔ Use controlled breathing to sustain effort.
✔ Optimize hip drive in thrusters to minimize shoulder fatigue.
✔ Scale appropriately to maintain intensity and form.
Workout Modifications for Beginner Athletes
The scaled version ensures accessibility by adjusting weights and modifying pull-ups, allowing all levels of athletes to maintain a high-intensity effort.
This WOD is a benchmark test that combines weightlifting and gymnastics, making it a valuable tool for assessing an athlete’s overall fitness and progression.
21-15-9
- Dumbbell Thrusters (Two DBs at 35-40% of 1RM Front Squat)
- Jumping Pull-ups
To access the warm-up and cool-down programs for this WOD, please use the WODEX app.
How to create games
How to create a game
Creating a Competition on WODEX: A Platform for All
The WODEX app is a unique platform for designing, managing, and participating in sports competitions. With this feature, every user can easily create their own competitions, share them with others, and host diverse sporting events. This section of the app is designed to provide a simple yet professional experience for both organizers and participants.
Key Features of WODEX Competition Section
1) Custom Competition Creation
Users can design competitions according to their needs. This includes setting the type of competition (individual or team), scheduling, participation conditions, and specific rules for each event.
2) Coverage of Online and In-person Competitions
WODEX allows the hosting of both online and in-person competitions. In online competitions, participants submit videos of their performance, and judges assess them digitally.
3) Advanced Judging Management
Organizers can assign judges to their competitions and manage the judging process through the app. Scoring, recording results, and announcing winners are carried out precisely and transparently.
4) Participant Registration and Management
Participants can easily register for competitions via the app (Registration Guide). They can view schedules, competition rules, and track their registration status.
5) Live Display and Online Leaderboards
WODEX adds excitement to competitions by offering live leaderboards with real-time score updates.
6) Monetization Tools for Organizers
Organizers can set participation fees and earn income through the app.
7) Support for Various Sports
The platform is designed for all types of sports, with flexibility to adjust the rules and criteria for each sport.
Why WODEX Competitions?
- Simple and smooth user experience
- Professional features for organizers and participants
- Centralized management of all aspects of the competition, from registration to result announcements
- Direct communication and interaction between users and judges
Steps to Create a Competition:
A) Download the App and Create an Account
B) How to Access the Games Panel
Download the App and Create an Account
The WODEX app is completely free and available to all users. By installing this app, you can easily take advantage of our various features and services. After downloading and installing the app, you will need to create an account for yourself (see How to Create an account).
How to Access the Games panel
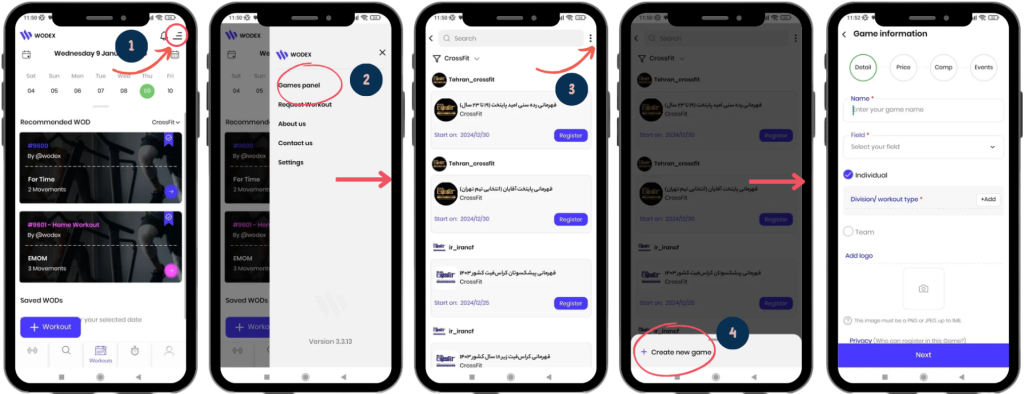
1) On the homepage, as shown in Image 1, tap on the menu icon located at the top right of the screen.
2) Select the Games Panel option to access the list of games.
3) On this page, you can view the complete list of games. To access the page for creating a new game, tap on the three dots icon at the top right of the screen.
4) Choose the Create New Game option.
How to Create a Game
Here are the steps for creating a game. The process consists of 4 sections:
Below, we will explain each section in detail:
1) Detail:
In this section, you must enter the details of the game in order.
It is important to note that filling in the fields marked with a red * is mandatory. Each section is
Name:
Game Name: Enter the name of the game in this section.
The maximum length for the game name is 40 characters.
Field:
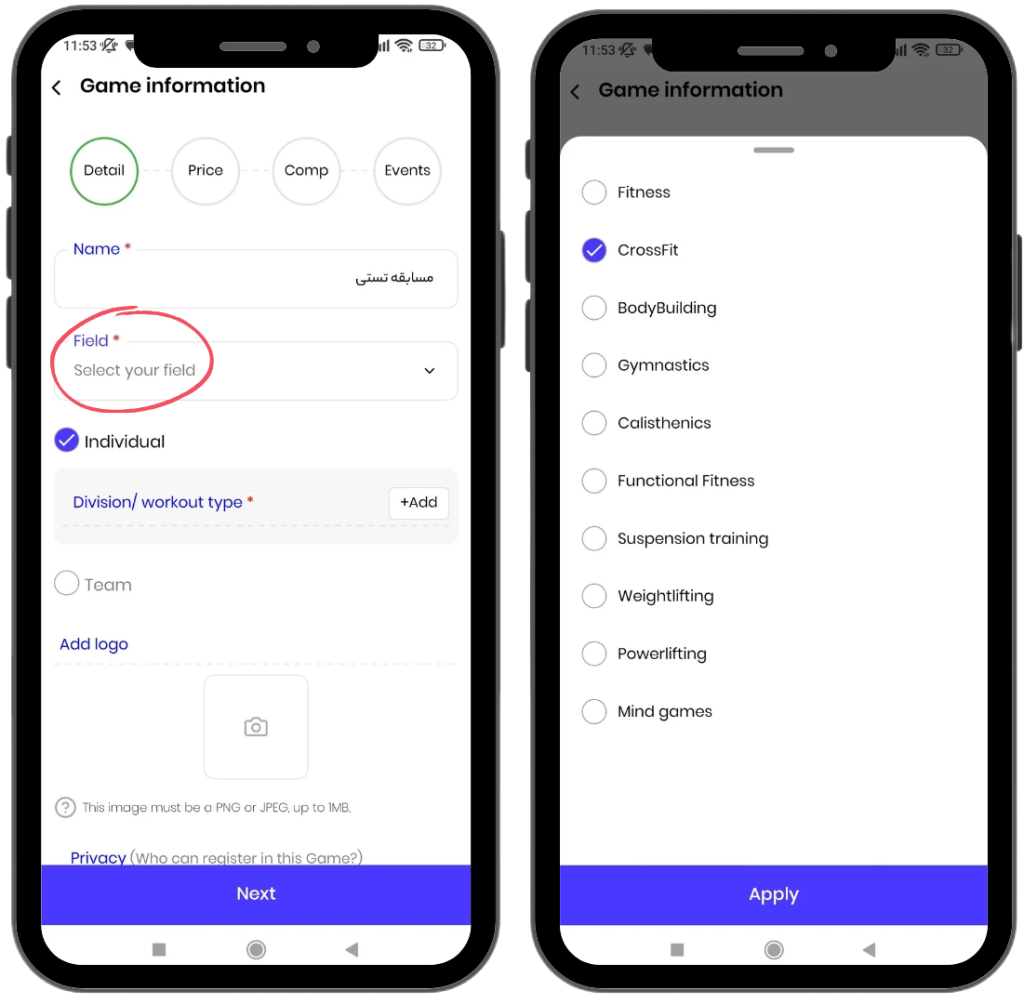
Sport Field: Enter the sport field for your game in this section, for example, CrossFit.
If your sport field is not listed, you can request to add it by sending an email to:
.
Game Type:
This section includes two categories: Individual and Team games.
Using the WODEX app, you can host your games as individual, team-based, or both simultaneously. To hold both individual and team games, make sure to select both checkboxes.
Details on how to fill out this section will be explained below:
Individual:
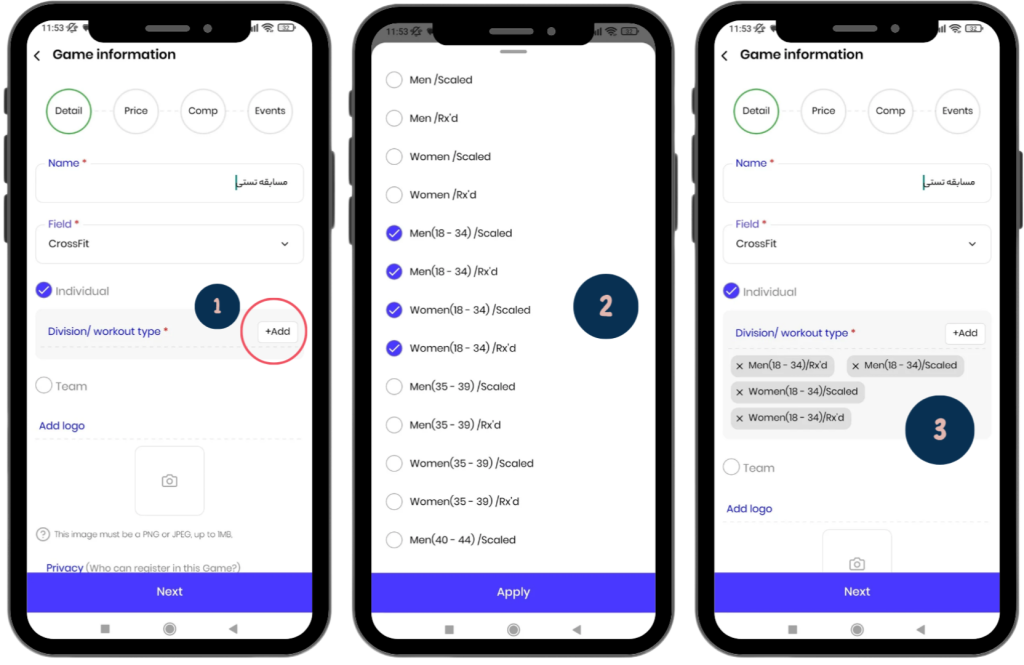
To Add an Individual Game:
- First, select the “Individual” checkbox (enabled by default).
- Then, choose the appropriate category for your game from the “Division/Workout Type” section. This includes gender, age group, and skill level.
- For better management, the selected categories will be listed on the page.
Team:
To Create a Team Game:
- First, check the “Team” option.
- Then, follow the steps below to complete the process of creating a team game.
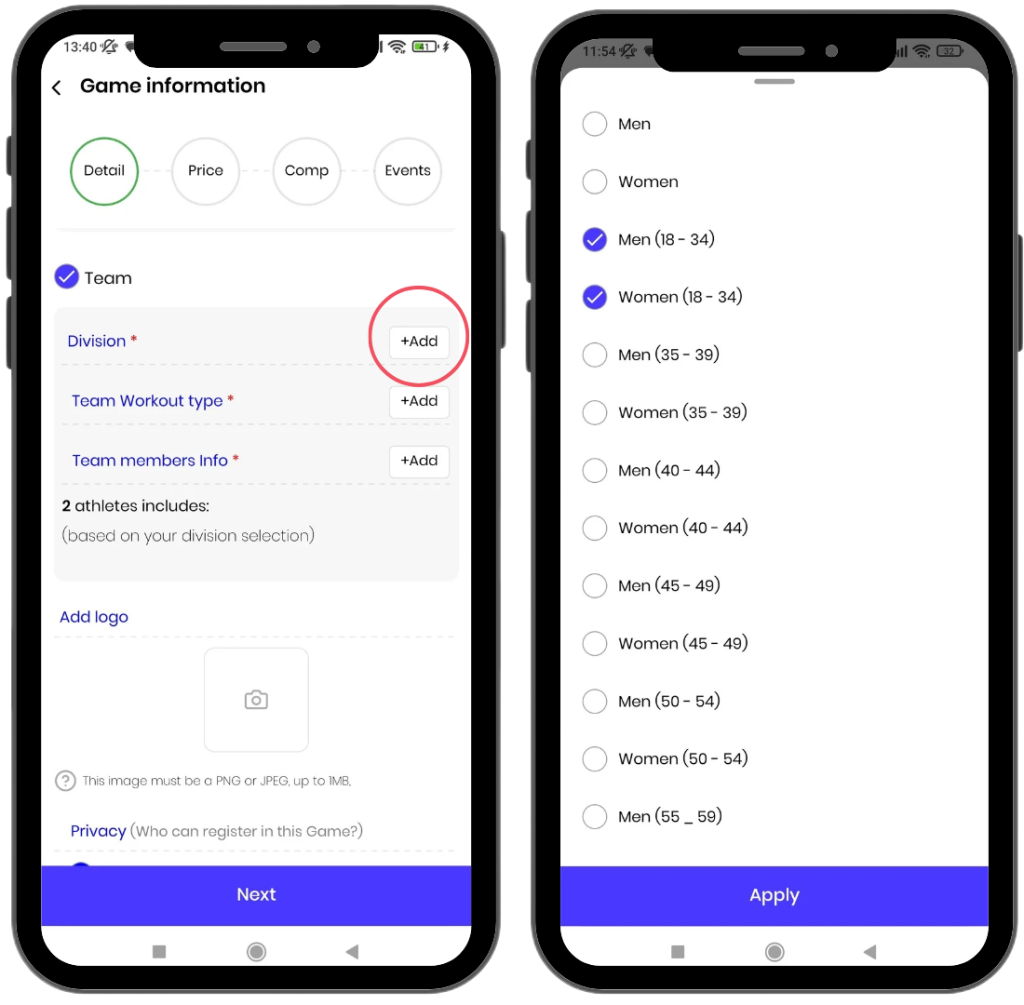
1) Division:
In this section, you need to specify the gender groups and age categories that each team can include.
For example, a team can consist of one male member aged 18–34, one female member aged 35–40, or any other desired combination.
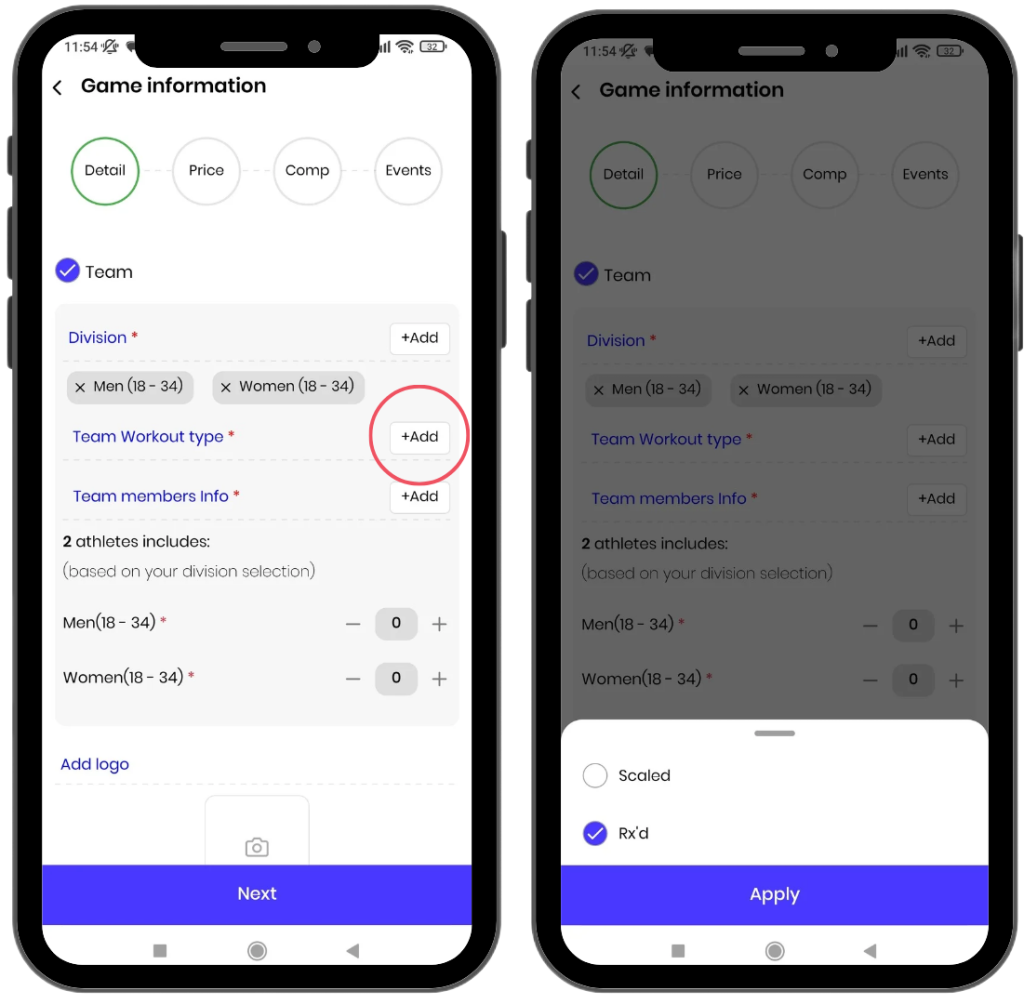
2) Workout Type
From this section, you need to select the game levels.
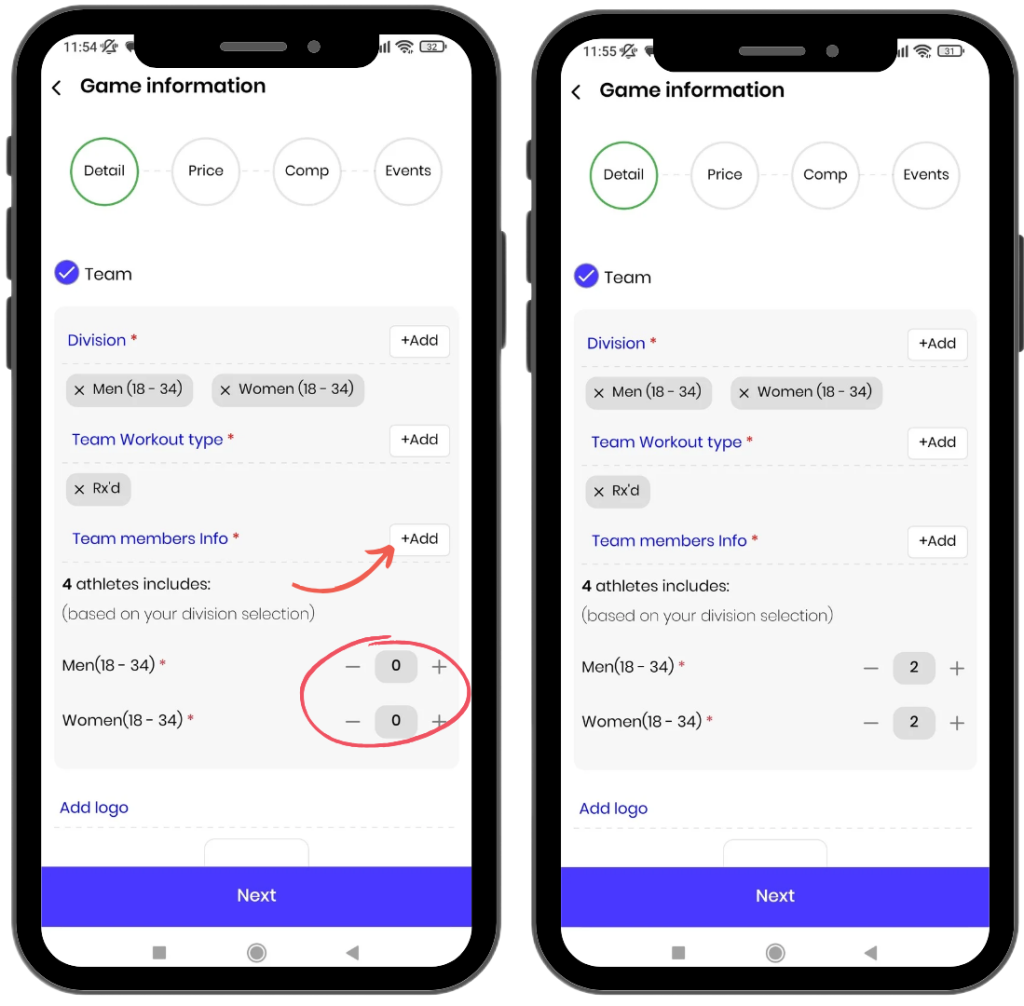
3) Team Members Info:
- From this section, you need to specify how many members each team should have. For example, teams of 3 members. The minimum number of members per team is 2.
- Next, you need to select the number of athletes for each category. For example, if you selected 4 members for the team, you need to specify how many athletes should be male aged 18-34 and how many should be female aged 18-34.
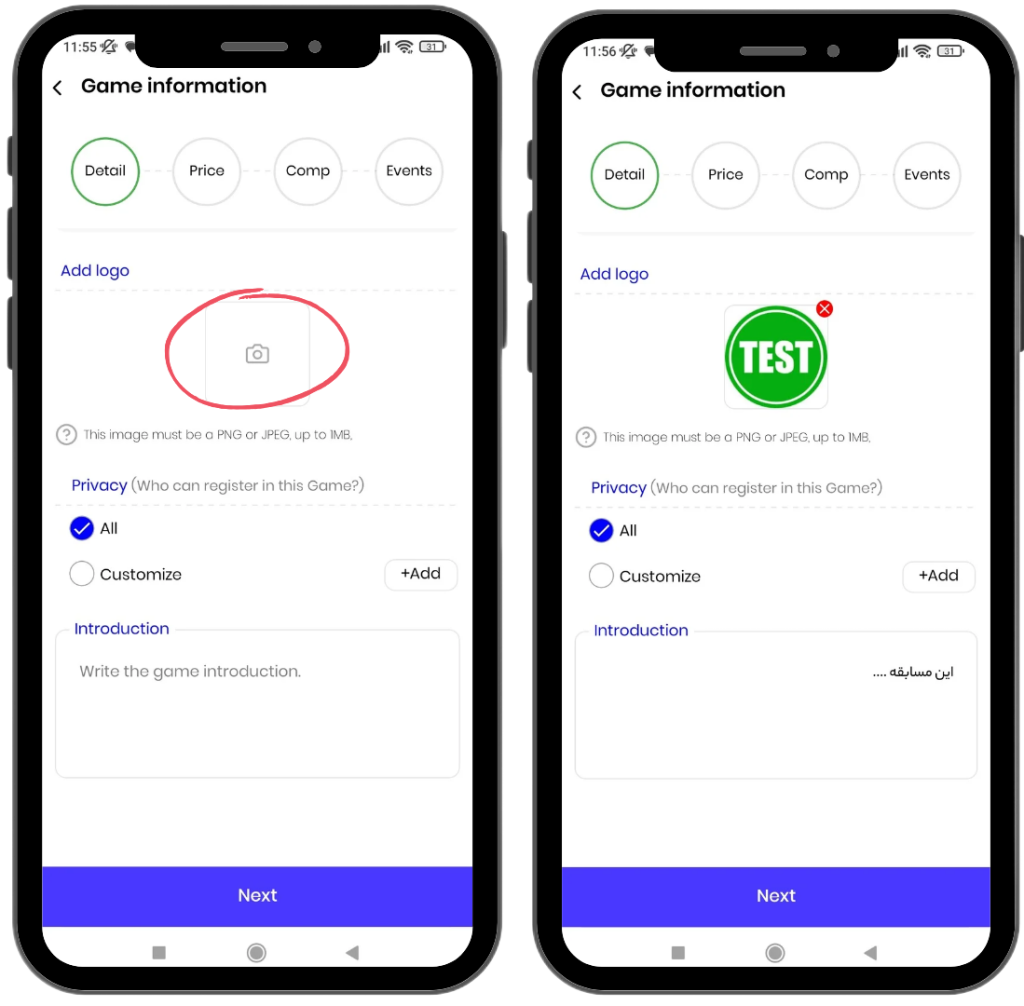
Add Logo:
From this section, you can upload the logo of the game.
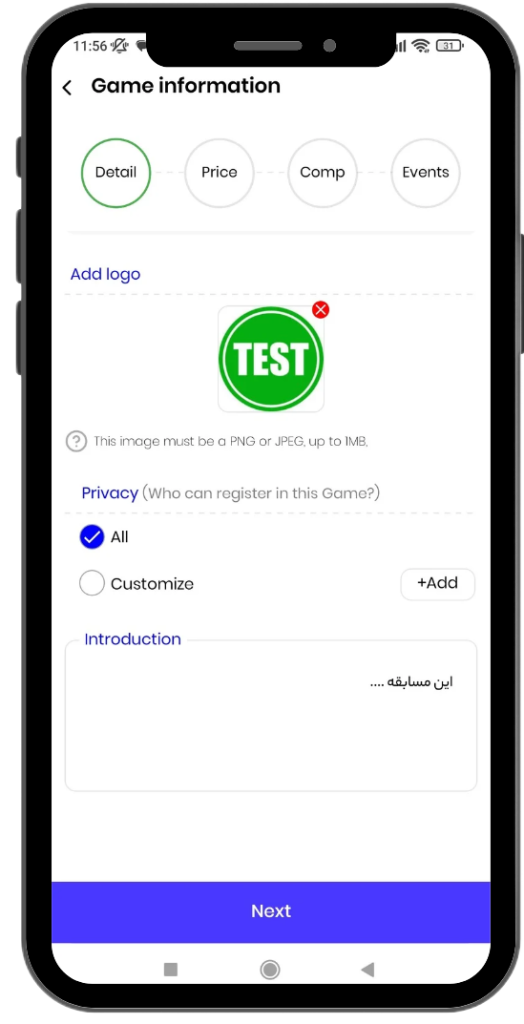
Privacy:
Privacy consists of two sections:
- All: By selecting this option, all athletes can participate in the game.
- Customize: By selecting this option, only athletes you add to the list can participate in the game. After selecting this option, you need to choose the WODEX usernames of the desired athletes. This option is suitable for hosting game among club members, friends, or family members.
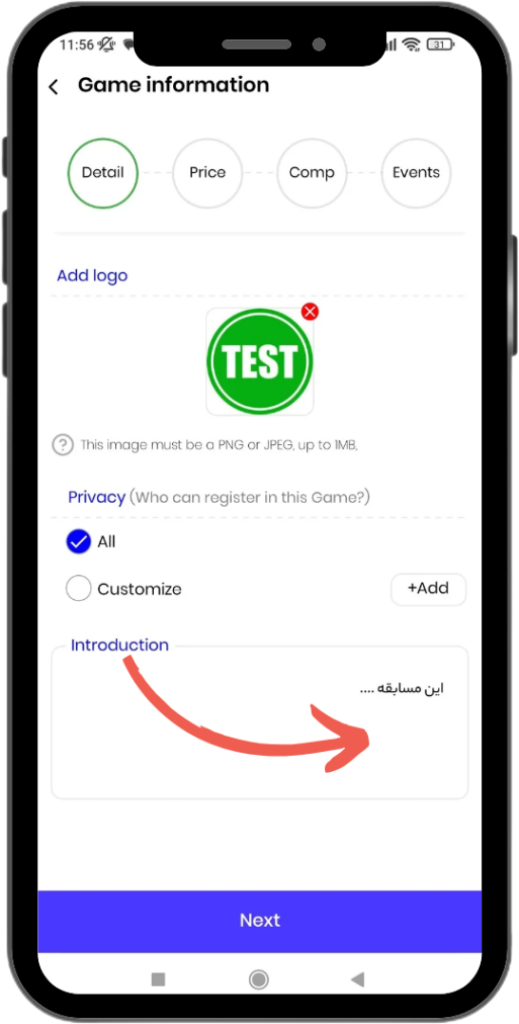
Introduction:
From this section, you can write the details related to your game.
For example, you can include the prize amounts or any other explanations.
2) Price
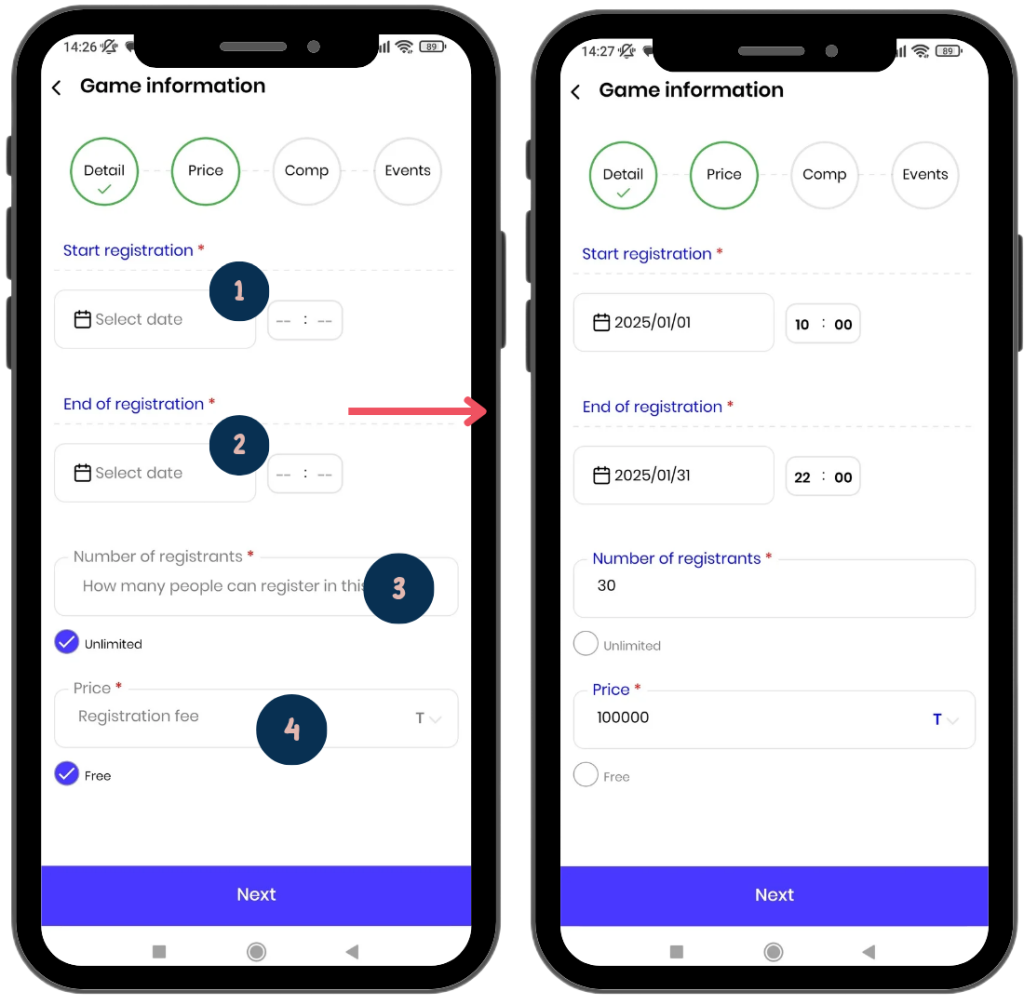
In this section, you need to enter the main registration settings for the game. The settings include the following:
- 1) Start Registration:
From this section, you can specify the date and time when registration will start. This time will mark the official start of the registration process for athletes. - 2) End of Registration:
Here, you must enter the date and time when registration will end. Athletes will only be able to register until this time; after this, registration will be closed.
3) Number of Registrations:
- By default, the “Unlimited” option is active, meaning there is no limit to the number of participants.
- To limit the number of participants, first disable the “Unlimited” option, then enter your desired number.
For example: If you enter 30, only 30 athletes will be able to register.
4) Price:
- By default, the competition is considered “Free.”
- To set a price, disable the “Free” option first, then enter your desired amount.
Note: You must also specify the currency. If no currency is entered, the game will be considered free.
These settings will help organize and streamline the registration process, assisting in better game management.
3) Comp
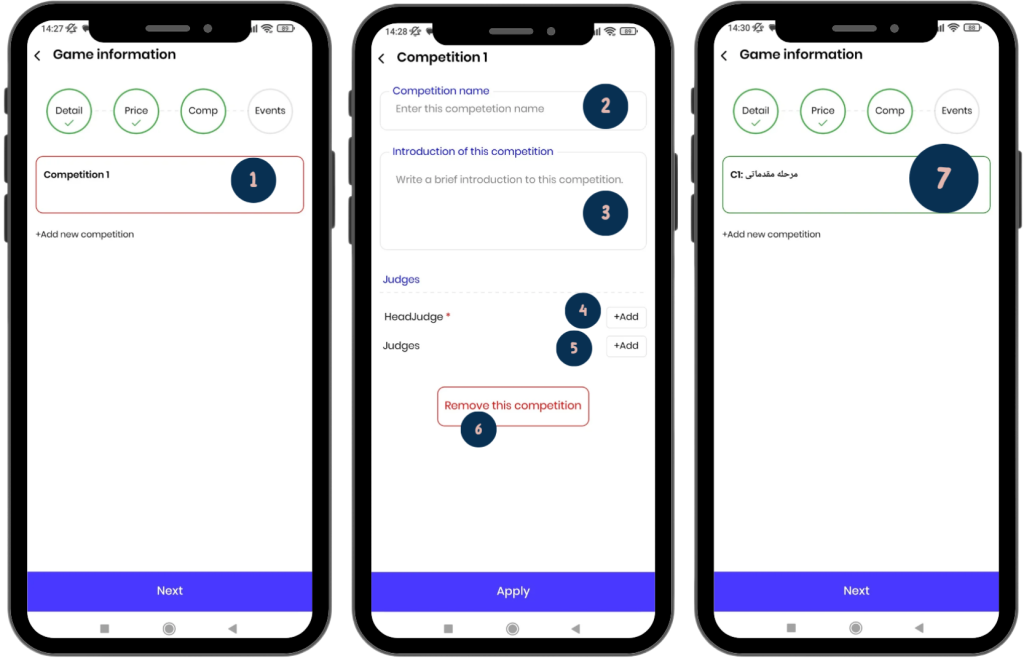
Adding Competition Stages
In this section, you need to define the stages of your competition.
What does a competition stage mean?
For example, you may want to organize a game with two competition: a preliminary competition and a final. The preliminary stage includes 5 events, and the top 10 athletes from this stage will advance to the final.
To create each stage, follow these steps:
1) Competition Stages:
If a section is highlighted with a red line (as shown in the image), this means the information for that section needs to be completed. To enter the details, click on it to go to the stage details page.
2) Comp Name:
Enter the name of the competition, such as “Preliminary.”
3) Comp Description:
Write a description of this competition.
4) Head Judge:
- At least one head judge must be assigned to each competition. This is done by searching for the head judge’s username and adding them. This step is mandatory.
- The head judge’s duties include assigning athletes to judges and overseeing their performance (see Competition Judges Guide).
5) Judges:
Add the judges for the competition in this section (see Competition Judges Guide).
6) Remove this competition:
Clicking this option will delete the selected competition. Keep in mind that at least one competition is required for creating the game.
Finally, click the Apply button to create the competition of your game.
Add new competition
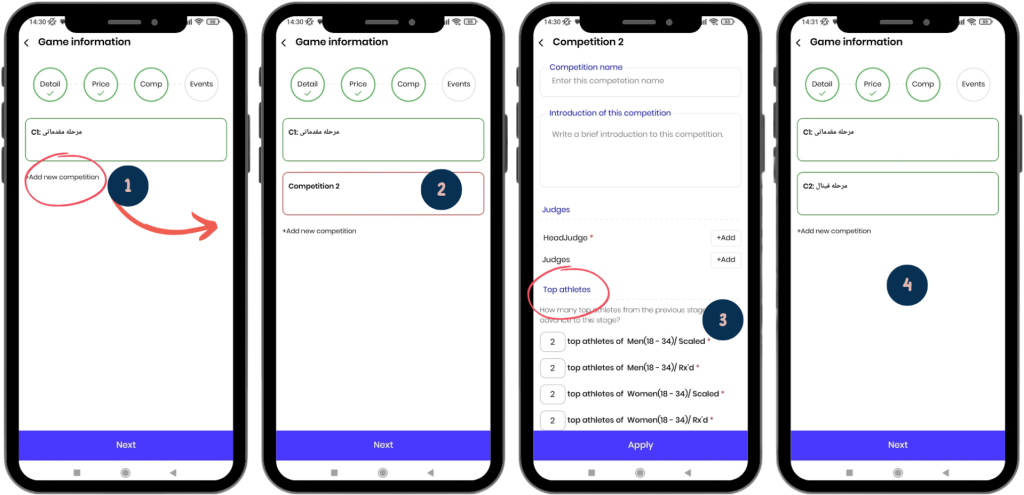
1) To create a new competition, click the Add new comp button.
2) competition 2 is highlighted in red and must be completed. To fill it in, click on it to go to its details page.
3) In this page, enter the necessary information. The only difference compared to the first competition is the Top Athletes section. In this section, you need to specify how many top athletes from the first competition can advance to the second competition.
4) Finally, by clicking the Apply button, the second competition will be created. You can easily organize various competitions, such as a Third Division League, Second Division League, and Premier League.
Events
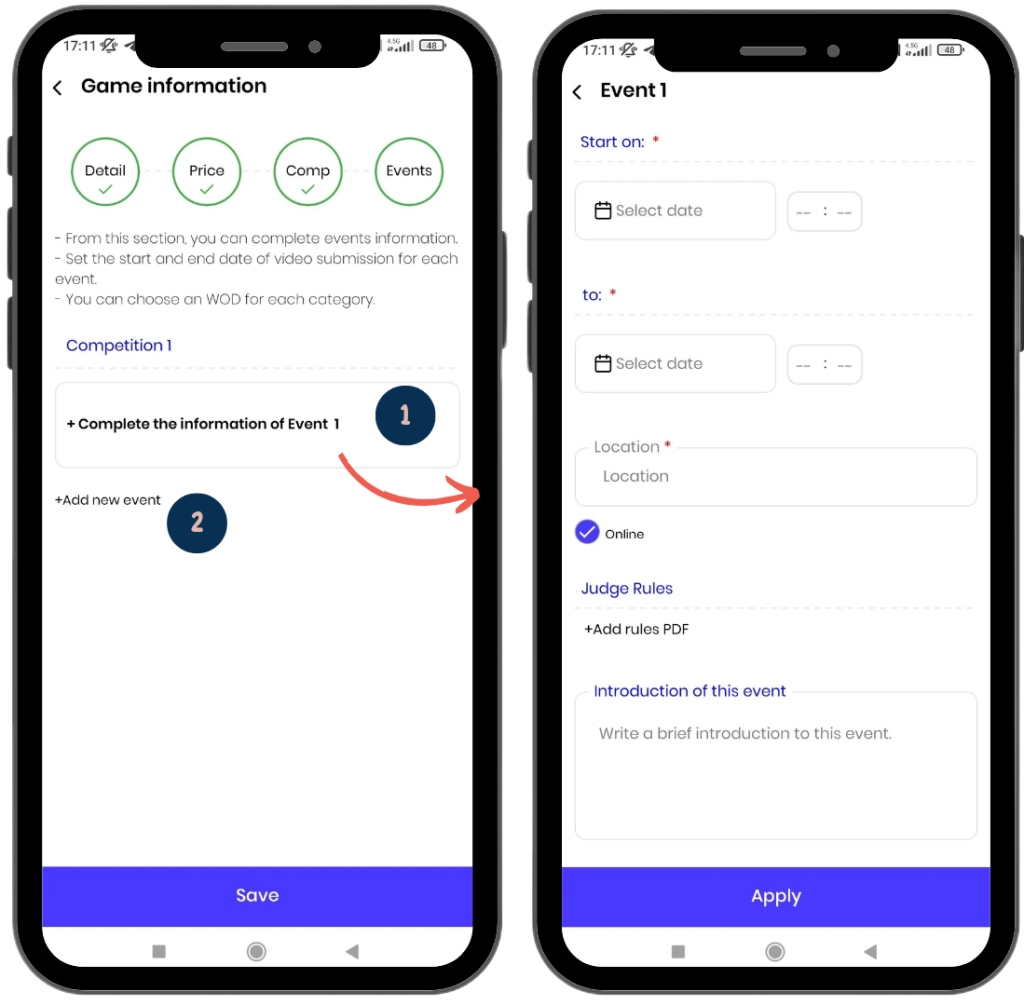
You can manage the desired events from this page.
- By clicking on the box of any event, you can access its details page.
- By clicking the Add new event button, you can add a new event.
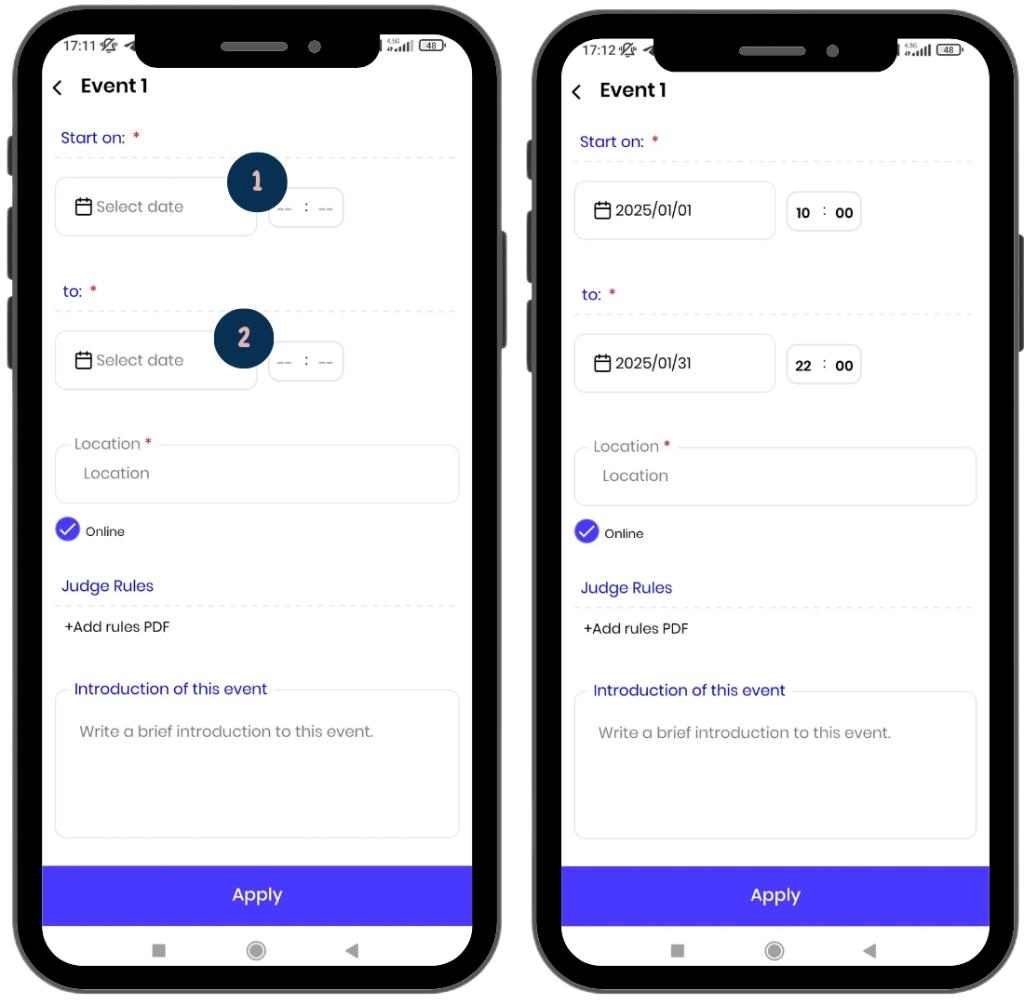
- From this section, you can specify the start time and date of the event.
- From this section, you can specify the end time and date of the event.
In online events, after the event’s end date, athletes will no longer be able to submit their videos.
After the event’s end date, athletes’ initial scores will be displayed on the leaderboard based on the information they have entered.
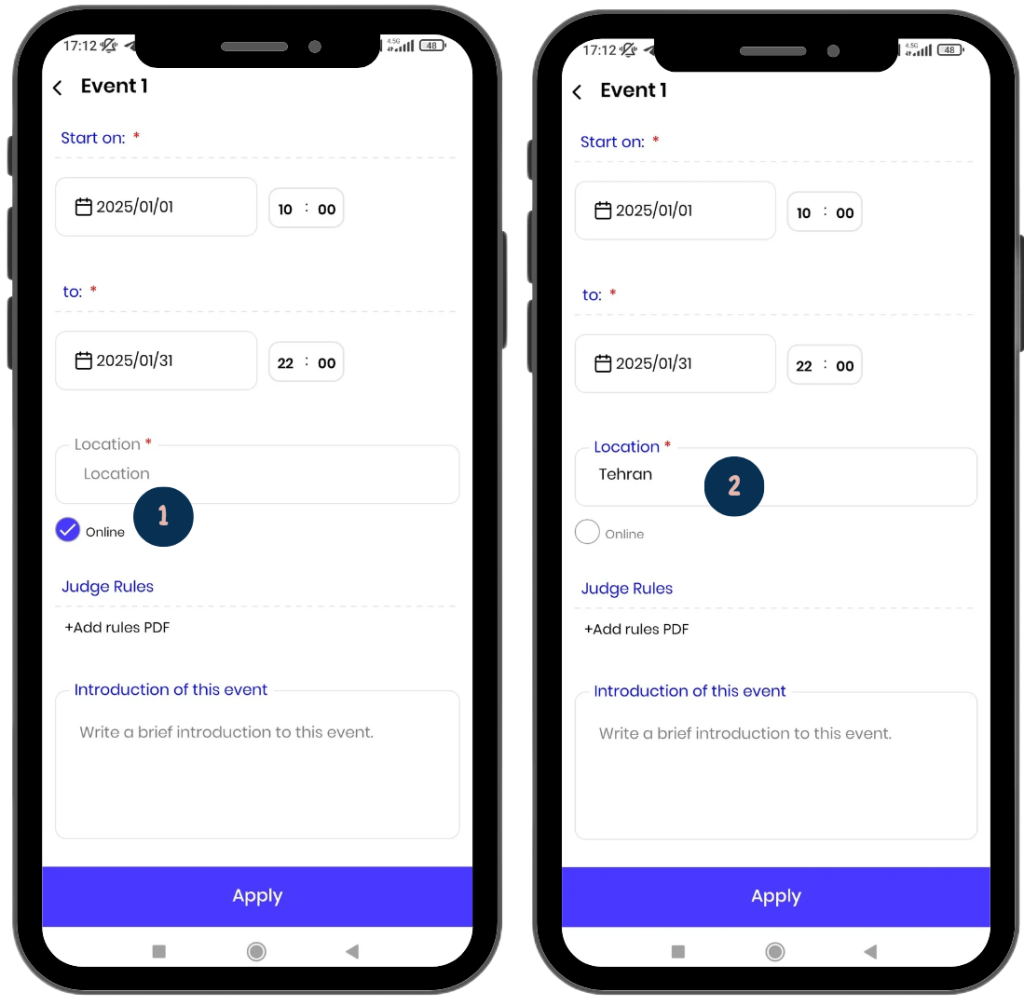
Online: By default, the online option is activated. In this case, athletes can submit their videos as soon as the event starts.
In-Person: To organize an in-person event, you need to enter the event’s location. Additionally:
- By selecting the in-person option, you can specify the number of heats, the number of lines available in each heat, and the timing for each heat.
- You will also be able to assign athletes to each line. This helps you manage your in-person event with a high level of organization.
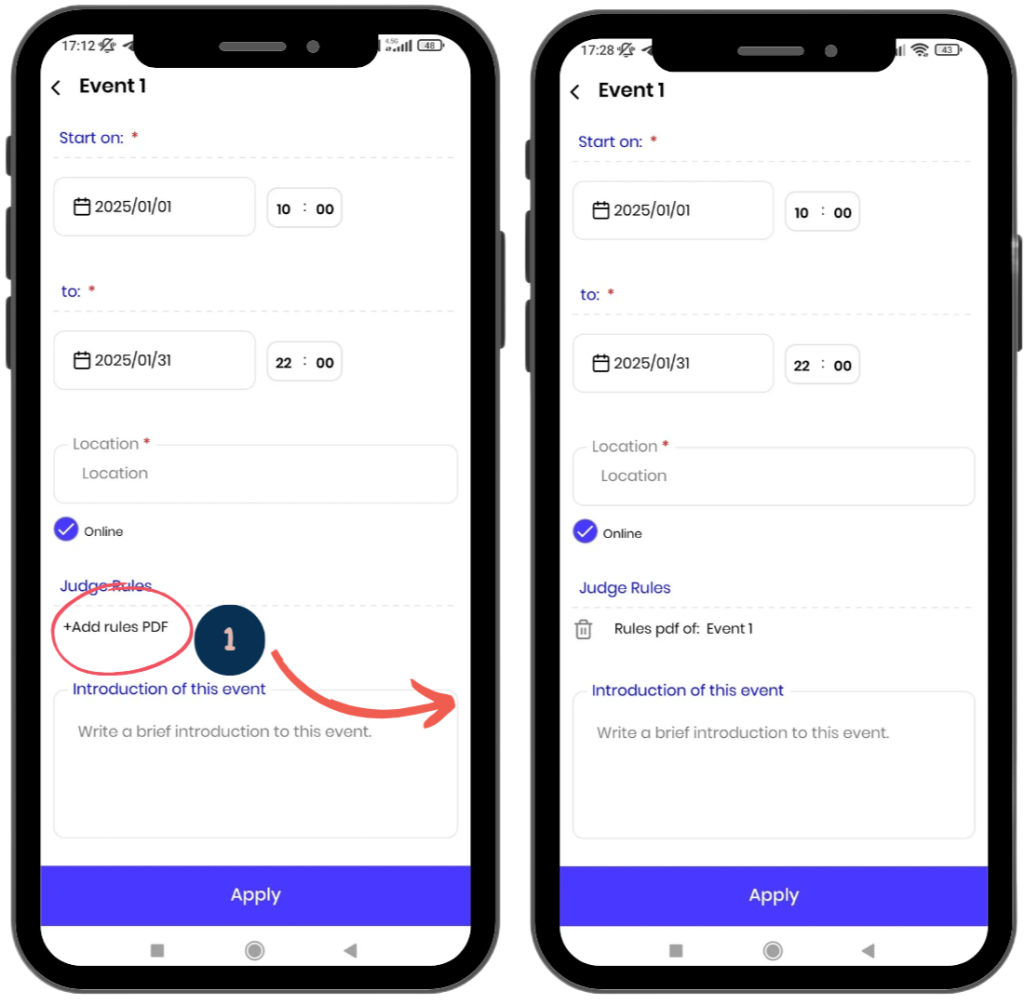
Judging Regulations:
From this section, you can upload the PDF file containing the rules and regulations for the competition’s events.
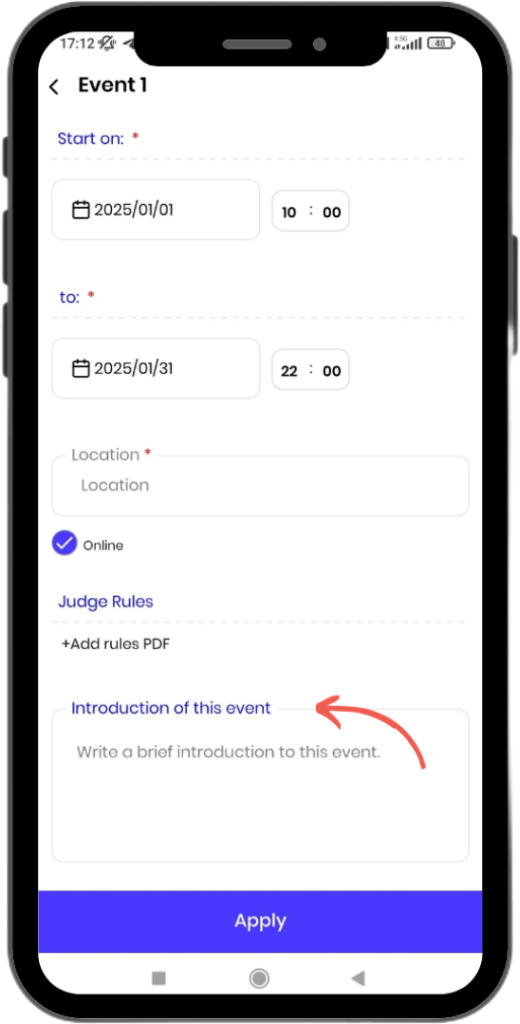
Event Overview:
In this section, you can write general information and descriptions about the event.
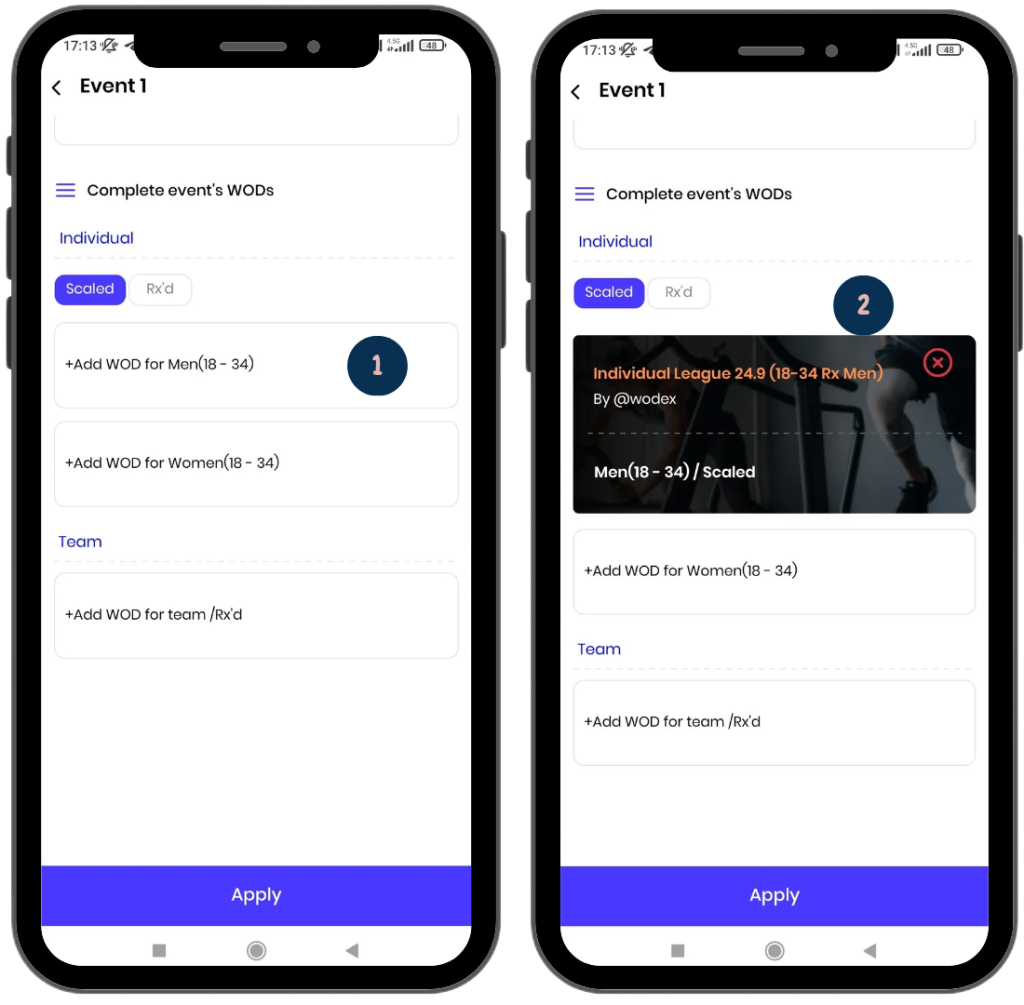
WODs for Each Category:
- All categories entered during the detail stage will be listed here.
- You can add the WOD for each category from this section.
- To do so, you must first create the WOD (see WOD creation guide).
Note: It’s not mandatory to register the WOD initially when creating the event. You can create the event first and add the WODs later. - By clicking on each age category box, you can search for and add the relevant WOD.
- Saving Information:
Finally, click the Apply button to save the information.
Editing a Created game:
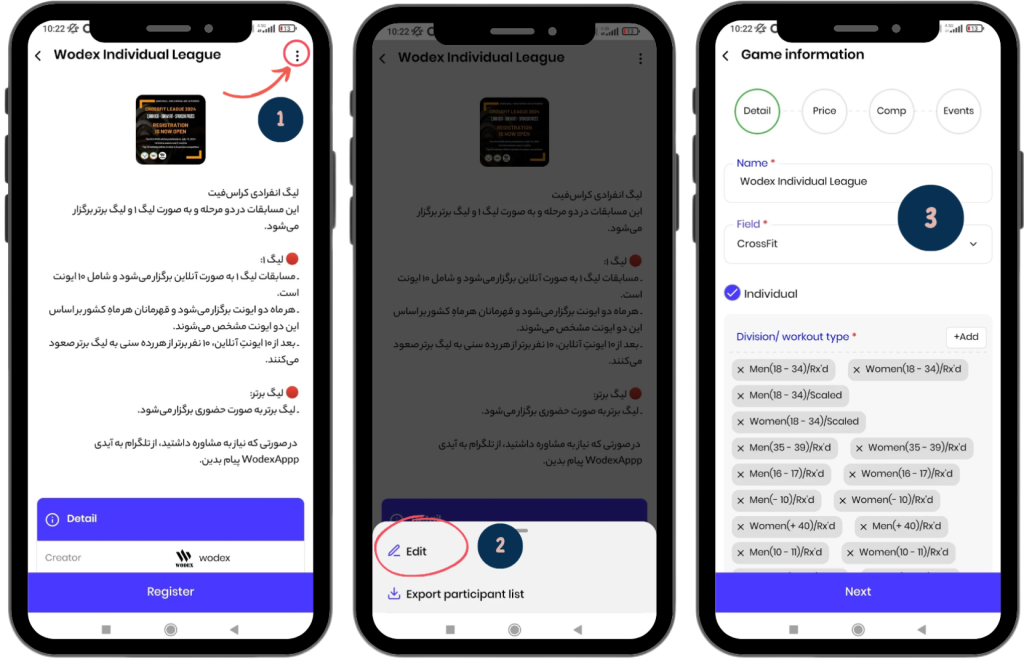
To edit a game, follow these steps:
- Click on the three-dot icon at the top-right corner of the page.
- Select the Edit option.
- In these pages, you can edit all items of the game.
Frequently Asked Questions
Yes, you can easily create and publish your competition for free.
All WODEX app users can create a competition. You can set up a competition among friends, family, club members, etc.
Yes, just select both “Individual” and “Team” options in the competition settings to hold both types at the same time.
The competition name will appear in the competition list, but only those you have granted access to can register for it.
All funds collected for the competition will be transferred to your account immediately after the competition ends.
Yes, you can modify the competition details by selecting the “Edit” option to update the schedule, judge list, or any other settings.
For more information, please refer to the head judge’s guide article.
For this, please refer to the Judge’s Guide article for detailed instructions on how judges can review and score the videos.
To register for competitions, please refer to the Competition Registration Guide article for detailed instructions.
You can view the leaderboard by selecting the “Leaderboard” option on the main competition page. For more information, please refer to the Leaderboard Guide article.
وAthletes can view the list of judges by selecting the “Judges” option. For more information, please refer to the Athlete’s Guide article.
Athletes must first upload their video to YouTube and then send the link through WODEX. For more information, please refer to the How to submit a video article.
Headjudges Guides
Guide for Head Judges
In this article, we aim to fully explain how to manage the role of a head judge. The responsibilities of a head judge in a competition include the following:
1) Assigning Athletes to Judges: The head judge must allocate athletes to the appropriate judges and ensure that all athletes are judged at the proper time.
2) Explaining the Rules and Movement Standards to Judges: The head judge is responsible for explaining all competition rules and movement standards to the judges, ensuring that the judging is precise and coordinated.
3) Monitoring Judge Performance: The head judge should oversee the performance of the judges to ensure that all judgments are carried out in compliance with the standards.
4) Handling Judging Appeals: The head judge is responsible for reviewing athlete appeals and providing appropriate responses. This process requires careful attention and review of the documentation.
Head judges should emphasize to the competition judges the importance of writing a complete judging report in the comments section. For example:
“Repetition of was a mistake due to .”
- This helps the head judge quickly understand the reason for the athlete’s error and eliminates the need to rewatch the entire video.
- Additionally, this transparency ensures that athletes understand the reason for their mistake and helps prevent unnecessary appeals.
- Important Note: The judging report should be written thoroughly and with full respect.
How to Access the Games Panel
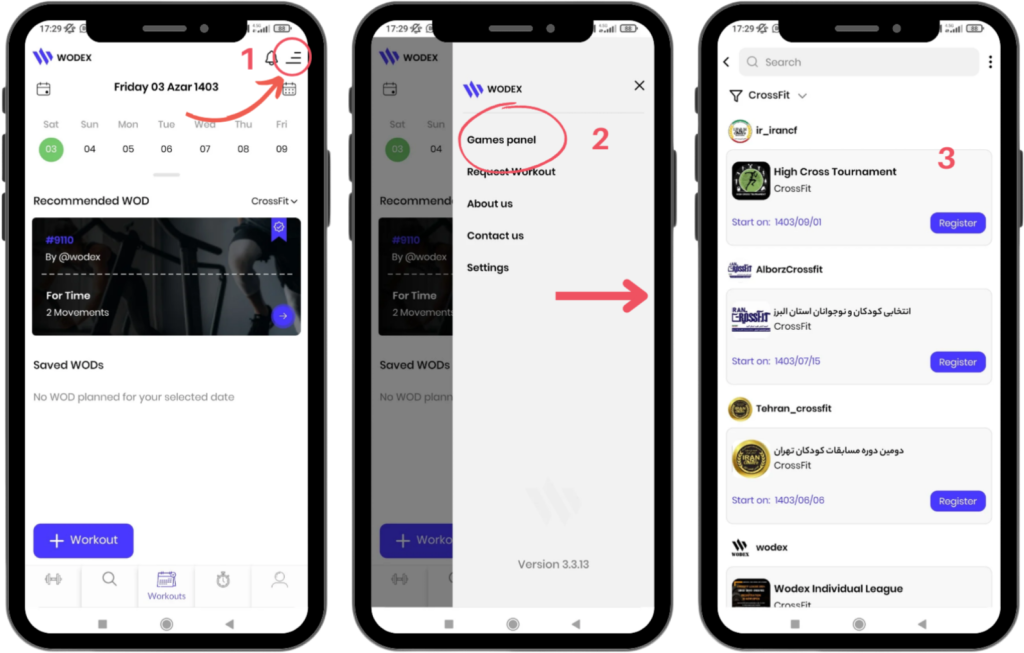
- On the main page, as shown in Image 1, tap the menu icon in the upper right corner of the screen.
- Select the Games Panel option to access the list of games.
- In this section, the complete list of games will be displayed. Find and select your desired competition.
How to Access the Judges Panel
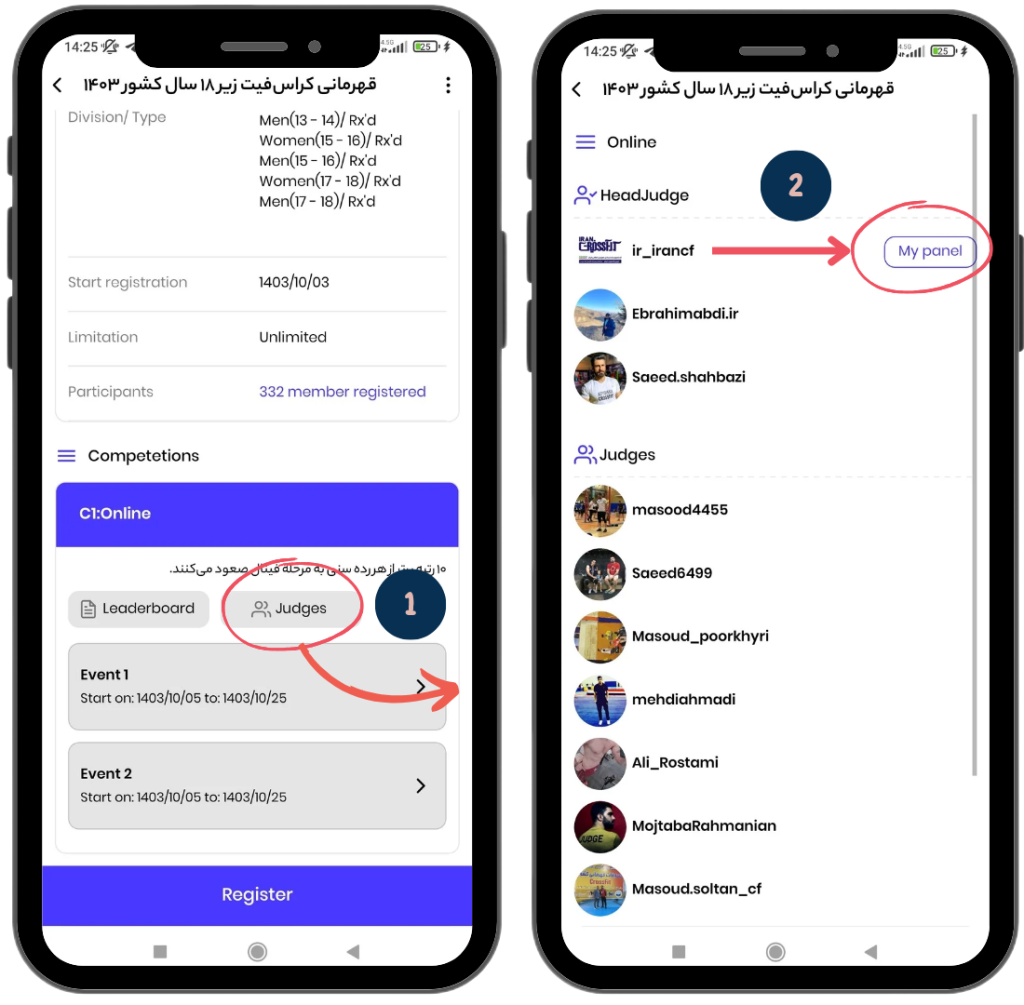
- From the “Competitions” section, click on the “Judges” button to enter the Judges Panel.
- Then, next to your name, click on the “My Panel” button to access your specific judging panel.
How to Navigate the Events List Page
Events List
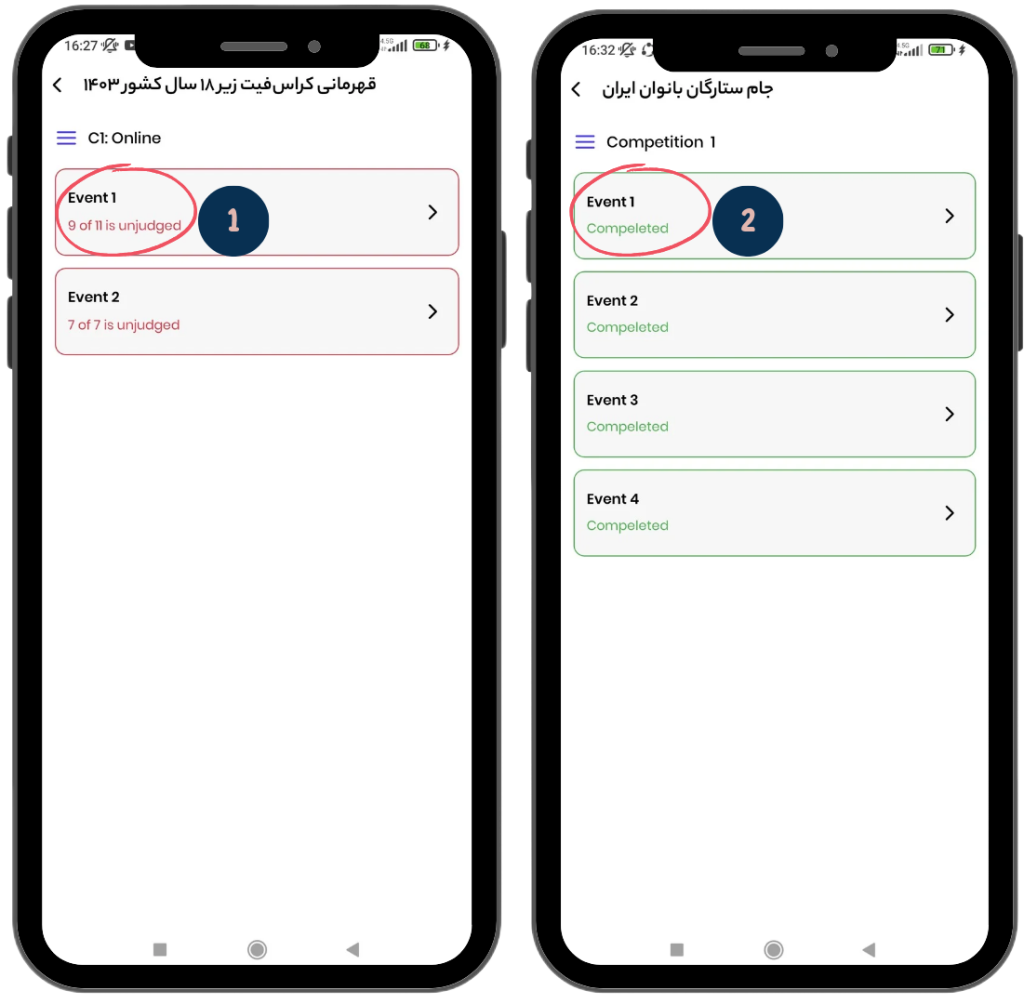
- Event List Overview: In this page, you can view the complete list of events.
- Event Box Details: Each event box shows the total number of athletes to be judged, as well as the number of athletes who have been judged so far. The number of athletes still awaiting judgment is highlighted in red.
- Example: As shown in the image on the left, it states: “9 out of 11 not judged yet.”
- Completion Status: If all athletes have been judged, it will be marked as “Completed” in green. In the image on the right, you can see an event where the judging has been completed.
- Reviewing the Events: You can click on any event to get more details or review the status of the judging process.
- This page allows you to keep track of judging progress and ensures that all athletes are fairly assessed before the event concludes.
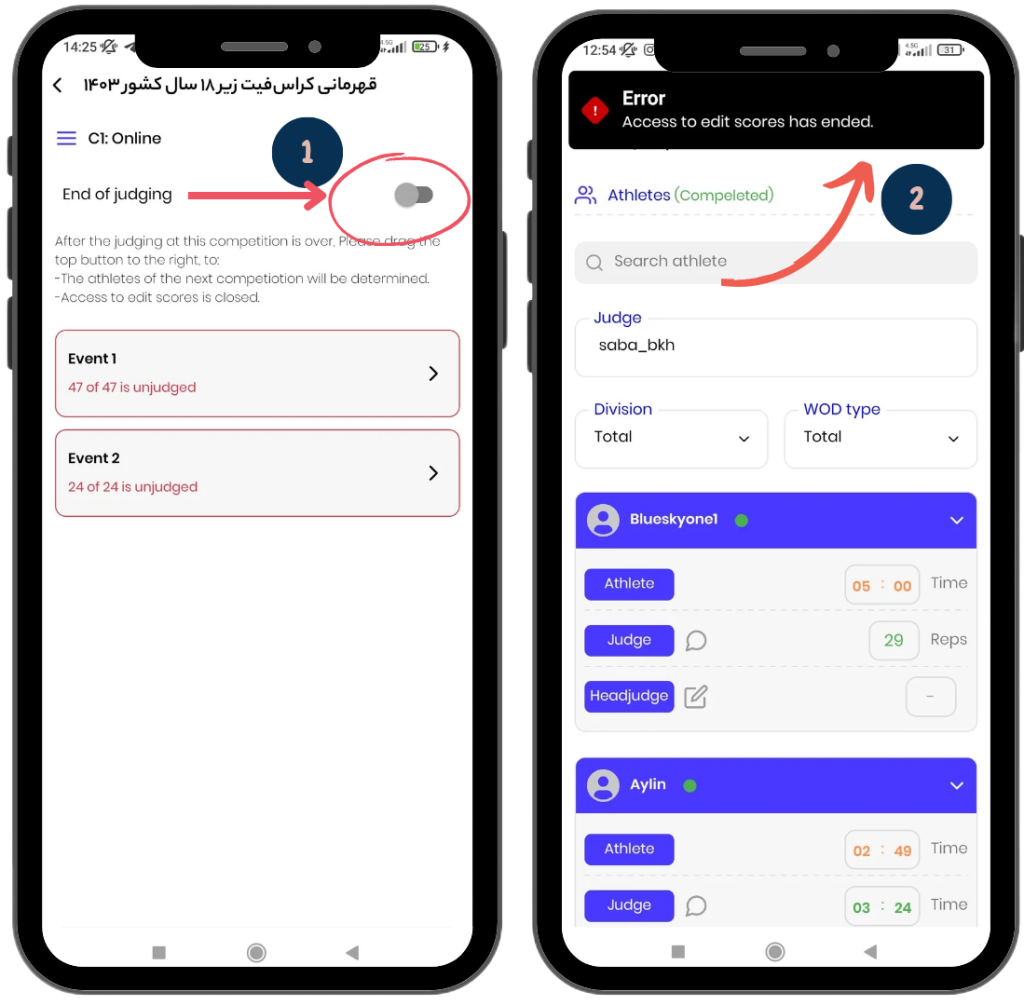
End of Judging
If the judging for a stage of the competition is completed or if you no longer wish to allow changes to the scores for events in that stage:
- Click on the End of Judging button at the top of the page.
- Once this action is taken, if a judge attempts to change an athlete’s score, they will encounter the following error message:
“Access to edit scores has ended.”
Event Management
To manage any event, select the desired event.
How to Assign Athletes to Judges
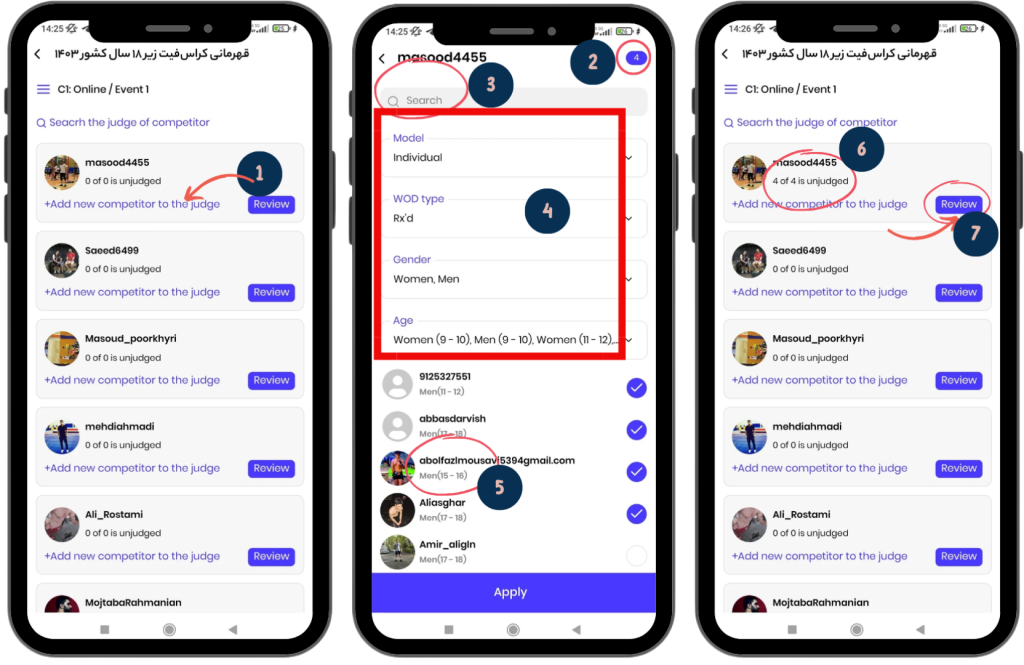
In the open page, a list of all the judges (added by the event creator) will be displayed.
1) To assign athletes to a judge:
- Click on the blue text Add New Competitor to the Judge.
- In the new page, select the athletes you want to assign to this judge (check the box next to the desired athletes).
2) The number of athletes assigned to the judge will be displayed in the upper-right corner of the page.
3) To make it easier to select a specific athlete, you can search for their name in the search bar at the top of the page.
4) To filter athletes, there are options such as age categories at the top of the page.
5) Under each athlete’s name, information such as age group, athlete’s level, and category will be displayed. In live events, the athlete’s heat number and lane number will also be shown.
- Finally, click on the Apply button to save the information.
6) In each judge’s box, the number of athletes assigned to them and the number of judgments completed will be displayed (e.g., 6 out of 6 unjudged).
7) To view the judge’s work report, click on the Review button.
Judging Performance Tracking Page Guide
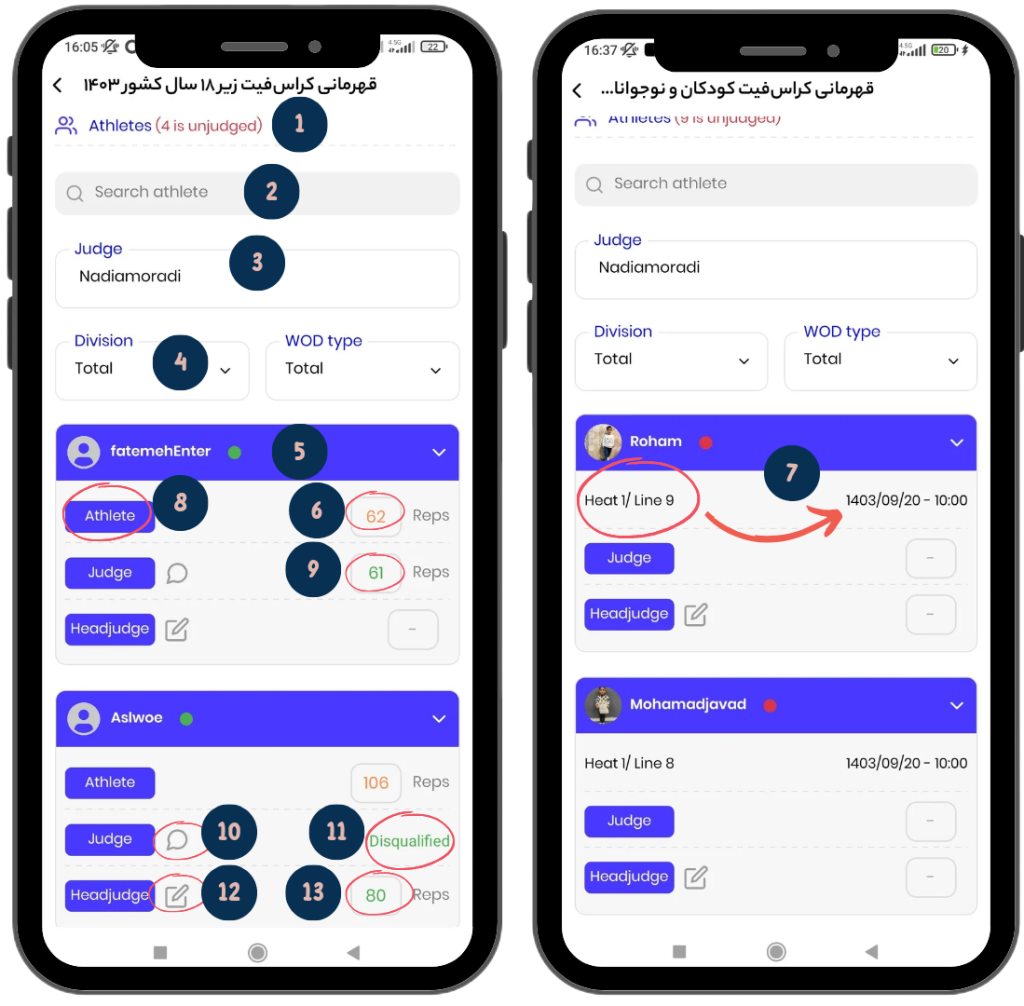
This page provides detailed information about the judgments and the status of athletes.
- The image on the left is an example of an online event.
- The image on the right is an example of a live event.
1) Number of Unjudged Athletes:
- In section 1, the number of athletes who have not yet been judged is displayed.
- Example: “4 athletes are unjudged.”
- If all athletes have been judged, the word “Completed” is displayed in green.
2) Search for Athlete Name: In section 2, you can search for an athlete’s name.
3) Associated Judge Name: In section 3, the name of the judge assigned to these athletes is displayed.
4) Filter Athletes: In section 4, you can filter athletes by Division and WOD Type.
Items in each athlete’s box:
5) Athlete’s Name and Image: At the top of each box, the athlete’s name and image are displayed.
6) Athlete’s Score (for online events): If the event is online, the athlete enters their score when submitting the video. This score is displayed informally in orange.
7) Competition Details (for live events): If the event is live, the following details are shown:
- Date and time of the competition, heat number, and athlete’s lane number.
- Example: The judge must be present on … at … time, Heat 1, Lane 9.
8) Athlete Profile: By clicking on the Athlete button, you will be directed to the athlete’s profile.
9) Score Registered by Judge: The score entered by the judge is displayed in green. This score is shown on the leaderboard immediately after it is entered.
10) Judge’s Comment: The judge can add a comment for the athlete, such as: “Repetition … of movement … was a fault due to … and one repetition is marked as a fault.”
- The athlete can view the comment on the leaderboard. The head judge can also read the comment by clicking on the comment icon.
11) Disqualification: If the judge disqualifies the athlete, a “Disqualified” label is assigned to them.
12) Score Registration by Head Judge: If the head judge wants to review the athlete’s video again and enter a new score, they must click on the edit icon.
13) Head Judge’s Score: The head judge’s score is also displayed in green.
- If both the judge and the head judge enter scores simultaneously, the head judge’s score takes priority over the judge’s, and it is displayed on the leaderboard.
How to Navigate the Score Page

This page is for entering athletes’ scores and helps judges to input final scores and add comments.
- Left Image: Example of an online event.
- Right Image: Example of an in-person event.
1) Athlete or Team Information: At the top of the page, the information of the athlete or team is displayed.
- For individual events, the athlete’s username, photo, and category are shown.
- For team events, the team name and the usernames of the team members are visible.
2) Show WOD: If you’ve forgotten the WOD items, you can click on the “Show WOD” button to navigate to the relevant WOD page.
3) View Video (for Online Events): If the event is online, you can view the athlete’s video from this section.
- Under normal conditions, clicking on the play icon will start the athlete’s video. If you encounter an error, follow the instructions provided at the end of this article
4) Event Information (for In-Person Events): If the event is in-person, this section displays details such as the competition venue, date and time of the competition, heat number, and lane number of the athlete you need to judge.
5) Disqualify: If the athlete has been disqualified, you must activate the “Disqualify” button.
6) Enter Score: In this section, you need to enter the athlete’s score.
7) Write Comment: You can write your comment for the athlete. For example: “The repetition of was a mistake due to , and one faulty repetition has been recorded.”
8) Submit and Save: At the end, click on the “Submit” button.
- Please note that once you submit, the score you entered will automatically and instantly be displayed on the leaderboard for everyone to see.


