Headjudges Guides
Guide for Head Judges
In this article, we aim to fully explain how to manage the role of a head judge. The responsibilities of a head judge in a competition include the following:
1) Assigning Athletes to Judges: The head judge must allocate athletes to the appropriate judges and ensure that all athletes are judged at the proper time.
2) Explaining the Rules and Movement Standards to Judges: The head judge is responsible for explaining all competition rules and movement standards to the judges, ensuring that the judging is precise and coordinated.
3) Monitoring Judge Performance: The head judge should oversee the performance of the judges to ensure that all judgments are carried out in compliance with the standards.
4) Handling Judging Appeals: The head judge is responsible for reviewing athlete appeals and providing appropriate responses. This process requires careful attention and review of the documentation.
Head judges should emphasize to the competition judges the importance of writing a complete judging report in the comments section. For example:
“Repetition of was a mistake due to .”
- This helps the head judge quickly understand the reason for the athlete’s error and eliminates the need to rewatch the entire video.
- Additionally, this transparency ensures that athletes understand the reason for their mistake and helps prevent unnecessary appeals.
- Important Note: The judging report should be written thoroughly and with full respect.
How to Access the Games Panel
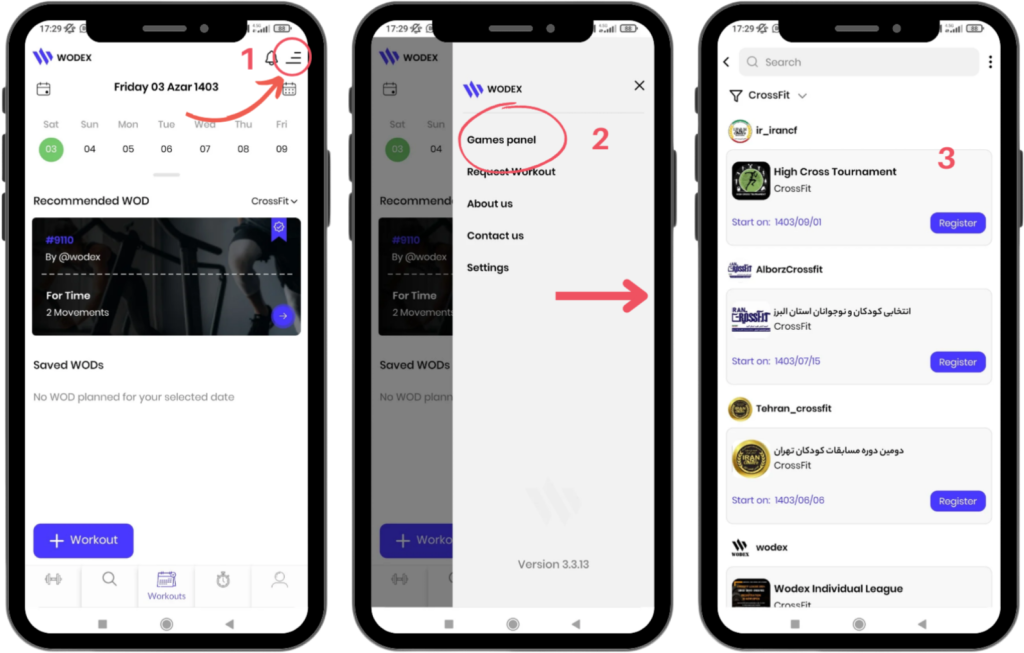
- On the main page, as shown in Image 1, tap the menu icon in the upper right corner of the screen.
- Select the Games Panel option to access the list of games.
- In this section, the complete list of games will be displayed. Find and select your desired competition.
How to Access the Judges Panel
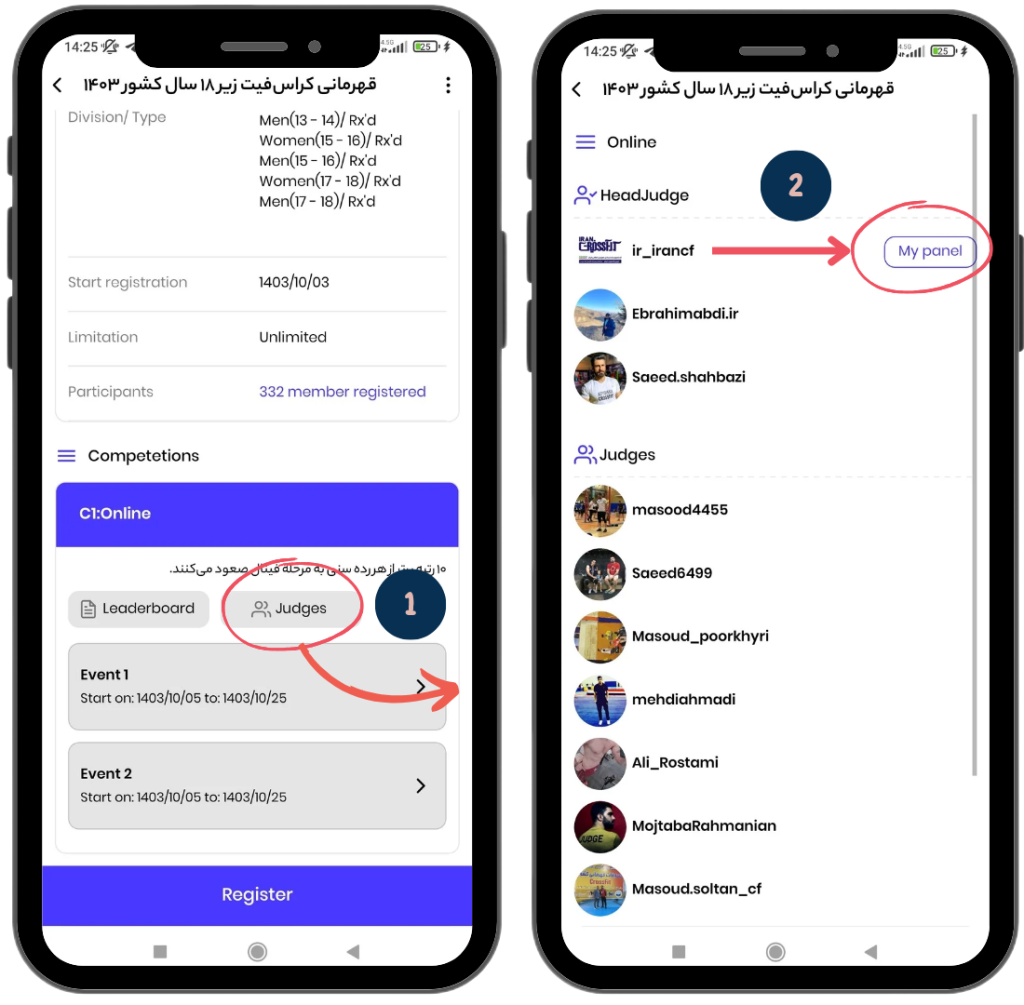
- From the “Competitions” section, click on the “Judges” button to enter the Judges Panel.
- Then, next to your name, click on the “My Panel” button to access your specific judging panel.
How to Navigate the Events List Page
Events List
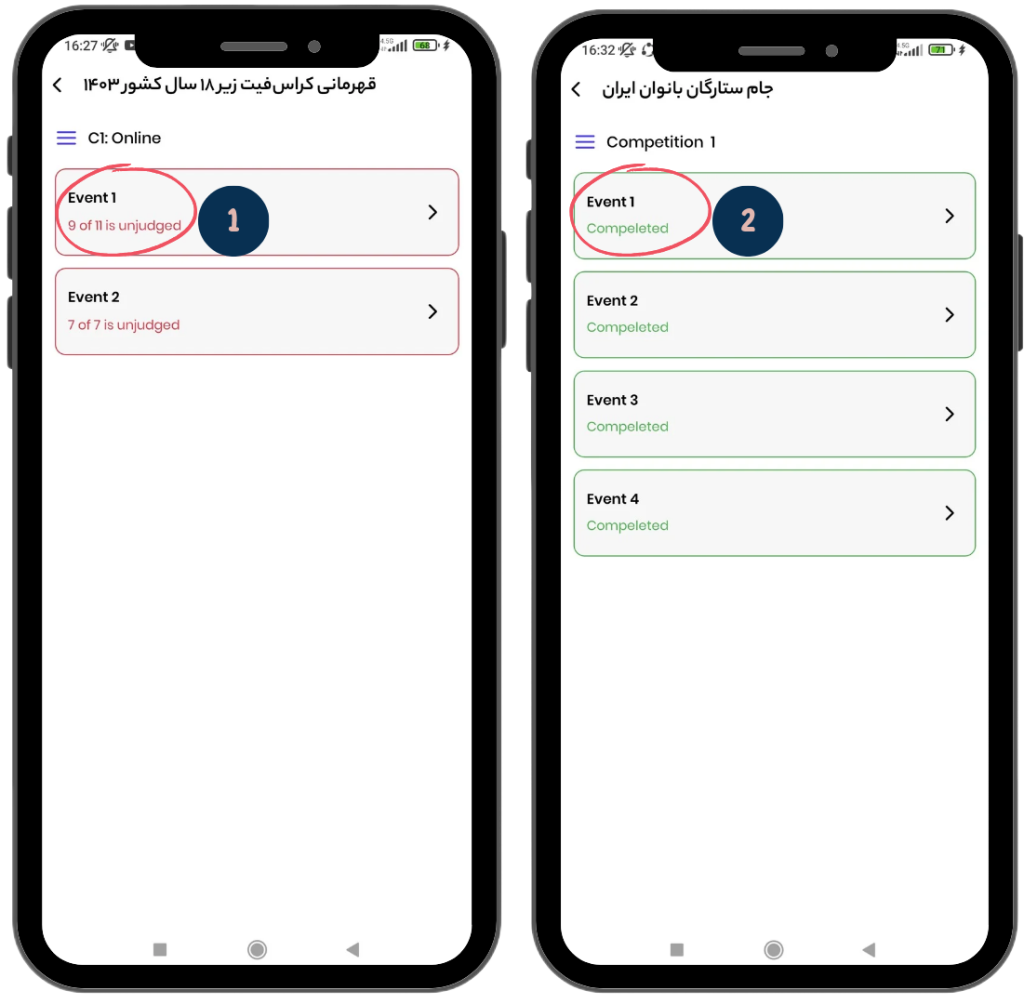
- Event List Overview: In this page, you can view the complete list of events.
- Event Box Details: Each event box shows the total number of athletes to be judged, as well as the number of athletes who have been judged so far. The number of athletes still awaiting judgment is highlighted in red.
- Example: As shown in the image on the left, it states: “9 out of 11 not judged yet.”
- Completion Status: If all athletes have been judged, it will be marked as “Completed” in green. In the image on the right, you can see an event where the judging has been completed.
- Reviewing the Events: You can click on any event to get more details or review the status of the judging process.
- This page allows you to keep track of judging progress and ensures that all athletes are fairly assessed before the event concludes.
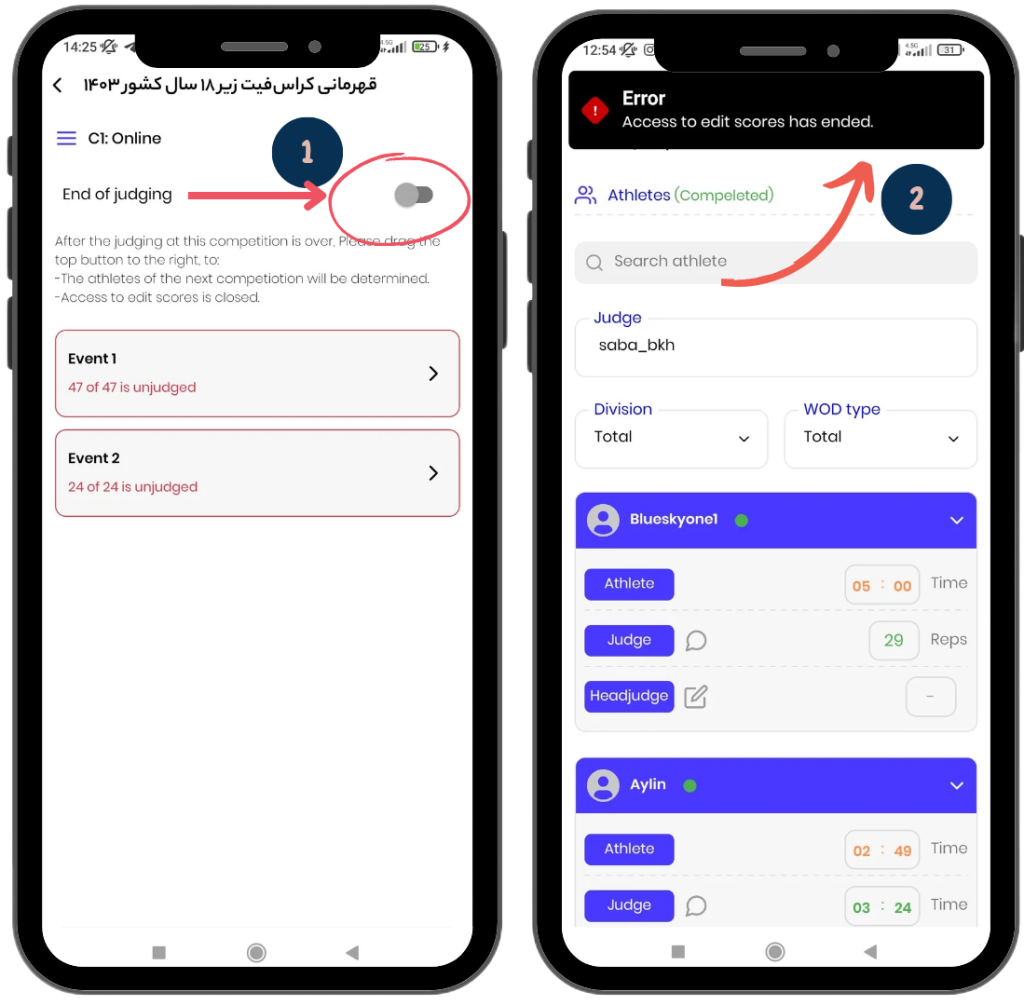
End of Judging
If the judging for a stage of the competition is completed or if you no longer wish to allow changes to the scores for events in that stage:
- Click on the End of Judging button at the top of the page.
- Once this action is taken, if a judge attempts to change an athlete’s score, they will encounter the following error message:
“Access to edit scores has ended.”
Event Management
To manage any event, select the desired event.
How to Assign Athletes to Judges
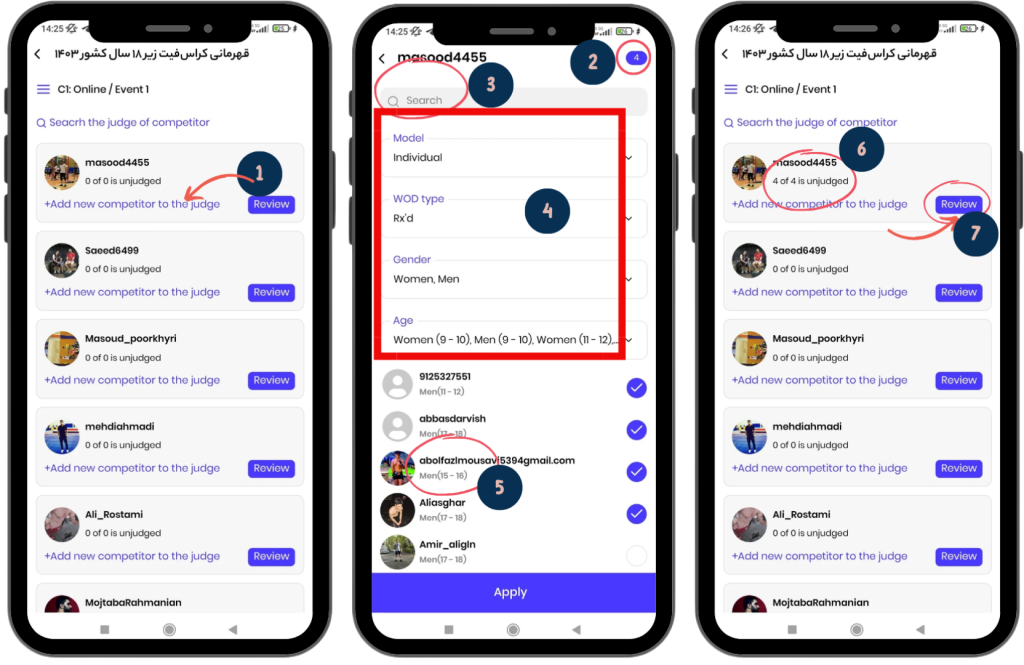
In the open page, a list of all the judges (added by the event creator) will be displayed.
1) To assign athletes to a judge:
- Click on the blue text Add New Competitor to the Judge.
- In the new page, select the athletes you want to assign to this judge (check the box next to the desired athletes).
2) The number of athletes assigned to the judge will be displayed in the upper-right corner of the page.
3) To make it easier to select a specific athlete, you can search for their name in the search bar at the top of the page.
4) To filter athletes, there are options such as age categories at the top of the page.
5) Under each athlete’s name, information such as age group, athlete’s level, and category will be displayed. In live events, the athlete’s heat number and lane number will also be shown.
- Finally, click on the Apply button to save the information.
6) In each judge’s box, the number of athletes assigned to them and the number of judgments completed will be displayed (e.g., 6 out of 6 unjudged).
7) To view the judge’s work report, click on the Review button.
Judging Performance Tracking Page Guide
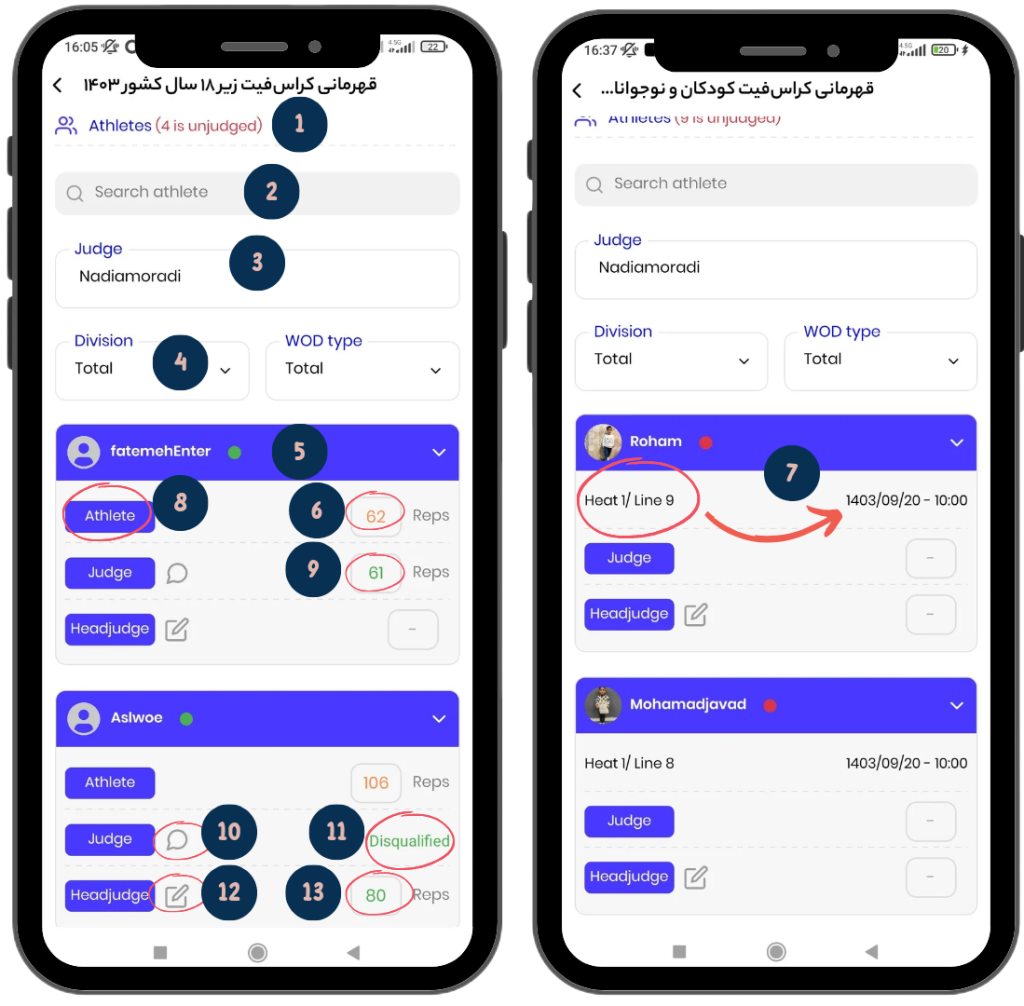
This page provides detailed information about the judgments and the status of athletes.
- The image on the left is an example of an online event.
- The image on the right is an example of a live event.
1) Number of Unjudged Athletes:
- In section 1, the number of athletes who have not yet been judged is displayed.
- Example: “4 athletes are unjudged.”
- If all athletes have been judged, the word “Completed” is displayed in green.
2) Search for Athlete Name: In section 2, you can search for an athlete’s name.
3) Associated Judge Name: In section 3, the name of the judge assigned to these athletes is displayed.
4) Filter Athletes: In section 4, you can filter athletes by Division and WOD Type.
Items in each athlete’s box:
5) Athlete’s Name and Image: At the top of each box, the athlete’s name and image are displayed.
6) Athlete’s Score (for online events): If the event is online, the athlete enters their score when submitting the video. This score is displayed informally in orange.
7) Competition Details (for live events): If the event is live, the following details are shown:
- Date and time of the competition, heat number, and athlete’s lane number.
- Example: The judge must be present on … at … time, Heat 1, Lane 9.
8) Athlete Profile: By clicking on the Athlete button, you will be directed to the athlete’s profile.
9) Score Registered by Judge: The score entered by the judge is displayed in green. This score is shown on the leaderboard immediately after it is entered.
10) Judge’s Comment: The judge can add a comment for the athlete, such as: “Repetition … of movement … was a fault due to … and one repetition is marked as a fault.”
- The athlete can view the comment on the leaderboard. The head judge can also read the comment by clicking on the comment icon.
11) Disqualification: If the judge disqualifies the athlete, a “Disqualified” label is assigned to them.
12) Score Registration by Head Judge: If the head judge wants to review the athlete’s video again and enter a new score, they must click on the edit icon.
13) Head Judge’s Score: The head judge’s score is also displayed in green.
- If both the judge and the head judge enter scores simultaneously, the head judge’s score takes priority over the judge’s, and it is displayed on the leaderboard.
How to Navigate the Score Page

This page is for entering athletes’ scores and helps judges to input final scores and add comments.
- Left Image: Example of an online event.
- Right Image: Example of an in-person event.
1) Athlete or Team Information: At the top of the page, the information of the athlete or team is displayed.
- For individual events, the athlete’s username, photo, and category are shown.
- For team events, the team name and the usernames of the team members are visible.
2) Show WOD: If you’ve forgotten the WOD items, you can click on the “Show WOD” button to navigate to the relevant WOD page.
3) View Video (for Online Events): If the event is online, you can view the athlete’s video from this section.
- Under normal conditions, clicking on the play icon will start the athlete’s video. If you encounter an error, follow the instructions provided at the end of this article
4) Event Information (for In-Person Events): If the event is in-person, this section displays details such as the competition venue, date and time of the competition, heat number, and lane number of the athlete you need to judge.
5) Disqualify: If the athlete has been disqualified, you must activate the “Disqualify” button.
6) Enter Score: In this section, you need to enter the athlete’s score.
7) Write Comment: You can write your comment for the athlete. For example: “The repetition of was a mistake due to , and one faulty repetition has been recorded.”
8) Submit and Save: At the end, click on the “Submit” button.
- Please note that once you submit, the score you entered will automatically and instantly be displayed on the leaderboard for everyone to see.
Judges Guide
How to Judge in the Wodex App
In this article, we will explain how to judge competitions in the Wodex app in detail:
A) How to Access the Games Panel
B) How to Access the Judges Panel
C) How to Navigate the Events List Page
D) How to Navigate the Athletes List Page
How to Access the Games Panel
- On the main page, as shown in Image 1, tap the menu icon in the upper right corner of the screen.
- Select the Games Panel option to access the list of games.
- In this section, the complete list of games will be displayed. Find and select your desired competition.
How to Access the Judges Panel
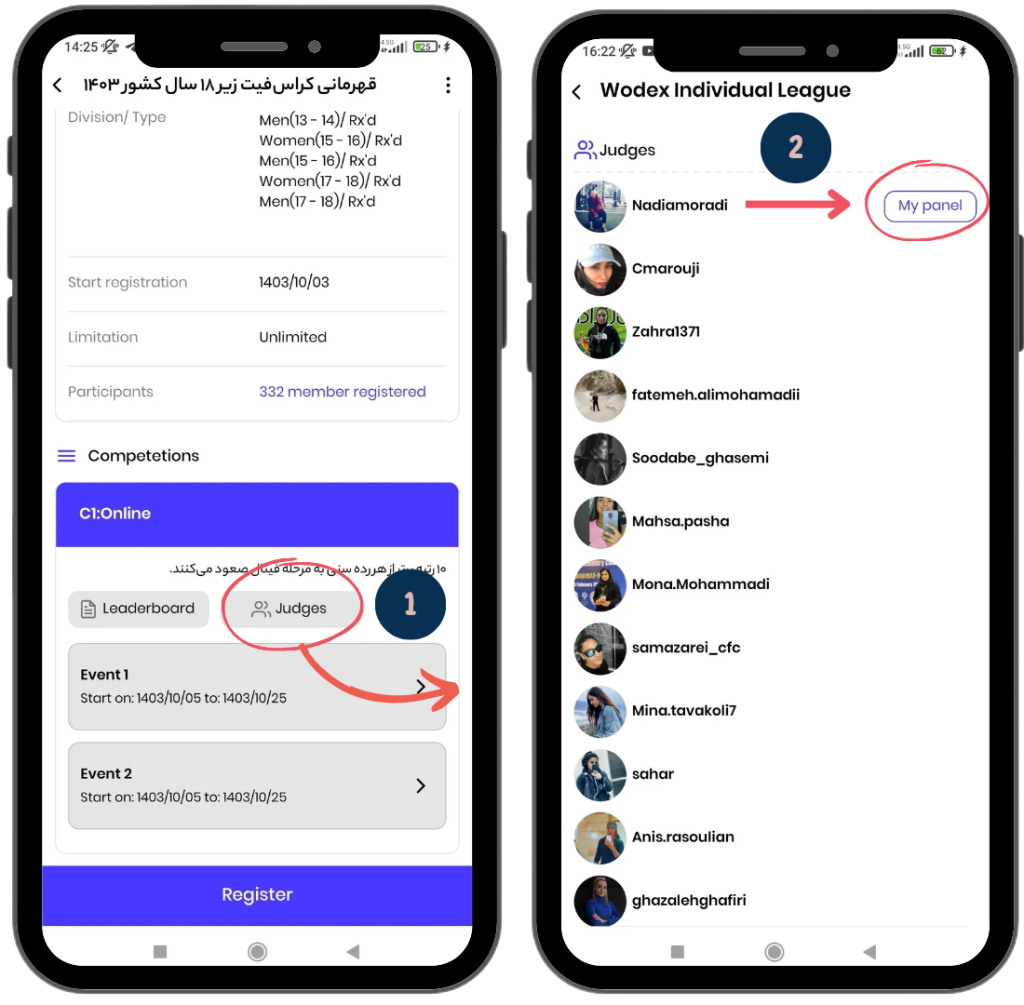
- From the “Competitions” section, click on the “Judges” button to enter the Judges Panel.
- Then, next to your name, click on the “My Panel” button to access your specific judging panel.
How to Navigate the Events List Page
- Event List Overview: In this page, you can view the complete list of events.
- Event Box Details: Each event box shows the total number of athletes to be judged, as well as the number of athletes who have been judged so far. The number of athletes still awaiting judgment is highlighted in red.
Example: As shown in the image on the left, it states: “9 out of 11 not judged yet.”
- Completion Status: If all athletes have been judged, it will be marked as “Completed” in green. In the image on the right, you can see an event where the judging has been completed.
- Reviewing the Events: You can click on any event to get more details or review the status of the judging process.
This page allows you to keep track of judging progress and ensures that all athletes are fairly assessed before the event concludes.
How to Navigate the Athletes List Page

In this page, detailed information about the judging and status of athletes is displayed.
- Left Image: Example of an online event.
- Right Image: Example of an in-person event.
1) Number of Unjudged Athletes:
- In section 1, the number of athletes who have not been judged yet is displayed.
- Example: “4 athletes are unjudged.”
- If all athletes have been judged, it will display “Completed” in green.
Search Athlete Name: From section 2, you can search for an athlete by name.
3) Filter Athletes: In section 4, you can filter athletes by division (Division) and level (WOD Type).
Items in Each Athlete’s Box:
4) Name and Image of the Athlete: At the top of each athlete’s box, the athlete’s name and image are shown.
5) Athlete Score (for Online Events): If the event is online, the athlete enters their score when submitting the video. This score is displayed informally in orange.
6) Competition Details (for In-Person Events): If the event is in-person:
- The competition date, time, heat number, and lane number of the athlete are shown.
- Example: “The judge needs to be present on , at , Heat 1, Line 9.”
7) Athlete Profile: By clicking on the Athlete button, you can view the athlete’s profile.
8) Score Registered by the Judge: The score entered by the judge is displayed in green. This score will be updated immediately on the leaderboard.
9) Judge’s Comment: The judge can leave a comment for the athlete, such as: “The repetition of was a mistake due to , and one faulty repetition was recorded.”
- The athlete can view the comment on the leaderboard. The head judge can also read the comment by clicking the comment icon.
- Comments should be written respectfully. Start with “Hello dear athlete,” and end with “Wishing you success.” For example: “Hello dear athlete, the repetition of was a mistake due to , and one faulty repetition has been recorded. Wishing you success.”
10) Disqualified Status: If the judge disqualifies the athlete, the disqualification status will be recorded for them.
- Priority of the Head Judge’s Score: If both the judge and head judge enter a score at the same time, the head judge’s score takes priority, and it will be displayed on the leaderboard.
How to Navigate the Score Page
This page is for entering athletes’ scores and helps judges to input final scores and add comments.
- Left Image: Example of an online event.
- Right Image: Example of an in-person event.
1) Athlete or Team Information: At the top of the page, the information of the athlete or team is displayed.
- For individual events, the athlete’s username, photo, and category are shown.
- For team events, the team name and the usernames of the team members are visible.
2) Show WOD: If you’ve forgotten the WOD items, you can click on the “Show WOD” button to navigate to the relevant WOD page.
3) View Video (for Online Events): If the event is online, you can view the athlete’s video from this section.
- Under normal conditions, clicking on the play icon will start the athlete’s video. If you encounter an error, follow the instructions provided at the end of this article
4) Event Information (for In-Person Events): If the event is in-person, this section displays details such as the competition venue, date and time of the competition, heat number, and lane number of the athlete you need to judge.
5) Disqualify: If the athlete has been disqualified, you must activate the “Disqualify” button.
6) Enter Score: In this section, you need to enter the athlete’s score.
7) Write Comment: You can write your comment for the athlete. For example: “The repetition of was a mistake due to , and one faulty repetition has been recorded.”
8) Submit and Save: At the end, click on the “Submit” button.
- Please note that once you submit, the score you entered will automatically and instantly be displayed on the leaderboard for everyone to see.
Common Erorrs
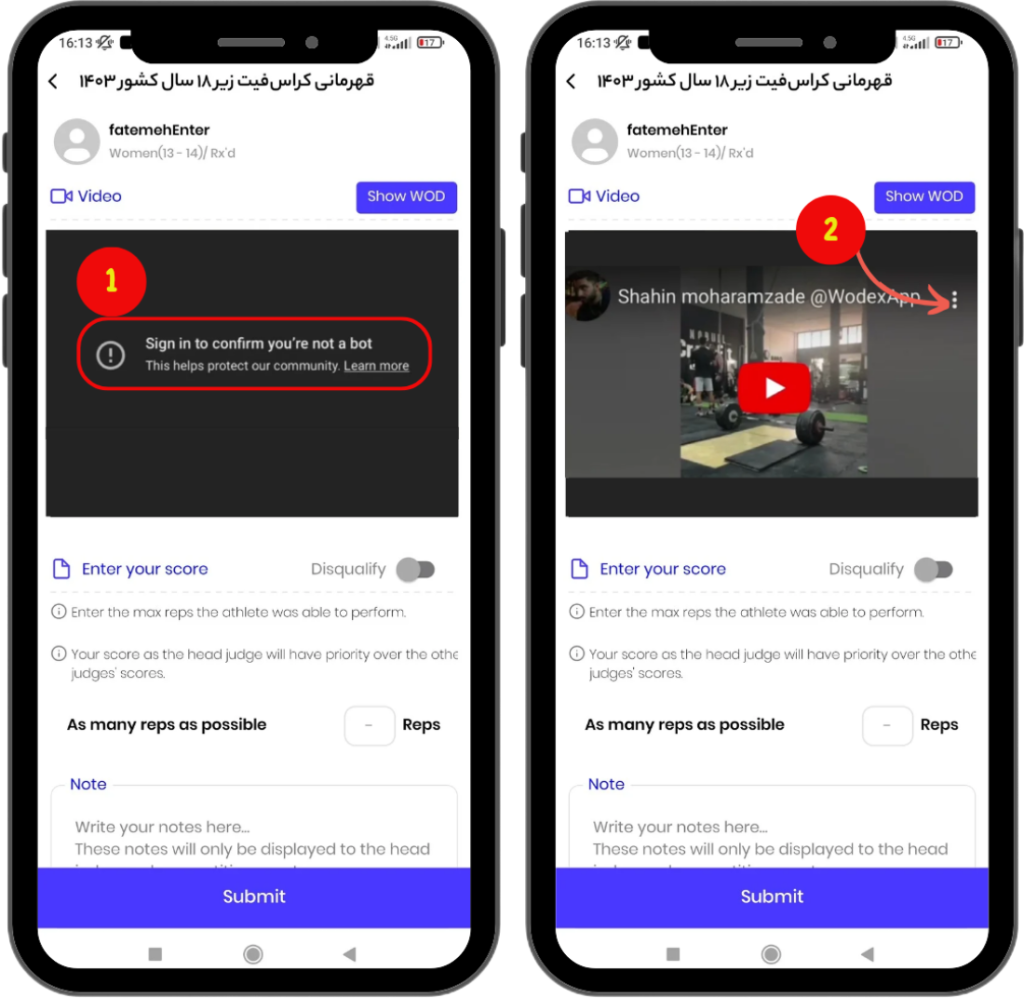
This error occurs because your YouTube account is not synced with your other applications, and therefore it cannot verify that you are not a robot. If you encounter this error:
- At the beginning of accessing the score submission page, as shown in the image on the right, click on the three-dot icon and copy the video link.
- Then, paste the copied link into YouTube’s search bar to watch the video
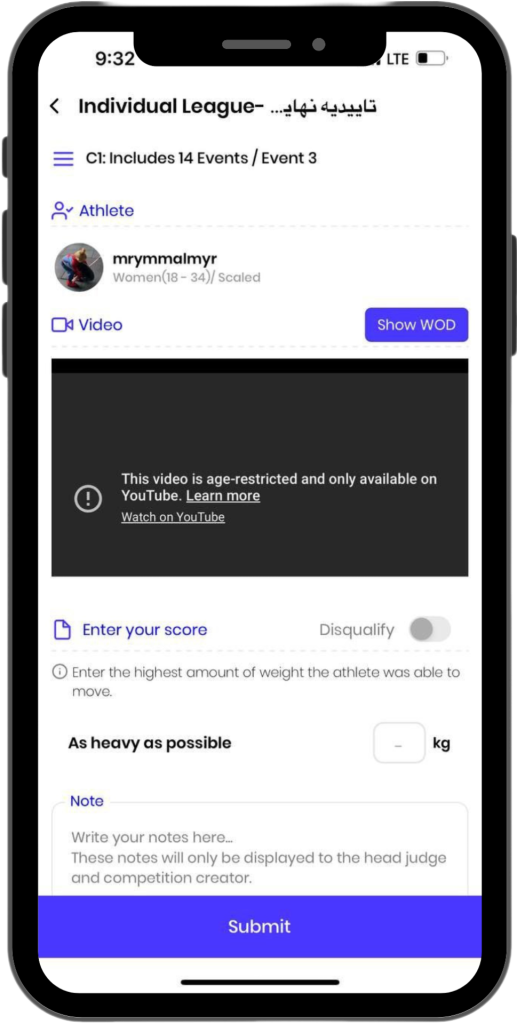
This error appears when the athlete has enabled the age-restriction option while uploading the video to YouTube.
Leave the following comment for the athlete:
“Hello dear athlete, your video cannot be viewed because you have enabled the Age-restricted option. Please disable this setting so the judging can proceed.
Wishing you success, dear athlete.”
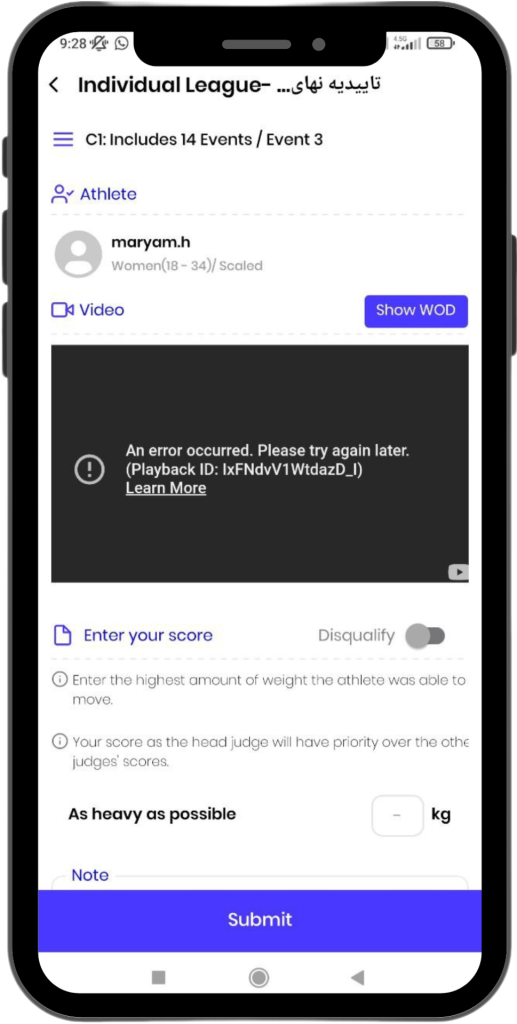
This error occurs when the athlete has entered an incorrect link in WODEX.
For example, they might have provided their YouTube profile link instead of the video link.
Leave the following comment for the athlete:
“Hello dear athlete, you have entered the wrong link, and your video cannot be displayed. Please enter the correct video link.
Wishing you success, dear athlete.”
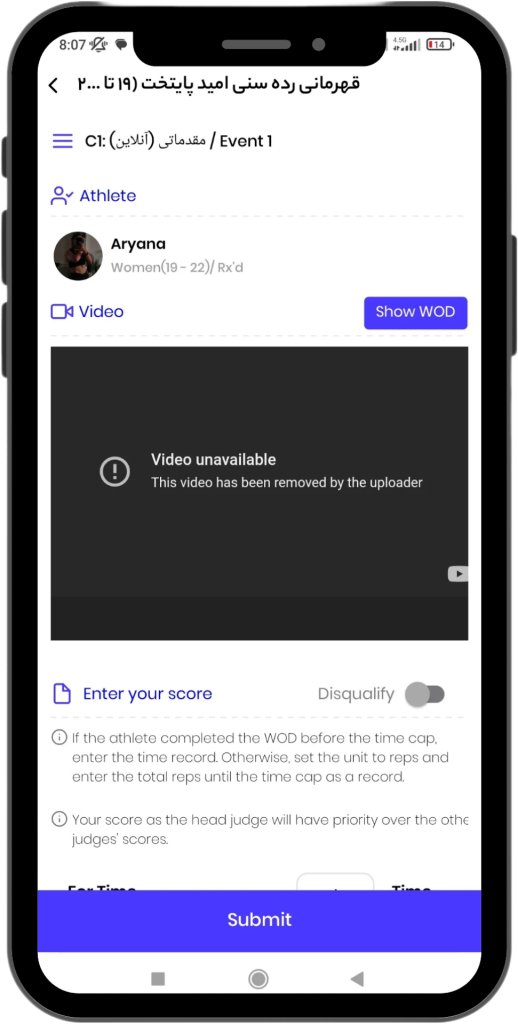
This error occurs when the athlete has deleted their video from YouTube.
Leave the following comment for the athlete:
“Hello dear athlete, your video has been deleted from YouTube, which is why it cannot be displayed.
Wishing you success, dear athlete.”
How to Upload Videos to YouTube
How to Upload and Edit Video Information on YouTube
To upload a video to YouTube, you first need to have a YouTube account.
If you don’t already have an account, follow these steps:
How to Upload a Video to YouTube
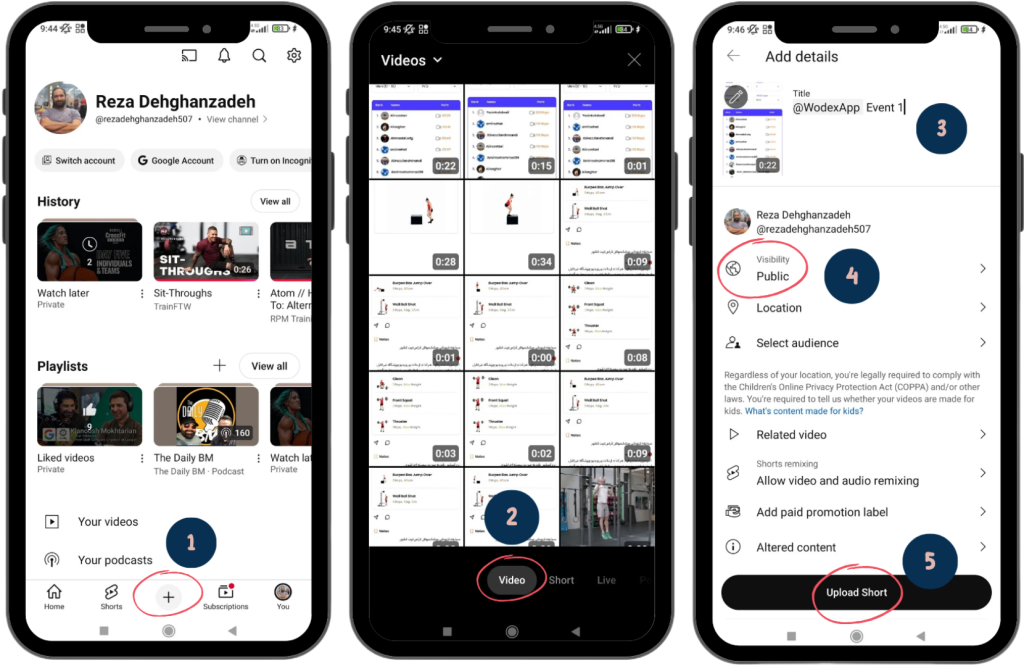
Step 1: Access the Upload Section
- Click on the + icon (as shown in the image).
- Note: If this icon is not visible, it means you haven’t created a YouTube account yet.
Step 2: Select the Video
- In the pop-up window, choose the video you want to upload.
- Tip: Ensure the selection mode is set to Video. If you choose Short, only one minute of your video will be uploaded.
Step 3: Add a Title
- Enter the title of your video in the Title section.
- Suggestion: To make your video easier to find, mention @WodexApp in the title.
Step 4: Adjust Visibility Settings
- Set the Visibility to Public.
- Important: If you choose Private, competition judges will not be able to view your video, and you will be disqualified.
- Note: If you notice after uploading that Visibility is set to Private, you can change it in the edit section (refer to the guide on editing video details).
Step 5: Final Confirmation and Submission
- Click on the Upload Short button to confirm and upload your video.
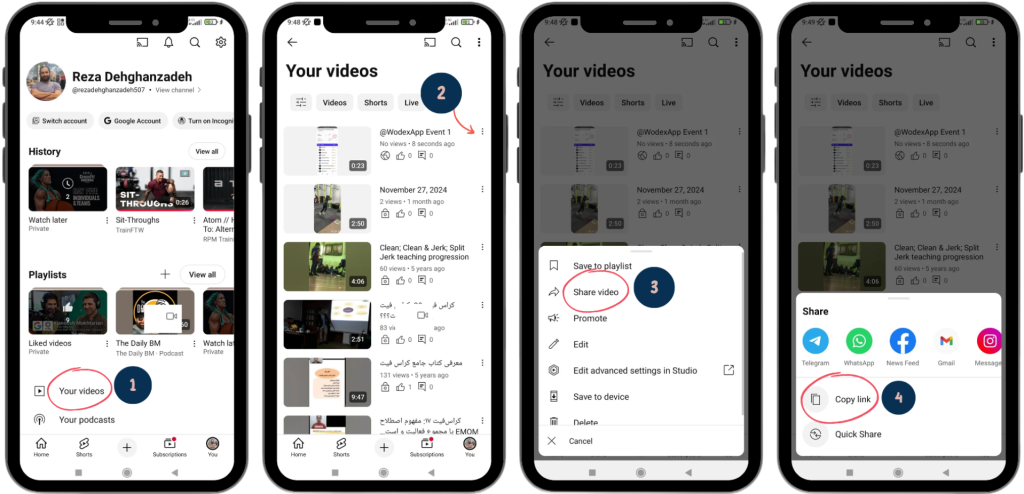
Step 1: Access Your Videos
- Select the Your Videos option.
Step 2: Choose the Video
- Click on the three-dot icon next to the video you want to copy the link for.
Step 3: Share the Video
- From the menu that appears, select Share Video.
Step 4: Copy the Link
- In the new window, click on Copy link.
- Your video link is now copied and ready to be used in the Wodex app.
(For more details, refer to the guide on “How to Submit a Video and Enter Scores in Wodex.”)
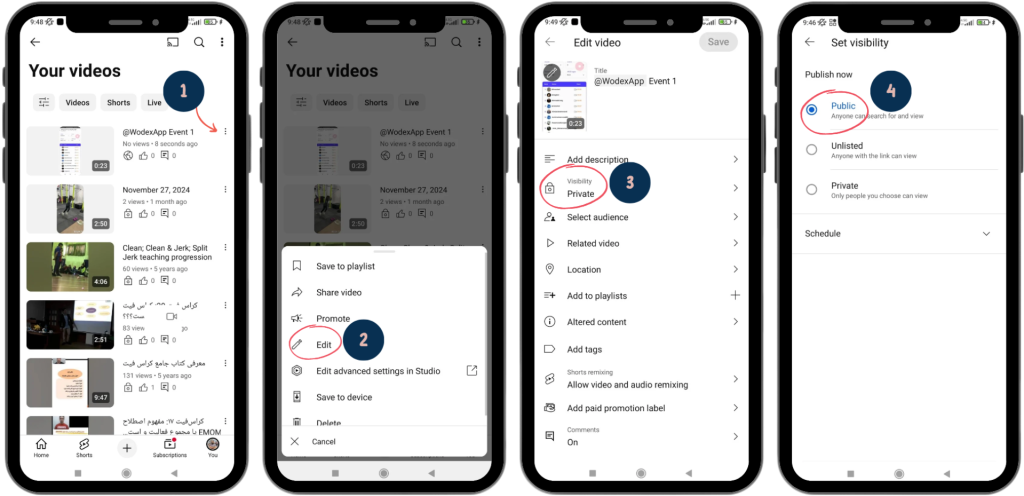
Step 1: Access the Edit Option
- Click on the three-dot icon next to the video you want to edit.
Step 2: Select the Edit Option
- From the menu that appears, choose Edit.
Step 3: Edit Video Information
- On the new page, make the necessary changes to your video details.
- Example: If the Visibility setting was mistakenly set to Private, you can change it to Public in this section.
Leaderboard Guide
In this article, we aim to provide a comprehensive review of the leaderboard. The topics covered in this article include:
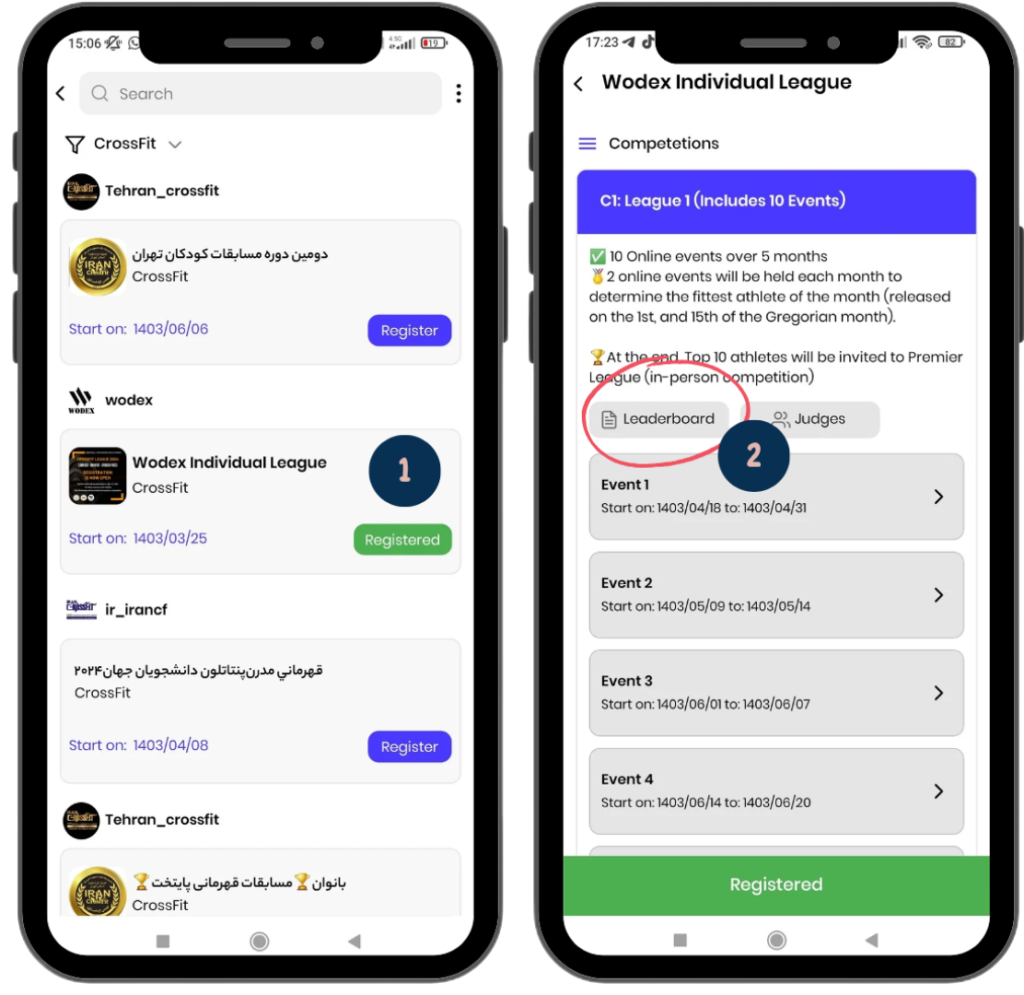
How to Access the Leaderboard Page
1) Selecting the Game:
On the games panel, a complete list of available games is displayed. Find and select the game you’re interested in.
2) Accessing the Leaderboard:
After entering the game page, click on the “Leaderboard” button to view the rankings and scores of the participants.
Next, the leaderboard will be reviewed in detail:
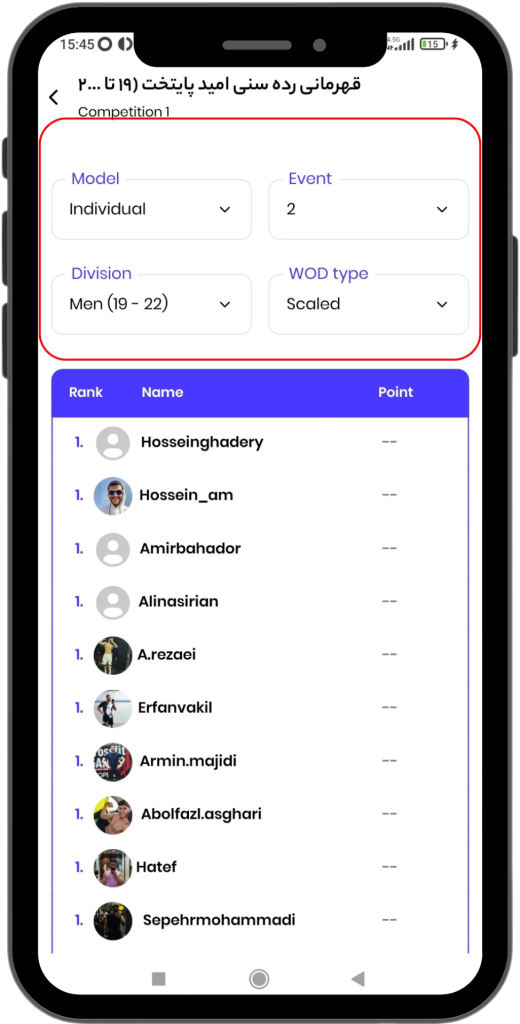
Filter Guide
Filter Options: You can filter the leaderboard based on specific events or categories. The available filters include:
- Model: Choose the type of game (e.g., individual or team).
- Events: Select the event to display the scores related to that event.
- Division: Sort the leaderboard based on a preferred category, such as men 12-19 years.
- WOD Type: Adjust the leaderboard based on different athlete levels (e.g., RX’d or Scaled).
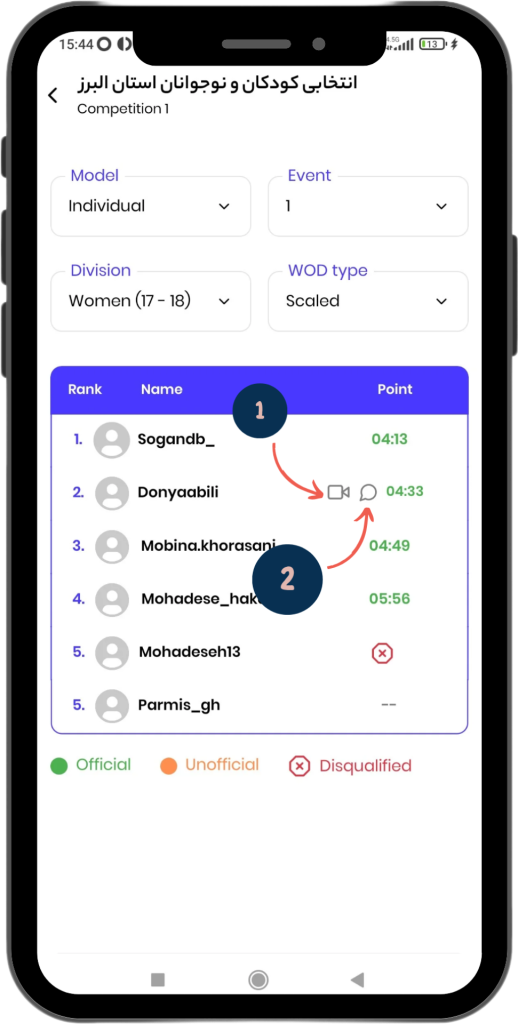
Icon Guide
- Comment Icon: Athletes can click on this icon to read the judge’s report.
- Video Icon: This icon indicates that the athlete has successfully submitted their video. By clicking on this icon, the athlete can view their video.
Score Display Modes
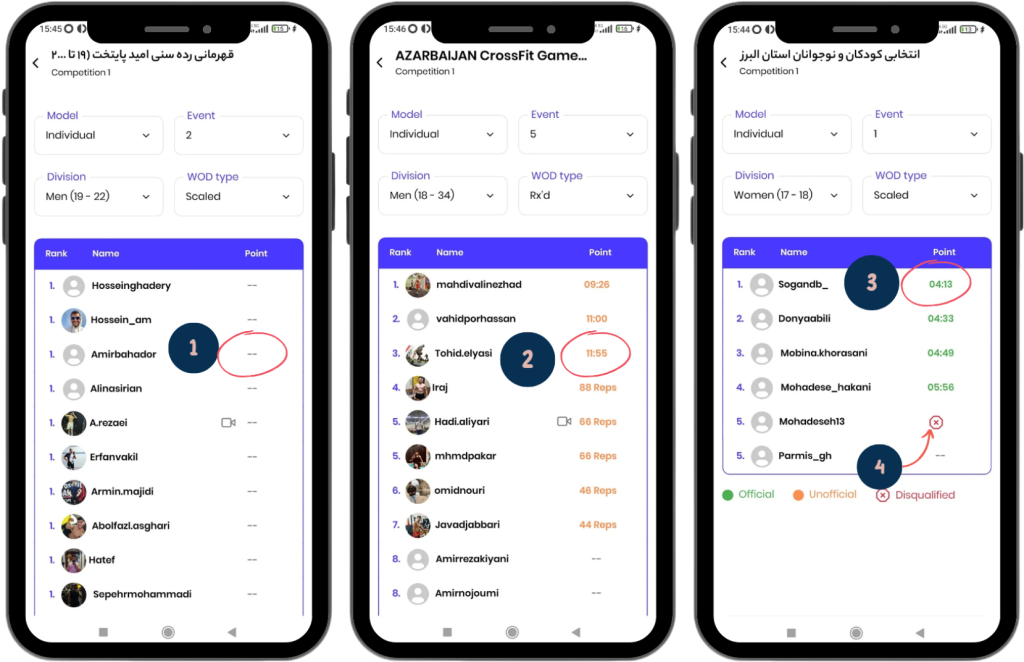
The scores on the leaderboard are displayed in four different modes:
- Two Dashes (–): Scores will not be displayed until the event’s end time has passed. Instead of a score, two dashes will appear.
- Orange Scores: After the event ends, the scores entered by athletes when submitting their videos are displayed as unofficial scores in orange.
- Green Scores: When a judge records a score for an athlete, the score is displayed officially in green. In this case, the leaderboard will be sorted based on these scores.
- Red Cross (×): If a judge disqualifies an athlete, a red cross will appear next to their name.
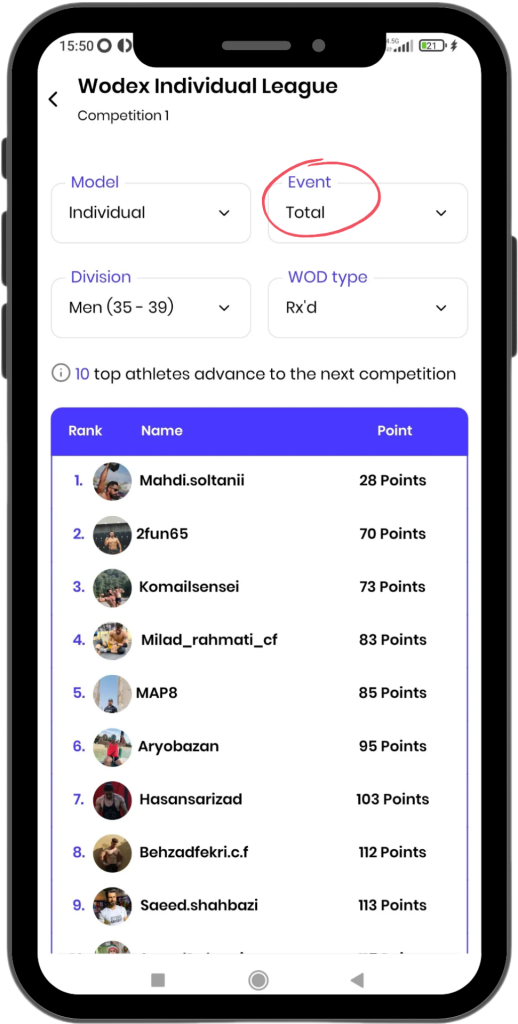
Total Ranks
By setting the table to “Total” mode, you can view the final results.
- The scores displayed in this section represent the sum of the rankings achieved in different events.
- For example, if you finish 5th in Event 1, 20th in Event 2, and 10th in Event 3, your total score will be:
5 + 20 + 10 = 35 - The total ranks will be sorted based on the total scores athletes have earned.
How to Submit a Video and Record a Score
In this article, we will explain the complete process of submitting a video. The topics covered in this article include:
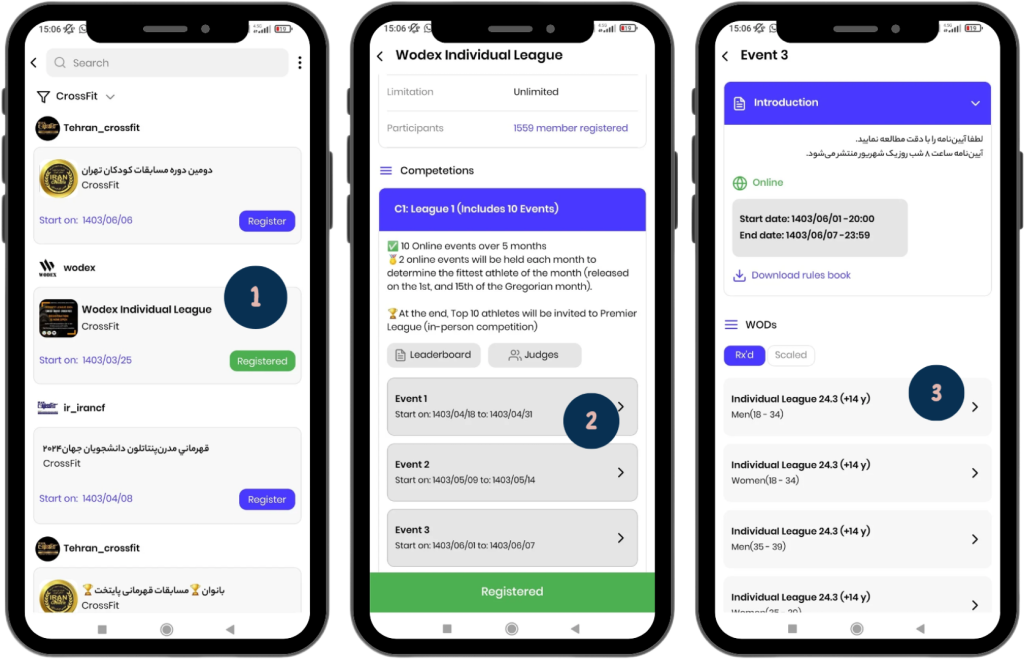
- In this page, you can see a complete list of games. Find and select your desired game.
- Once selected, enter the event page.
- On this page, choose the division in which you have registered.
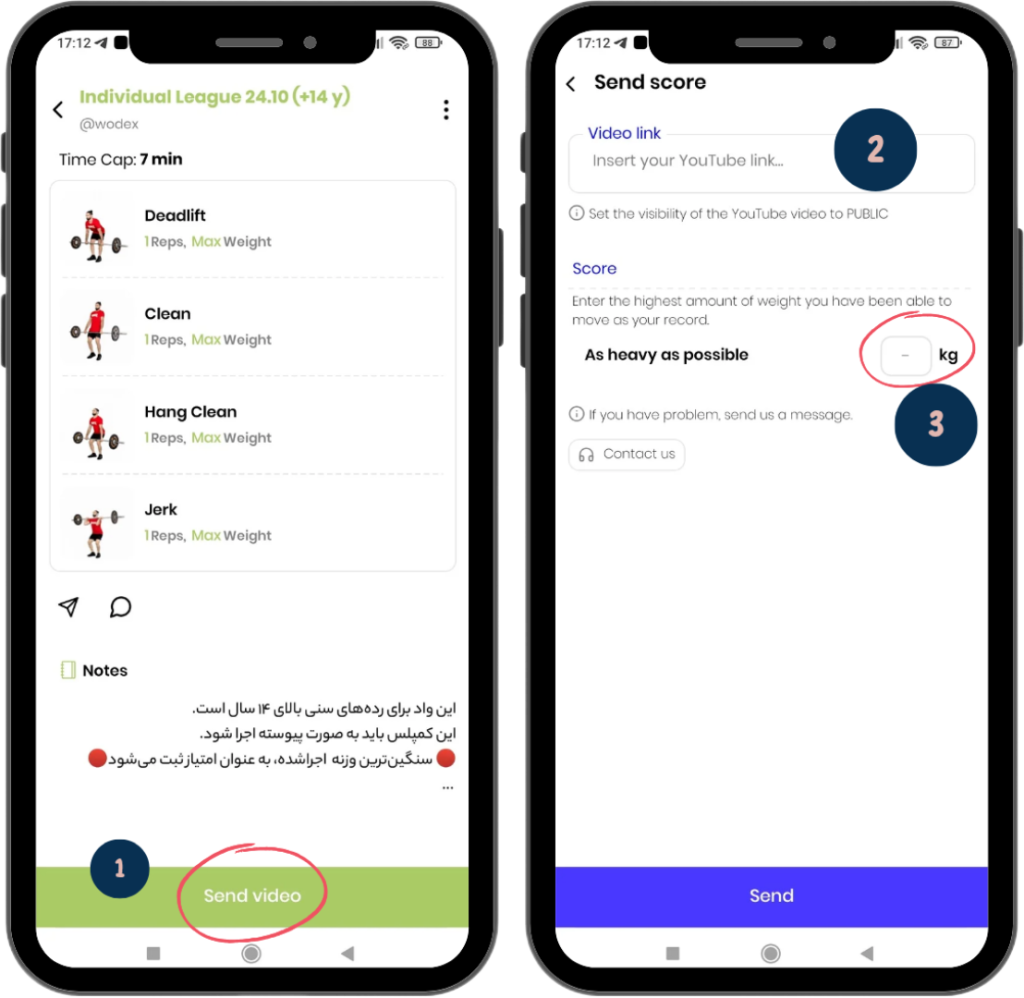
1) View WOD and Submit Video
In this section, you can view the WOD for your age group. To submit your video, click the “Send Video” button.
If you see an error after clicking this button, possible reasons include:
- You haven’t registered for this game (guide).
- You’ve entered the wrong category (age group, gender, or competition level) (guide).
- The event has not started yet (guide).
- The event has already ended (guide).
For details on each error, please refer to the “Common Errors” section.
2) How to Add Video Link
Upload your video to YouTube (How to Upload Video on YouTube).
Click on the “Video link” box and paste your video link there.
Important note: When uploading a video to YouTube, set the “Visibility” option to Public. Otherwise, the video will not be visible to the judges, and the athlete will be disqualified.
3) How to Enter Your Score
Click the box for entering your score and input your score. If you don’t enter your score, an error will occur.
The scoring method may vary depending on the WOD. For more information, check the “How to Record Your Score” guide.
4) Final Submission
After entering the link and score, make sure to click the “Send” button. If you don’t do this, your information will not be saved or submitted.
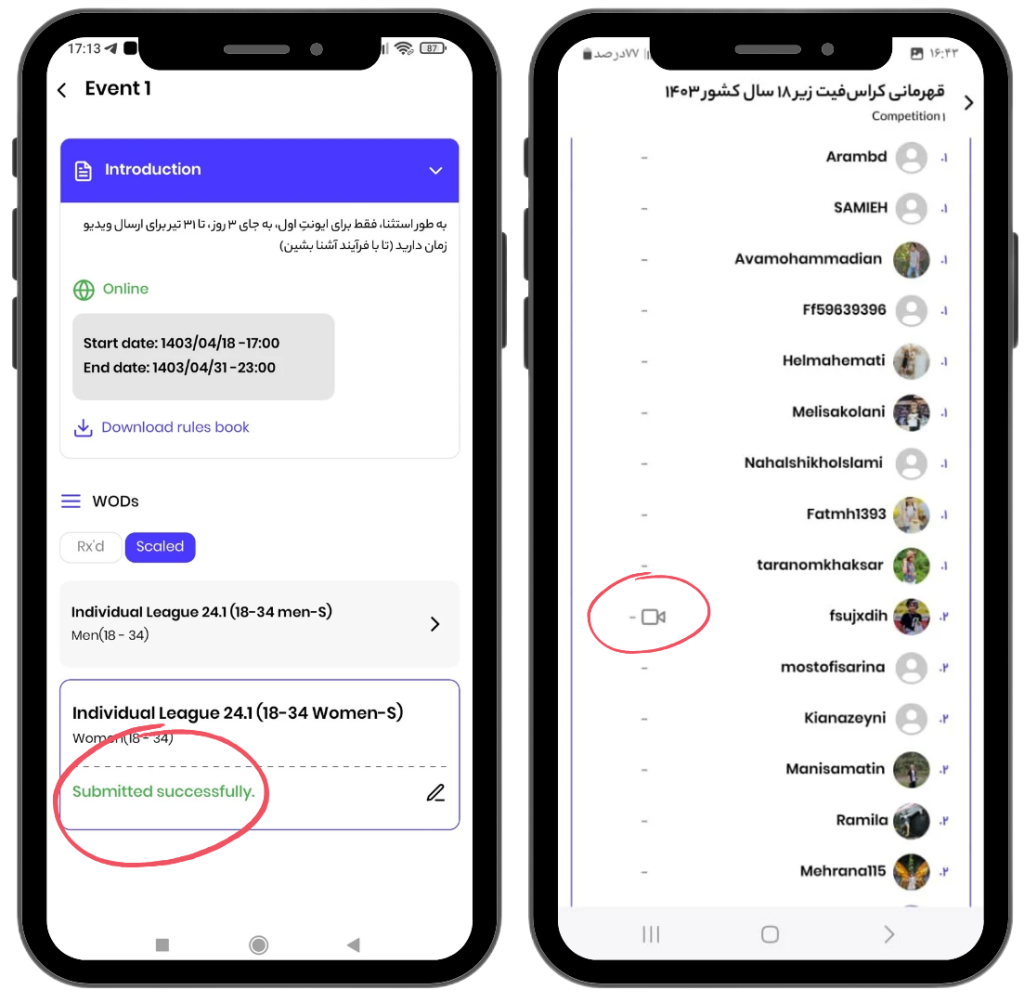
To ensure that your video has been successfully submitted, there are two ways to check:
- Success Message: If the submission is successful, a green message titled “Submitted Successfully” will appear (as shown on the left image).
- Leaderboard Icon: On the leaderboard page, an icon will appear next to your name. This icon indicates that you have submitted your video. By clicking on this icon, you can view your video (as shown on the right image).
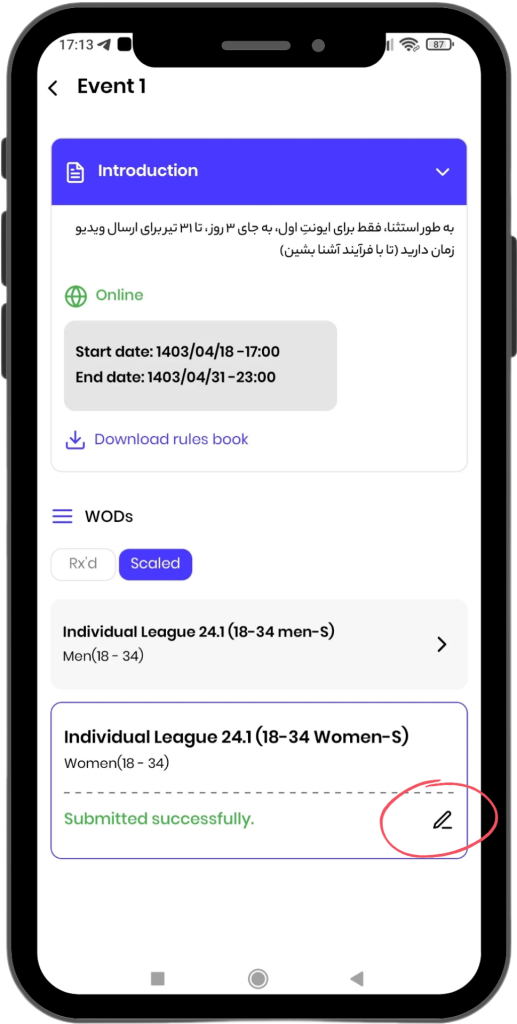
You have until the end of the event to edit your video link or score.
- To make changes, click on the edit icon.
- Then, you can edit your video link or score.

In case the WOD competition is “For Time,” the scoring is reviewed in two scenarios:
1) Score as Time: If you complete the WOD before the time cap, you need to submit the time it took to finish the workout.
2) Score as Reps: If you are unable to finish the WOD within the time cap, you need to submit the total number of reps completed during the time cap. To do this, click on the “Time” option and select “Rep” mode.
- The scoring on the leaderboard is based on athletes who complete the WOD in the shortest time being ranked higher, followed by those who perform more reps if they do not finish within the time cap.
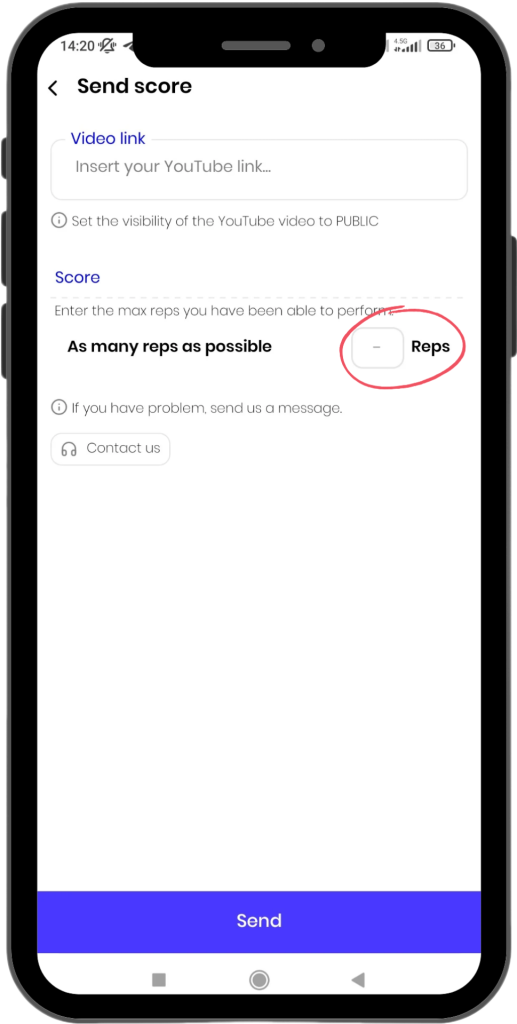
If the WOD game is of the AMRAP type, you should enter the total number of repetitions completed within the given time as your score.
For example, if you completed 3 rounds and each round consisted of 20 movements, you should enter 60 repetitions as your score.
- The scoring on the leaderboard is based on athletes who have completed more repetitions being ranked higher
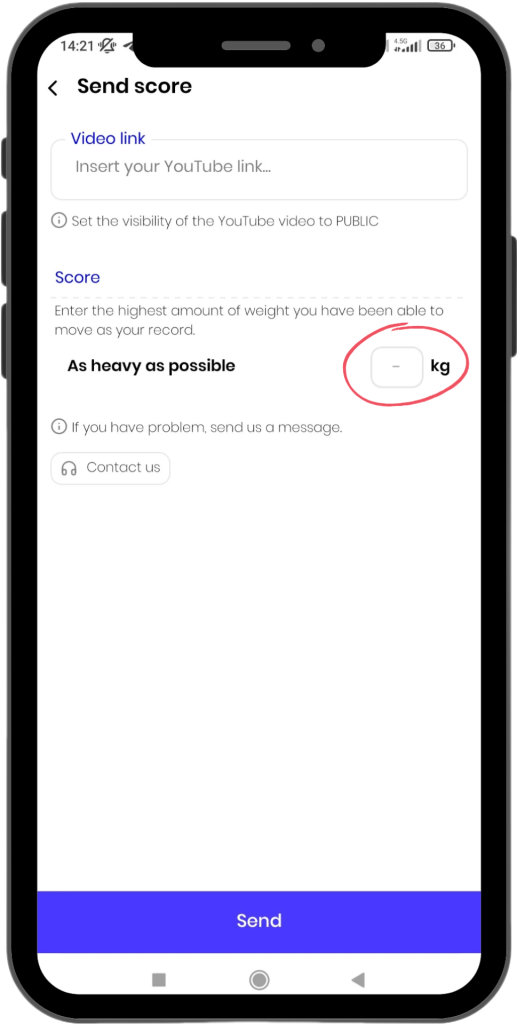
If the WOD game is of the AHAP type, you should enter the heaviest weight you have lifted as your score.
- The scoring on the leaderboard is based on athletes who have achieved higher records being ranked higher.
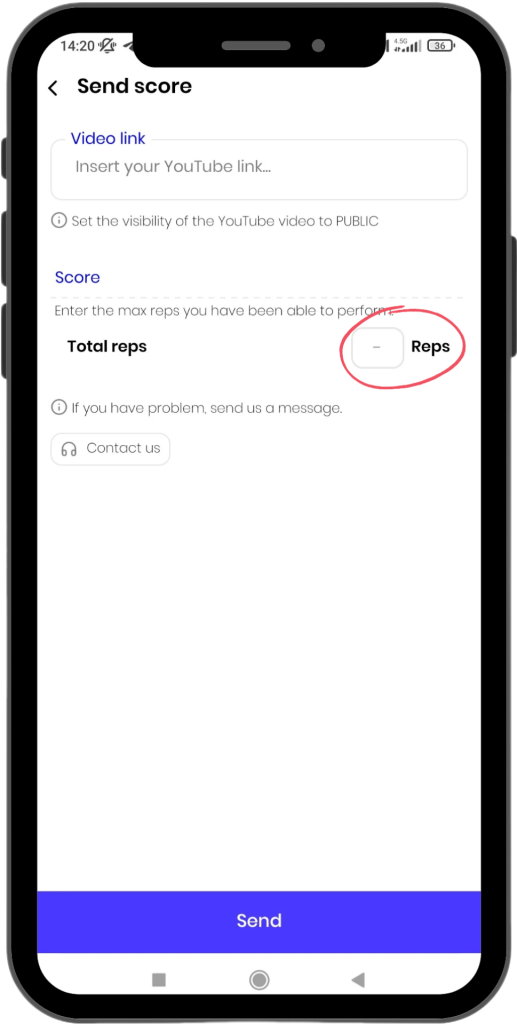
If the WOD game is of the interval type, you should enter the total number of repetitions completed during the specified time intervals as your score.
- The scoring on the leaderboard is based on athletes who have completed more repetitions being ranked higher.
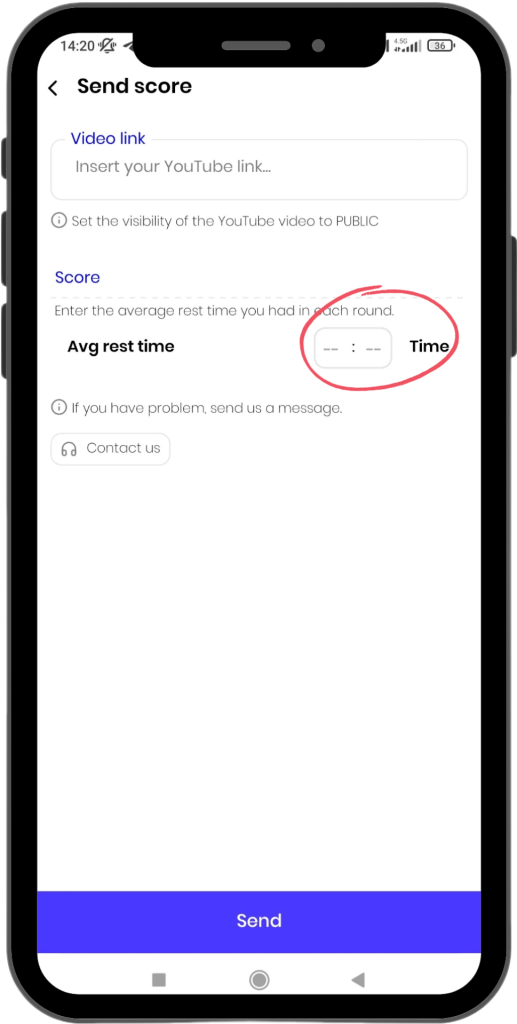
If the WOD game is of the EMOM type, you should enter the total remaining time in each round as your score. For example, if you have 10 seconds remaining in the first round, 5 seconds in the second round, and 3 seconds in the third round, you should enter the total of these times, which is 18 seconds, as your score.
- The scoring on the leaderboard is based on athletes who have more time entered, meaning those who complete each round in less time will be ranked higher.
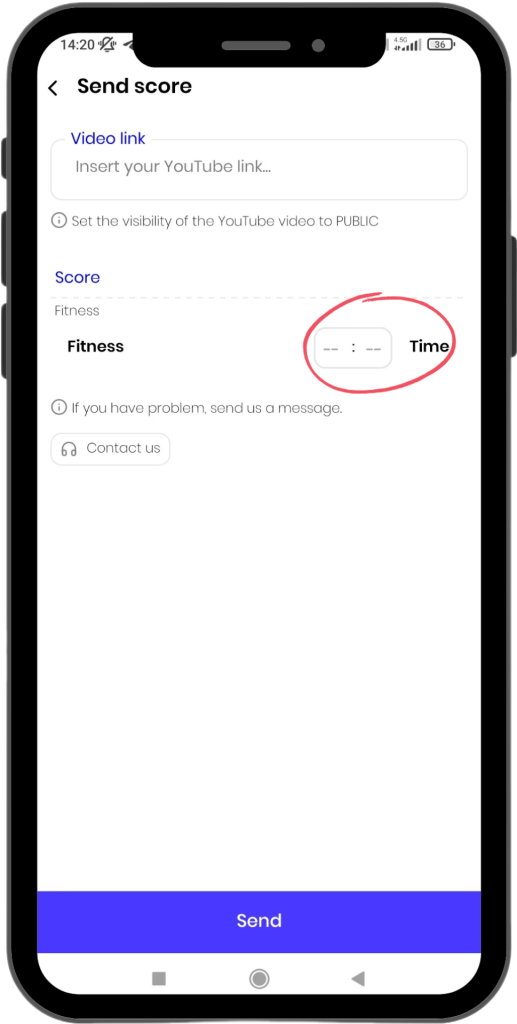
If the WOD game is of the Fitness type, you should enter the total time taken to complete the WOD as your score. For example, which athlete has the longest plank hold record?
- The scoring on the leaderboard is based on athletes who have more time entered, meaning those who complete each round in less time will be ranked higher.
Common Errors
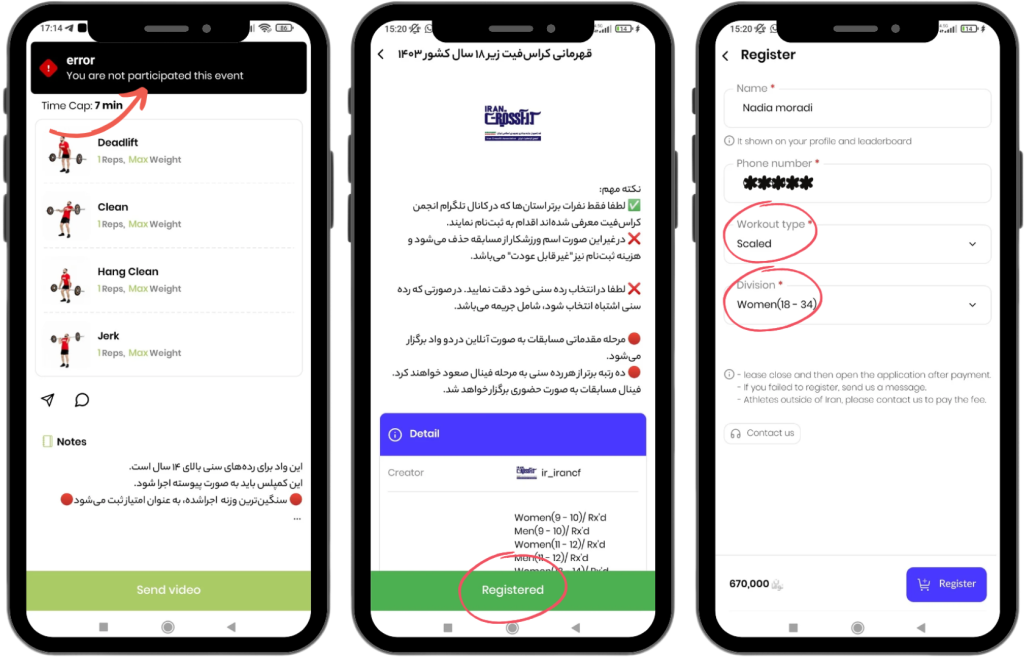
- Not Registered for the Game: This might be because you haven’t registered for the game. To confirm your registration, go to the game’s main page. If the button is blue, it means you haven’t registered yet. To fix this error, you need to register for the game (see the registration guide).
Once your registration is successful, the button at the bottom of the page will turn green, and it will display “Registered” (as shown in the middle image).
- Incorrect Category Selection: You may have selected the wrong category (age group, gender, Rx or Scaled level) from the event page. For example, you registered in the men (10-11) category but selected the women (10-11) category in the event page.
To see which category you registered for, go to the game’s main page and click the green button at the bottom of the page (as shown in the middle image). In the opened page, you can check your registered category.
If you registered for the wrong category, please contact support.
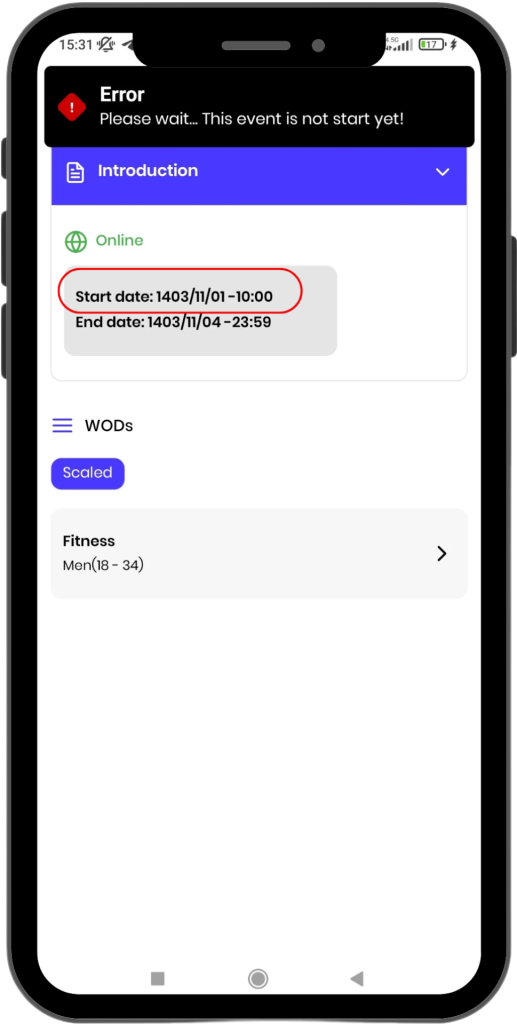
- This error indicates that the event has not started yet.
- The exact start time of the event is displayed on this page.

- This error indicates that the event has already ended.
- The exact end time of the event is displayed on this page.
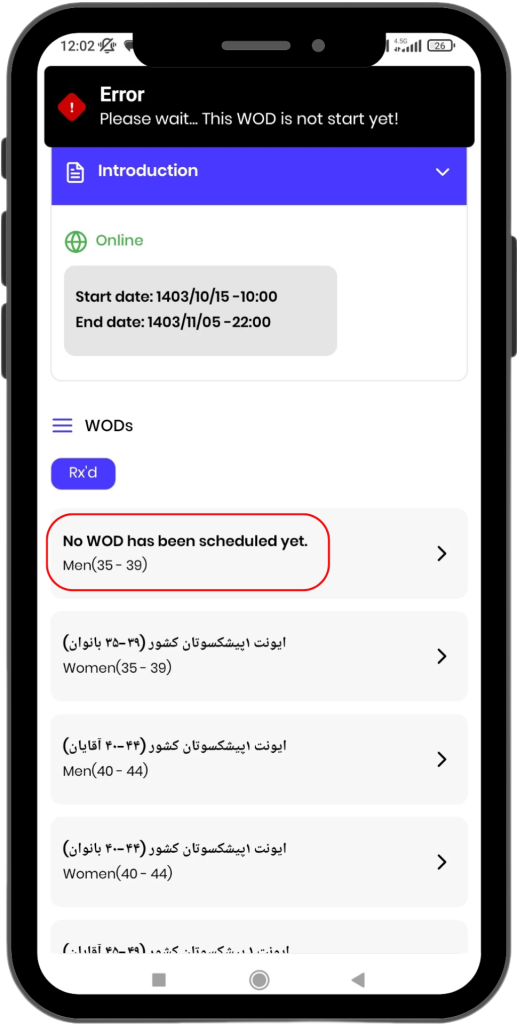
- This error indicates that the event organizer has not yet set up a WOD for the category you selected.
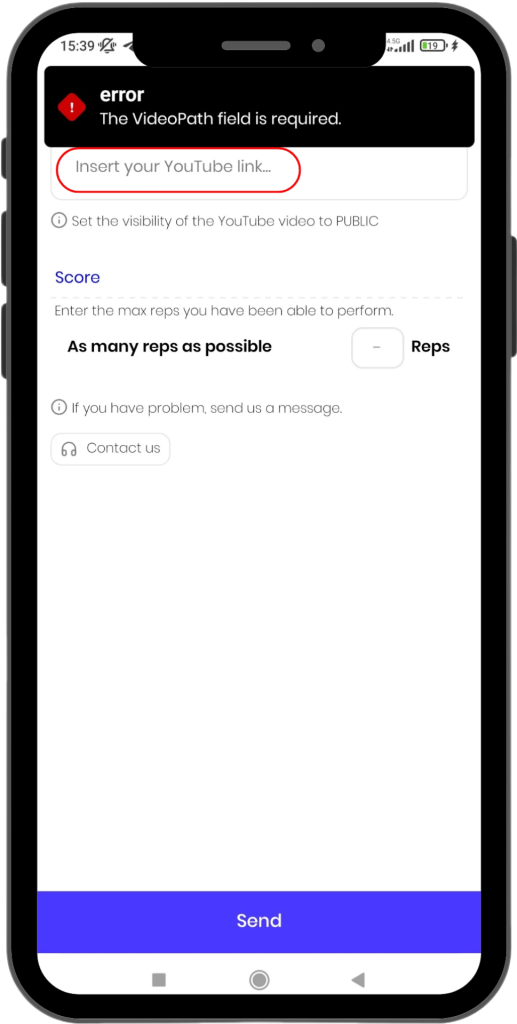
- This error indicates that you have not entered your video link. For further guidance, please refer to the “How to Submit a Video” section.
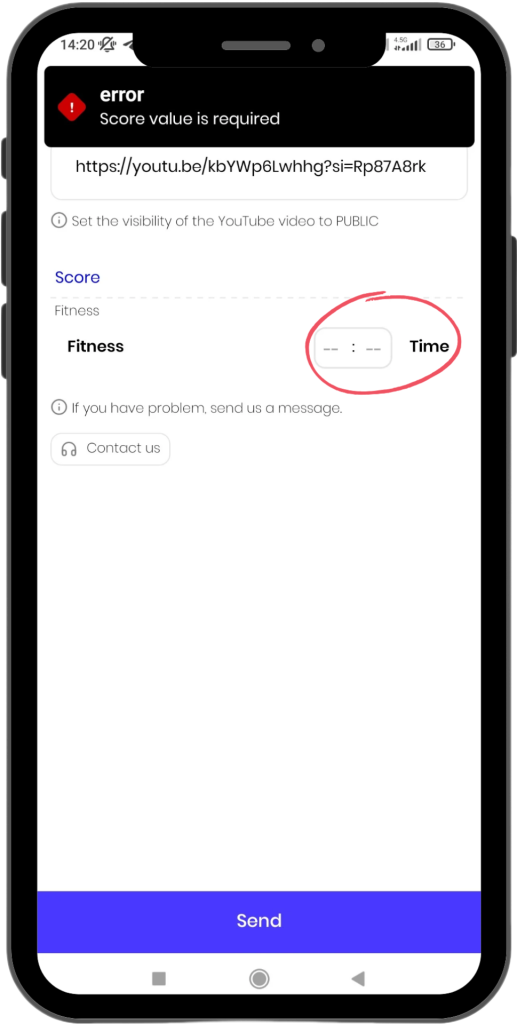
- This error indicates that you have not entered the score for your performance. For further guidance, please refer to the “How to Submit a Score” section.
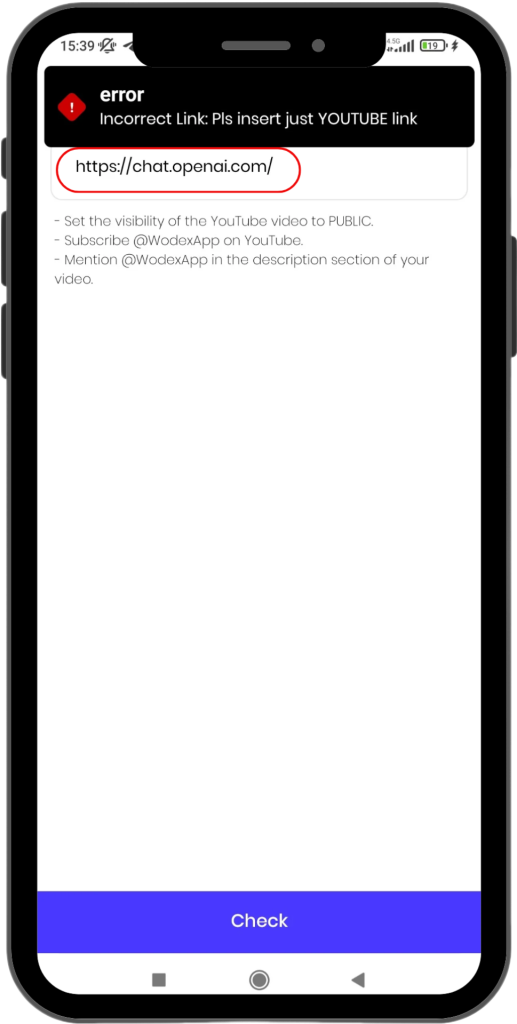
- This error indicates that the link you provided is incorrect. You are only allowed to submit a YouTube link.
- For instructions on how to upload a video to YouTube, please refer to the “How to Upload a Video to YouTube” guide.
How to Check Game Information
In this article, we aim to thoroughly review the information available on the game page. The topics covered in this article include:
How to Access the Games Panel
- On the main page, click the menu icon in the upper-right corner (as shown in Image 1).
- Select the “Games Panel” option to access the list of competitions.
- In this section, you will see the complete list of available competitions. Find and select the competition you are interested in.
Search for a Game:
- Use the search bar at the top of the page to search for the specific game you are looking for by name.
- You can also use the filter options to select competitions based on a specific sport.
Game Information:
- At the top of each game box, you will find the username of the game organizer. Clicking on this will take you to their profile page.
- Each game box includes information such as the game’s name, logo, sport type, and registration start time.
- To get more details about a specific game, simply click on its box.
How to Navigate the Game Homepage
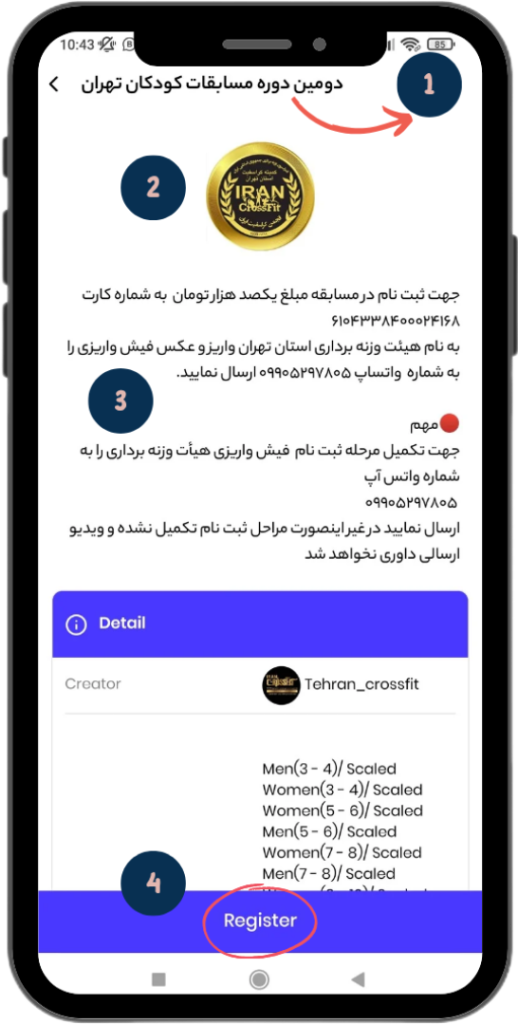
General Information:
- Game Name: Displayed at the top of the page.
- Game Logo: The image associated with the game.
- Game Description: General information about the game.
- Register for the Game: Guide on how to register for the game.
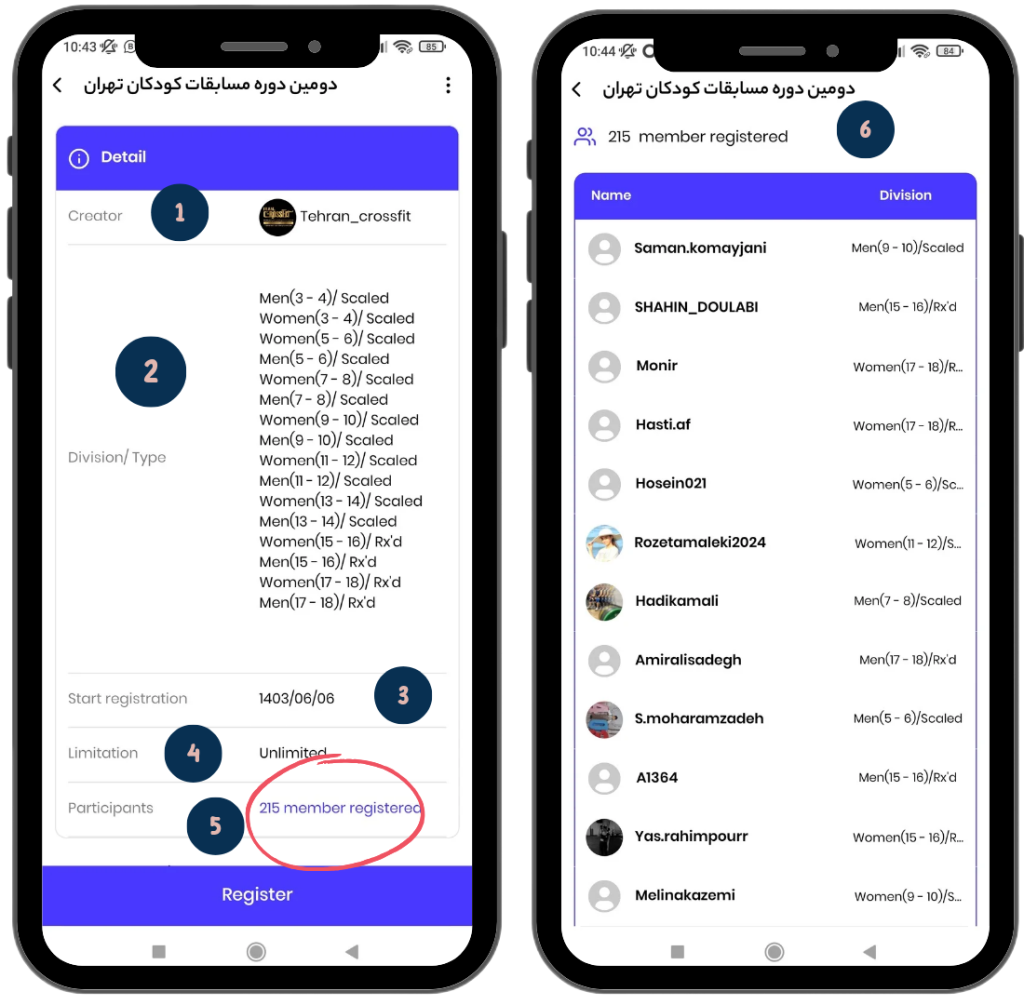
Details:
- Creator Username: Clicking on it will take you to the creator’s profile.
- Divisions/Types: Includes all available divisions in the game.
- Start Registration: The date when registration begins.
- Limits: The number of athletes allowed to register. If it is unlimited, “Unlimited” will be displayed.
- Number of Participants: The number of athletes who have registered. Click on the blue link to view their names.
- List of Registered Athletes: Displays the participants’ information.
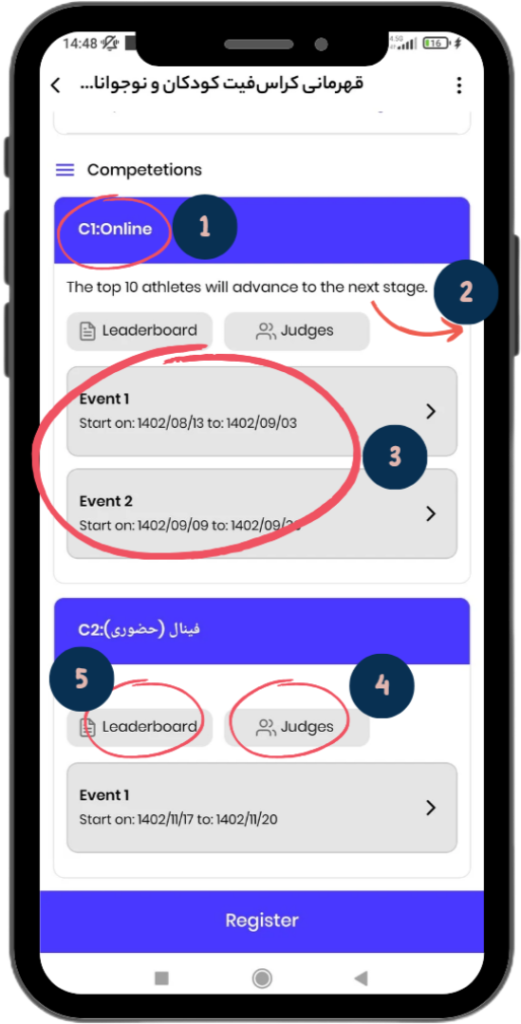
Competitions:
- Stage Number and Name: For example, Stage 1 – Online Game.
- Stage Description: For example, the top 10 athletes from this stage will advance to the next stage.
- Event List: Includes the start and end dates of the events. By selecting the desired event, you will be taken to the event page.
- Judges: Clicking on this button will display the list of head judges and other judges.
- Leaderboard: Guide to the leaderboard page.
How to Navigate the Event Page:

1) Online Event: The image on the left shows an example of an online event.
- In this type of event, the athlete must record a video of their performance and submit it.
2) In-Person Event: The image on the right shows an example of an in-person event.
- In this event, the athlete must attend the designated sports hall
- according to the scheduled time.
Other Important Aspects of Events:
- Event Description: The event description can be viewed at the top of the page.
- Event Start and End Dates: Athletes are only allowed to submit their performance video within the specified time frame (from the start to the end of the event). Any video submitted outside this timeframe will result in an error.
- Download Rulebook: If the organizer has uploaded a rulebook, there will be an option to download it as a PDF on the event page. By clicking this option, you can download and read the rulebook.
- Select Division and View WOD: By selecting your age group, you will be directed to the WOD page.
How to Navigate the WOD Page
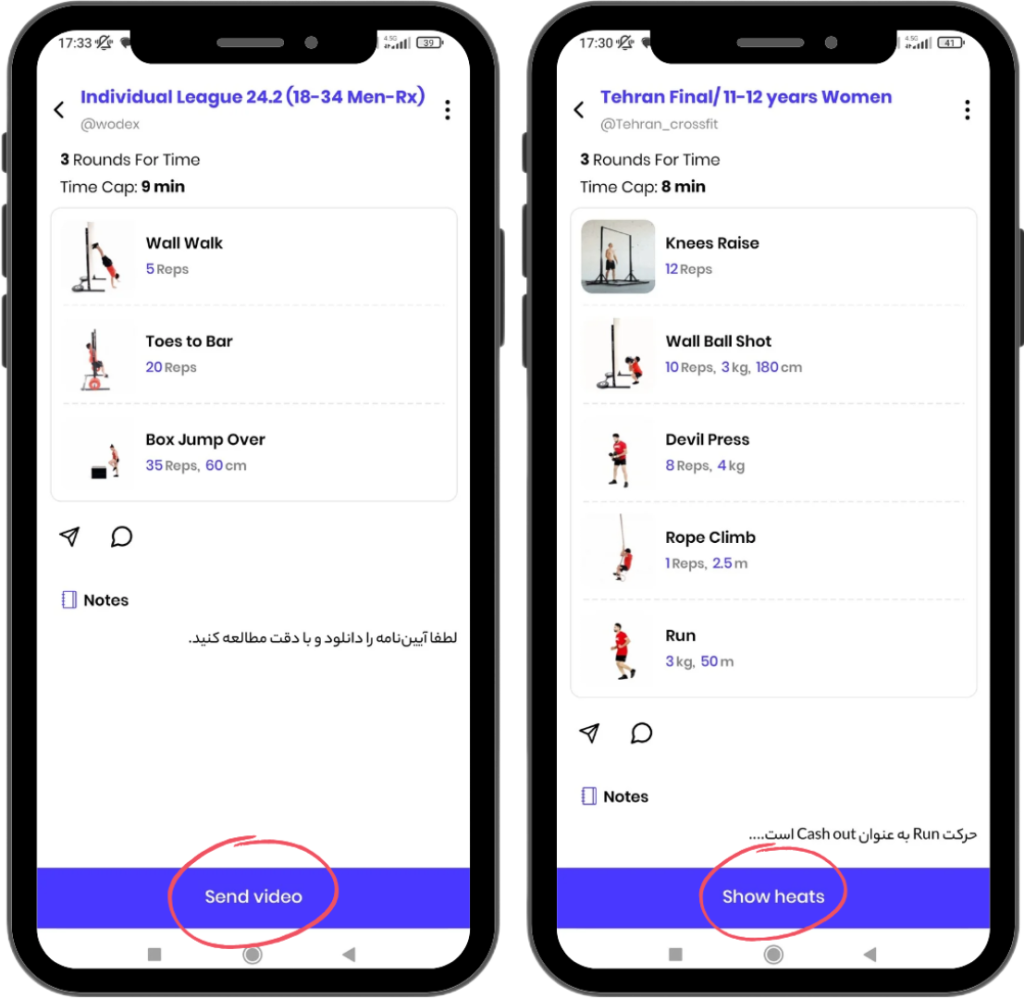
In this page, details regarding each WOD are displayed. The button at the bottom of the page varies depending on the type of event:
1) Online Event
In online events, the “Submit Video” button is located at the bottom of the page. By clicking this button, you can submit your video.
For a complete guide on how to submit a video, please refer to the “Video Submission Guide” article.
2) In-Person Event
In in-person events, the “View Heats” button is located at the bottom of the page. By clicking this button, you can view your event details, including: event date, arrival time, heat number, and lane number.
Make sure to carefully review the information related to your heat and lane, and be present at the event location according to the announced schedule.
How to Navigate the Leaderboard Page
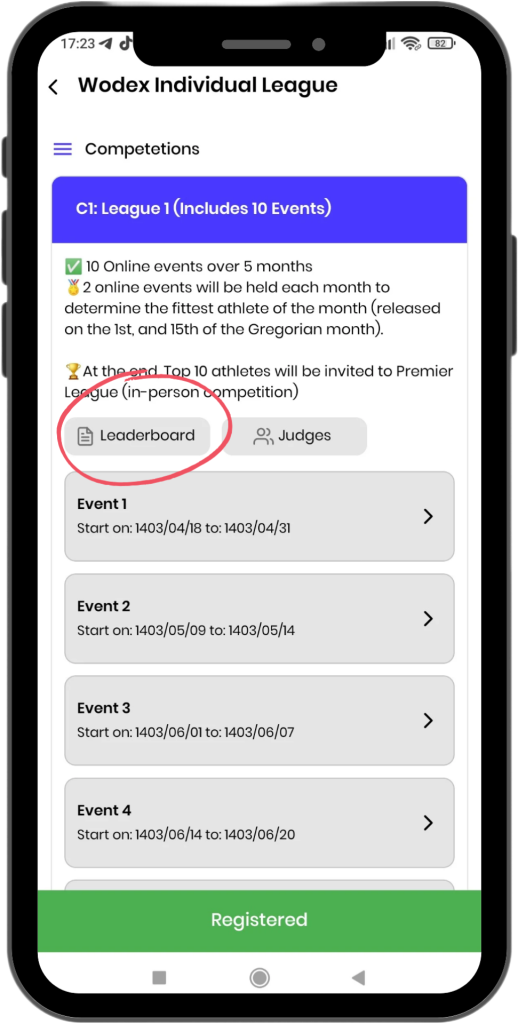
After entering the competition page, click on the “Leaderboard” button to view the ranking list and scores of participants.
For a complete guide on the leaderboard details, please refer to the “Leaderboard Guide” article.
How to register for the games
Steps to Register for the Competition
A) Download the App and Create an Account
B) How to Access the Game Panel
C) How to Register for Individual Competitions
D) How to Register for Team Competitions
Each of the above points will be explained in detail below:
Download the App and Create an Account
The WODEX app is completely free and available to all users. By installing this app, you can easily take advantage of our various features and services. After downloading and installing the app, you will need to create an account for yourself (see How to Create an account).


How to Access the Games panel
- On the main page, as shown in Image 1, tap the menu icon in the upper right corner of the screen.
- Select the Games Panel option to access the list of games.
- In this section, the complete list of games will be displayed. Find and select your desired competition.
Next, we will explain the steps for registering in Individual and Team Competitions:
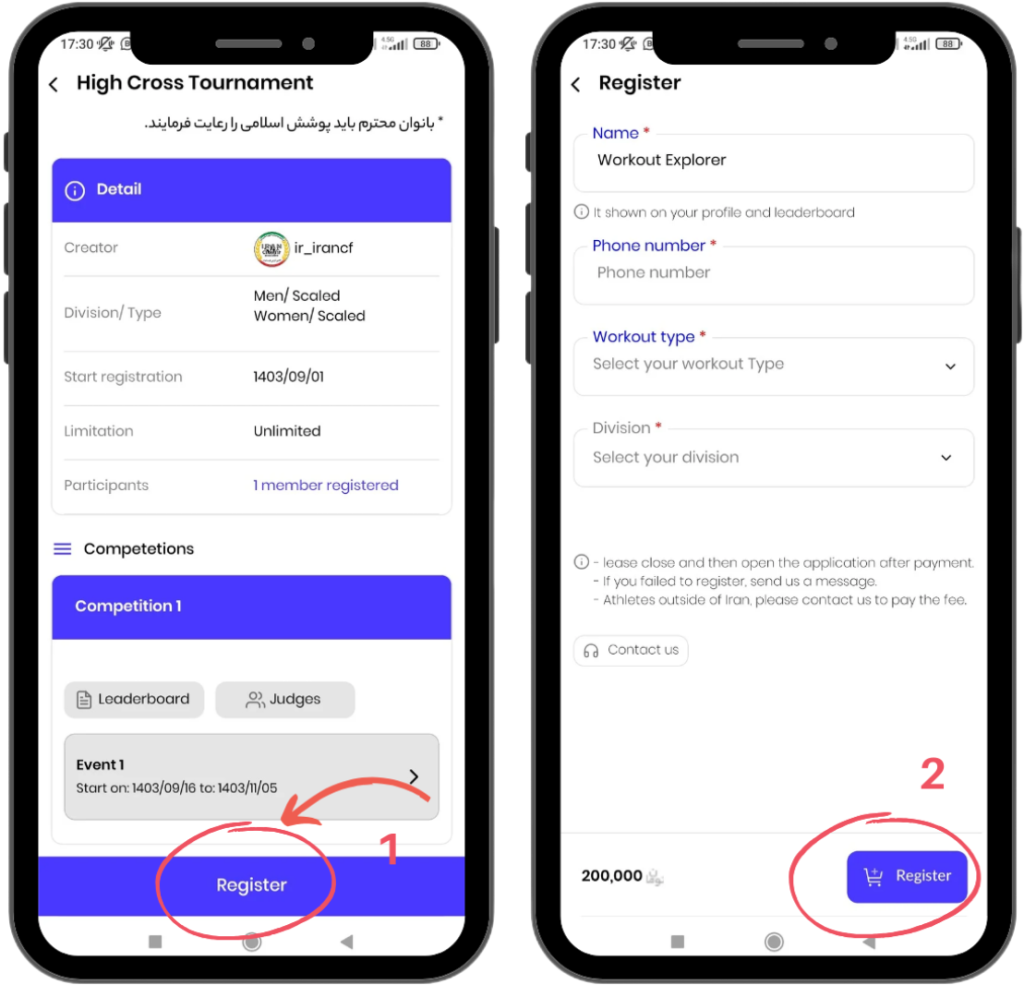
After selecting the competition, the full details will be displayed. Follow these steps:
1) At the bottom of the page, tap the Register button.
2) You will be directed to a page where you need to fill out your information:
- Name: Enter your full name.
- Phone Number: Provide your emergency contact number.
- Workout Type: Choose one of the competition levels (Beginner, Intermediate, Advanced, …).
- Division: Select the age category that suits you.
Finally, tap the Register button at the bottom of the page to complete your registration process.
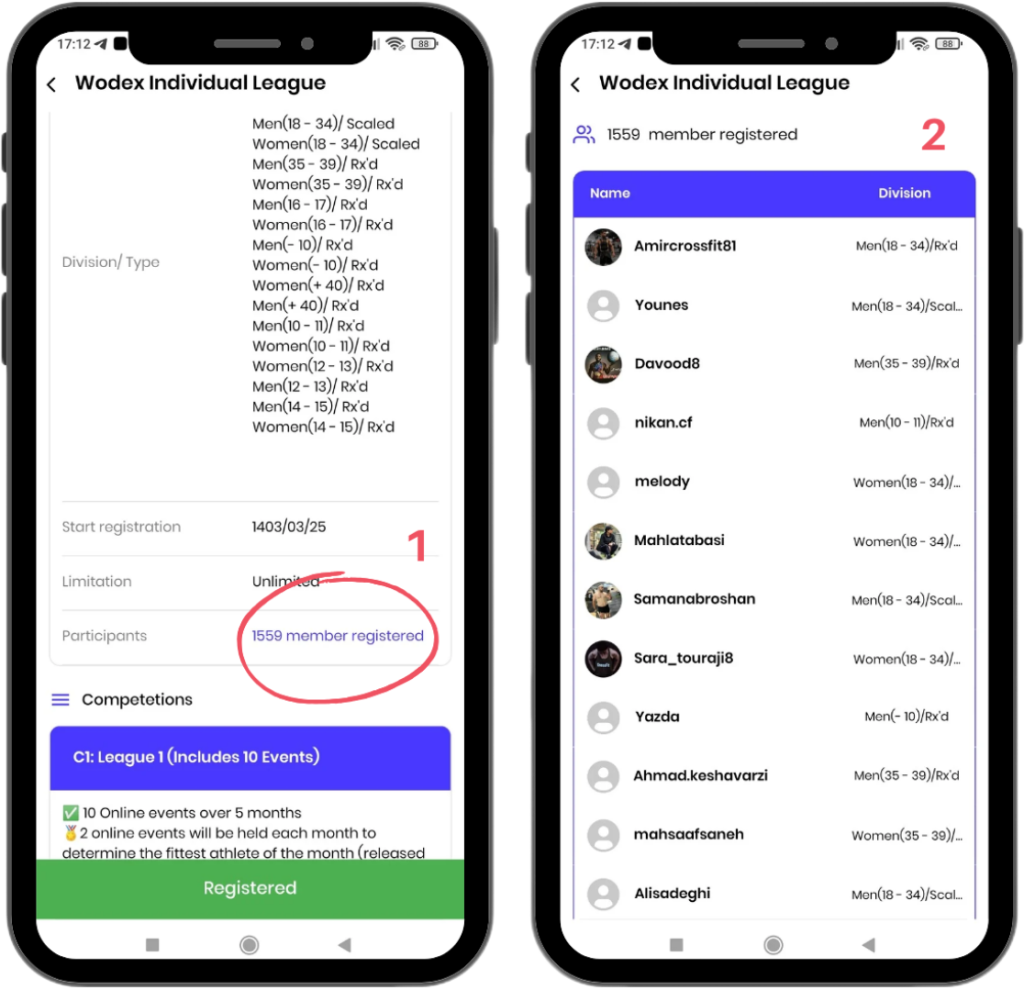
Ensuring Successful Registration
To confirm your registration, follow these steps:
Go back to the competition page (as shown in Image 1).
- Tap on the Registered Participants option.
- If your name appears in the list of registered participants, your registration was successful.
Additionally, the color of the button at the bottom of the page will change to green, displaying the text Registered.
How to Register for Team Competitions
Registering for team competitions is one of the most exciting features of the Wodex app. Below, we’ve outlined the steps and key points for team registration and management in detail.
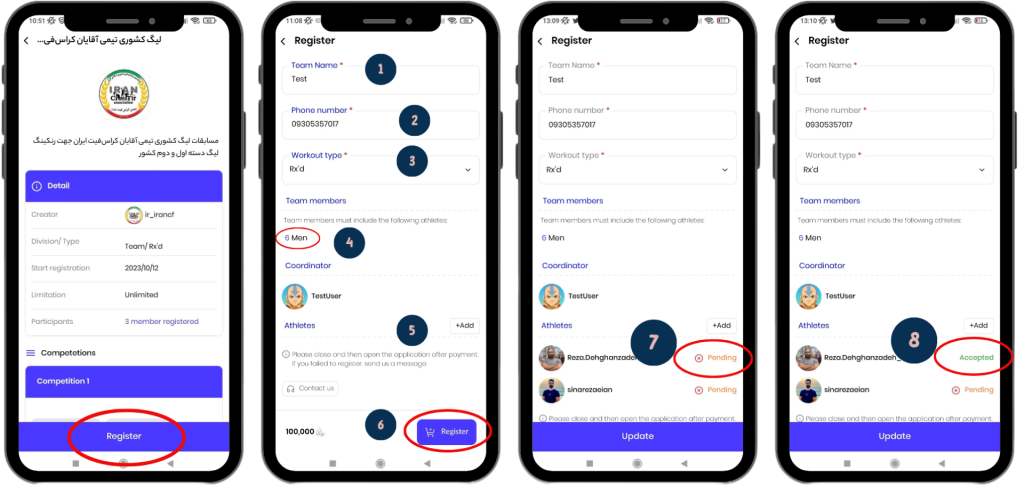
After selecting the competition, full details will be displayed. Follow the steps below for registration. Each numbered item in the image corresponds to the following explanations:
Step 1: Select the Register Option
At the bottom of the page, tap the Register button.
Step 2: Complete Team Information
- Team Name: Enter the name of your team.
- Phone Number: Provide a reachable phone number.
- Competition Level (Type): Select the desired level (Professionals – Rx’d or Beginners – Scaled).
- Number of Team Members: Review the maximum allowed number of team members.
- Add Team Members: Tap the Add option, search for your team members’ usernames, and add them to the team.
- Finalizing Registration: After completing the team information, tap the Register button.
Team Member Status:
7) After adding athletes, their status will be listed as Pending.
An invitation will be sent to members as a notification.
8) If the invitation is accepted, the status will change to Accepted.
How to Accept a Team Membership Request?
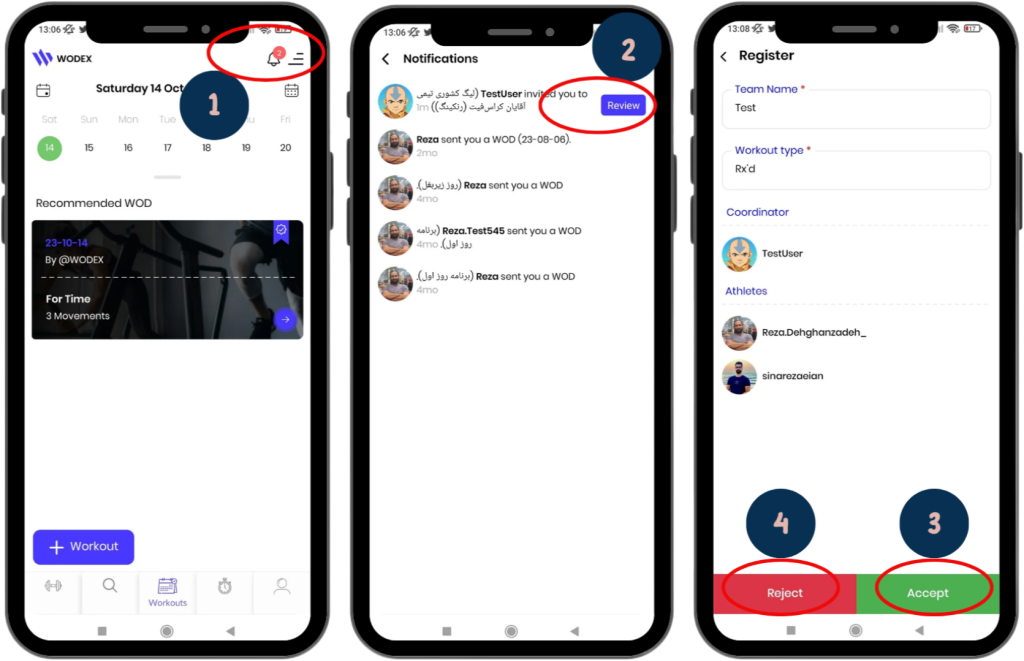
Team members can easily view and accept their invitations:
1) Receiving a Notification:
When an athlete is invited to a team, a notification will appear on their phone.
2) Viewing the Request:
Tap the notification and then the Preview option to enter the competition page.
Accept or Reject the Request:
3) Tap Accept to join the team.
4) Tap Reject to decline the invitation.
How to View the List of Competitors
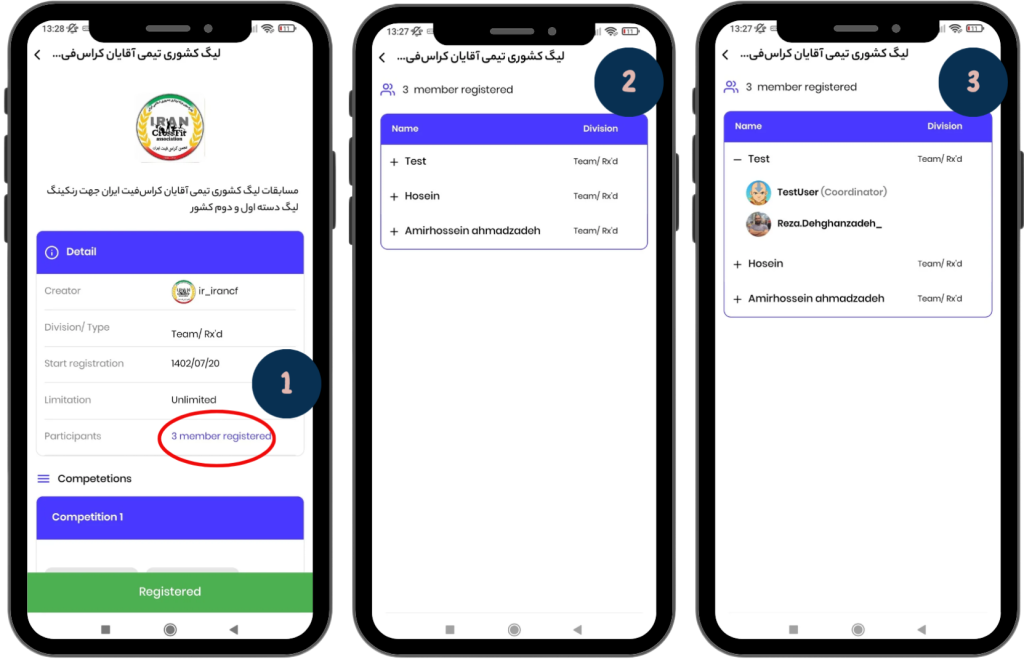
1) Participants List Button:
Click the blue button on the competition page to access the list of teams.
2) Team Information:
In this page, you’ll see the names of the teams and the categories they’re competing in.
3) View Team Members:
Click on the + icon to view the team leader and the members of the team.
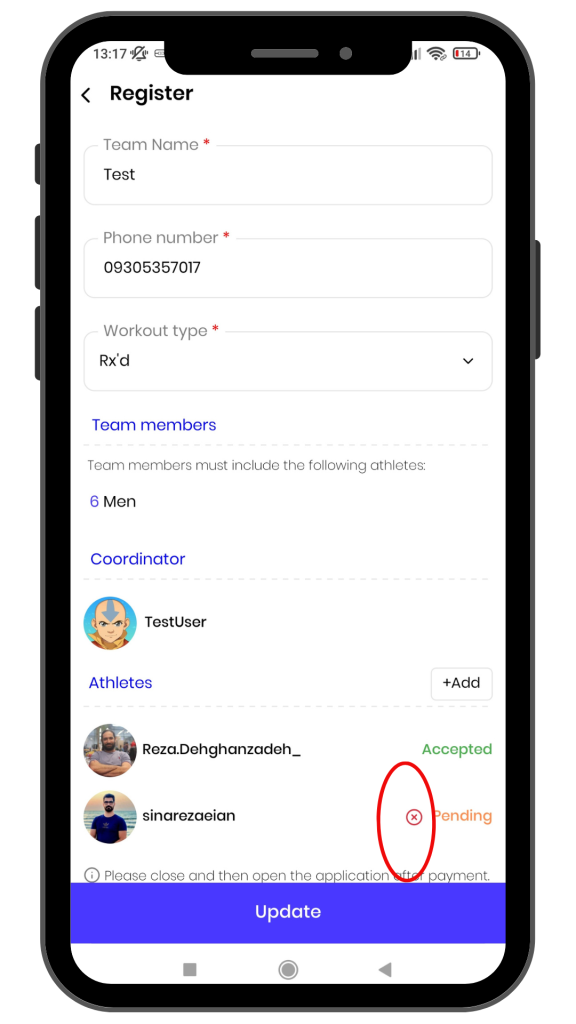
Frequently Asked Questions
1) Can I remove an added athlete?
Yes, as long as the athlete’s status is “Pending,” you can remove them from the team by clicking the X icon.
2) Is it possible to add a new athlete after completing the registration?
Yes, you can still add new athletes after completing the registration. Simply add them and then click the Update button.
Important Registration Tips
- Contact Information: Enter a valid and accessible phone number so the event organizers can reach you if needed.
- Select the Appropriate Level: Make sure the level and category you choose match your abilities.
- Final Check: After completing the registration, always review the list of registered participants to ensure the process was successful.
Home Workout: Monday, December 16, 2024
Home Workout: Monday, December 16, 2024
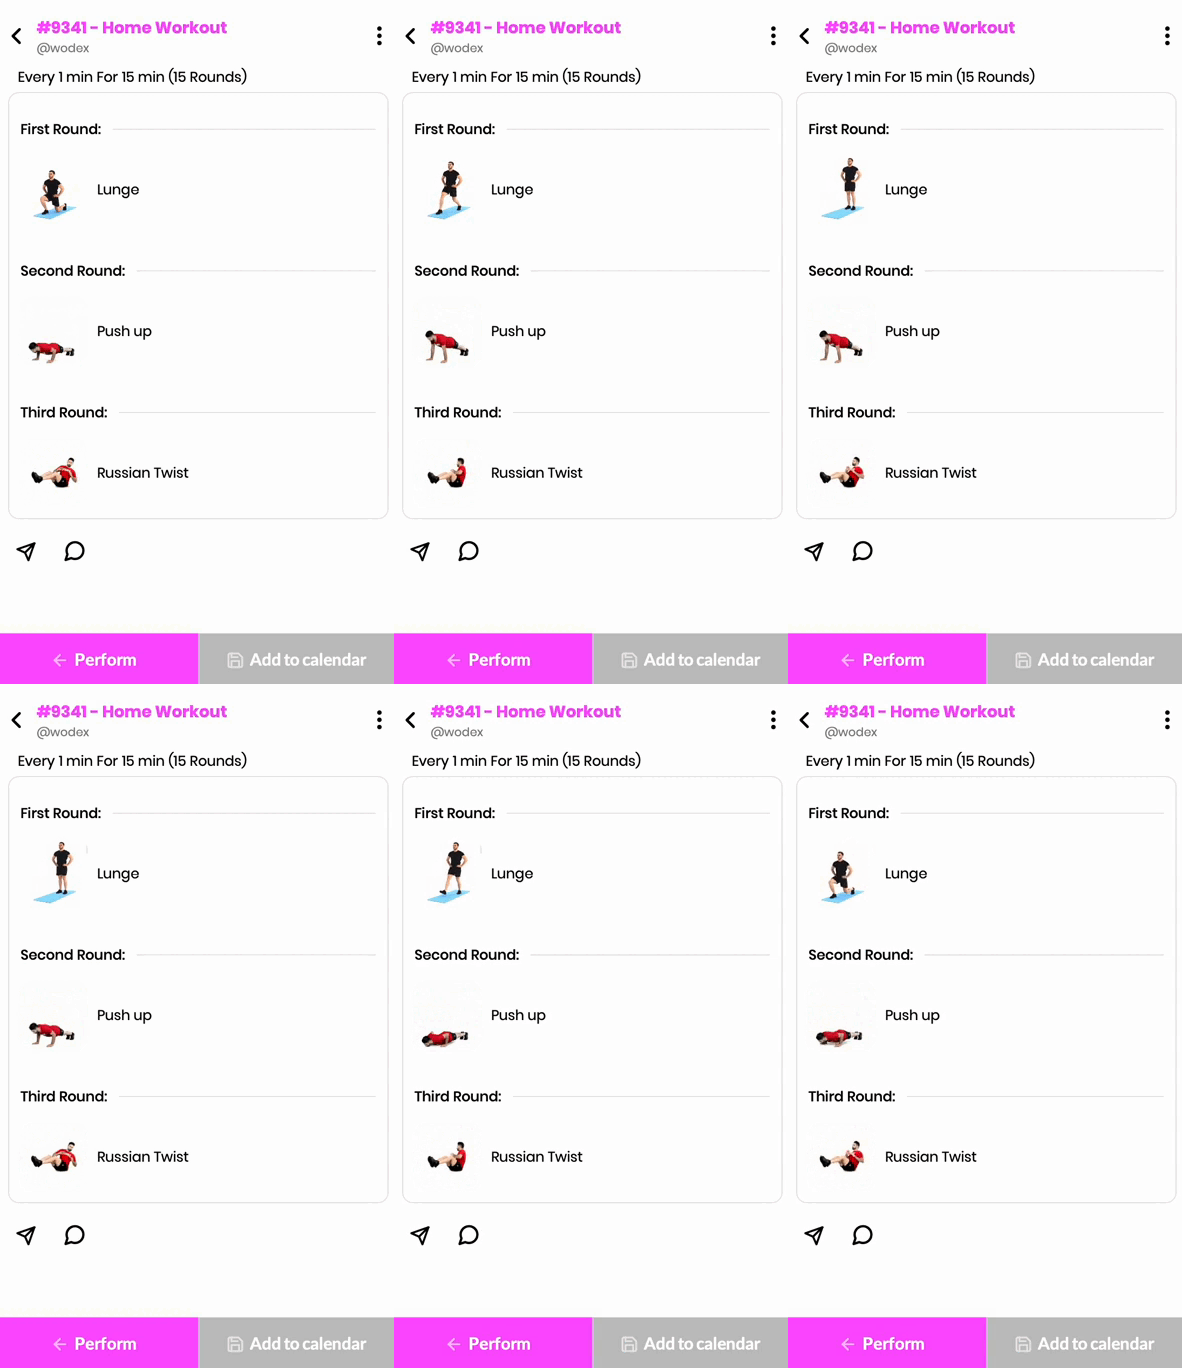
This 15-minute EMOM workout is designed to balance strength and endurance while offering manageable rest periods.
Lunges strengthen the quads, glutes, and hamstrings while improving balance and mobility.
Push-ups engage the chest, shoulders, triceps, and core, building upper-body strength.
Russian twists focus on core stability and rotational strength, targeting oblique muscles.
The EMOM format encourages participants to maintain a consistent pace, improving cardiovascular endurance and muscular stamina.
Proper form is critical to prevent fatigue-related injuries, making this an ideal workout for maintaining intensity while staying safe.
CrossFit Workout: Monday, December 16, 2024
CrossFit Workout: Monday, December 16, 2024
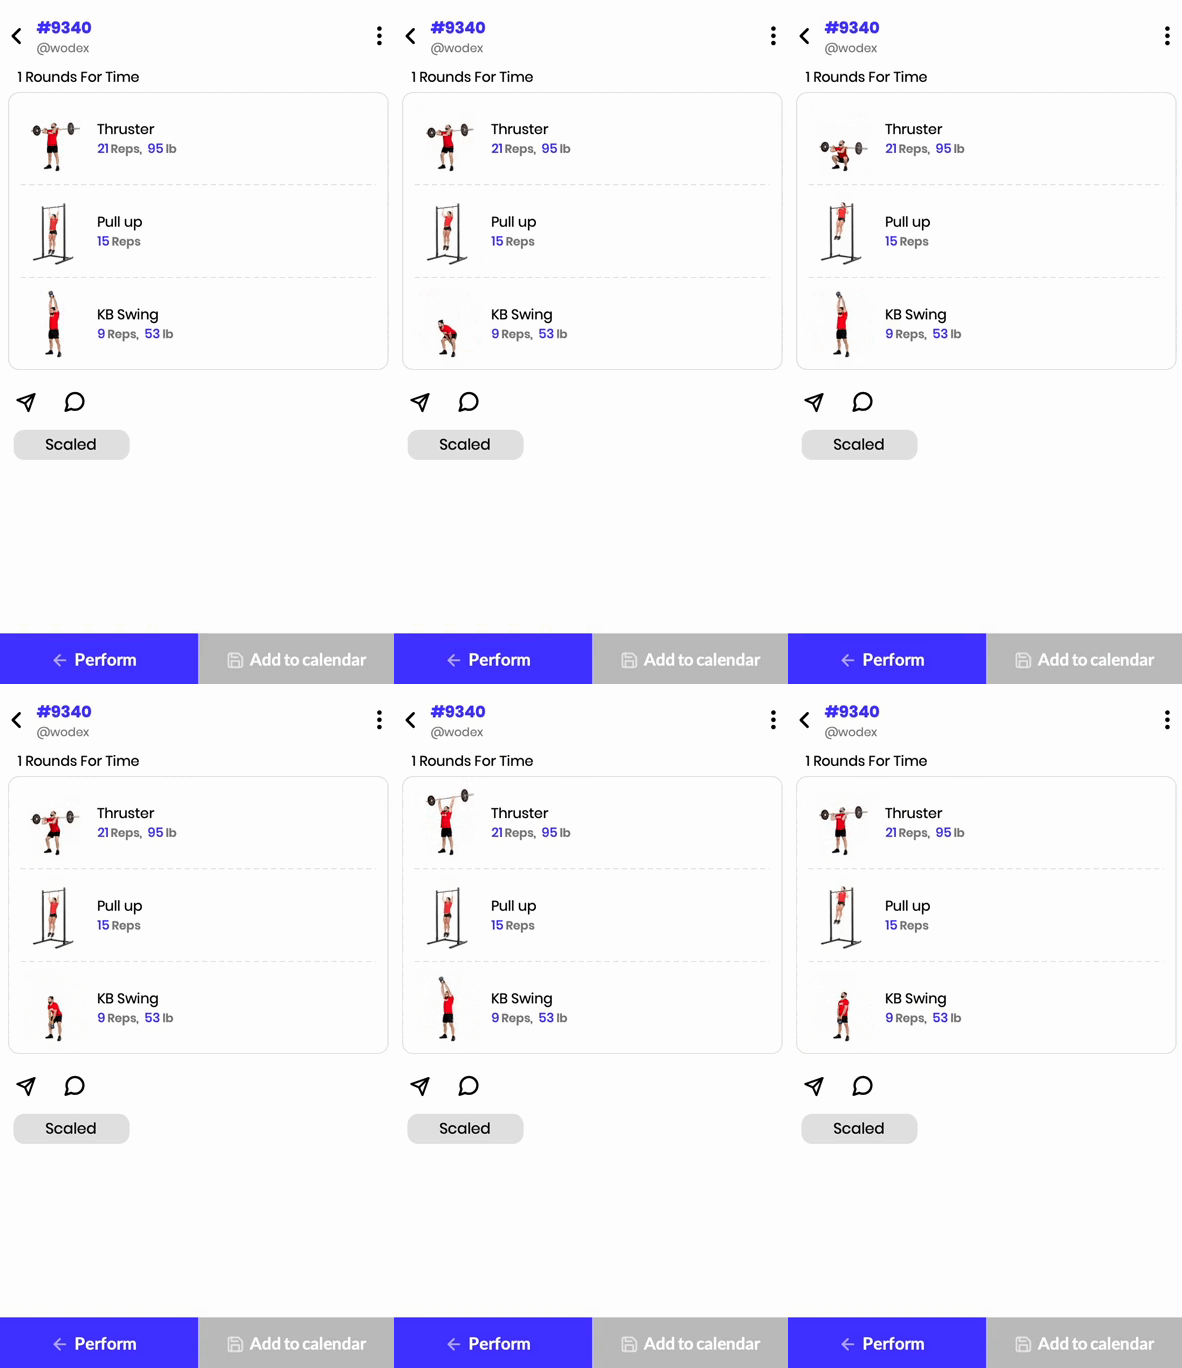
This for-time workout emphasizes speed, power, and endurance.
Thrusters, a combination of a front squat and push press, engage the entire body with a focus on legs, shoulders, and core.
Pull-ups develop upper-body pulling strength, engaging the lats, biceps, and core.
Kettlebell swings build explosive hip power, targeting the posterior chain and improving grip strength.
The for-time format challenges athletes to move quickly while maintaining proper form, promoting mental toughness and efficiency under fatigue.
The workout can be scaled for athletes of all levels by adjusting weights, movements, and equipment.
Workout Modifications for Beginner Athletes
For Time:
Complete the following as quickly as possible:
- 21 thrusters (65 lb)
- 15 pull-ups
- 9 Russian kettlebell swings (35 lb)
To access the warm-up and cool-down programs for this WOD, please use the WODEX app.
Home Workout: Sunday, December 15, 2024
Home Workout: Sunday, December 15, 2024
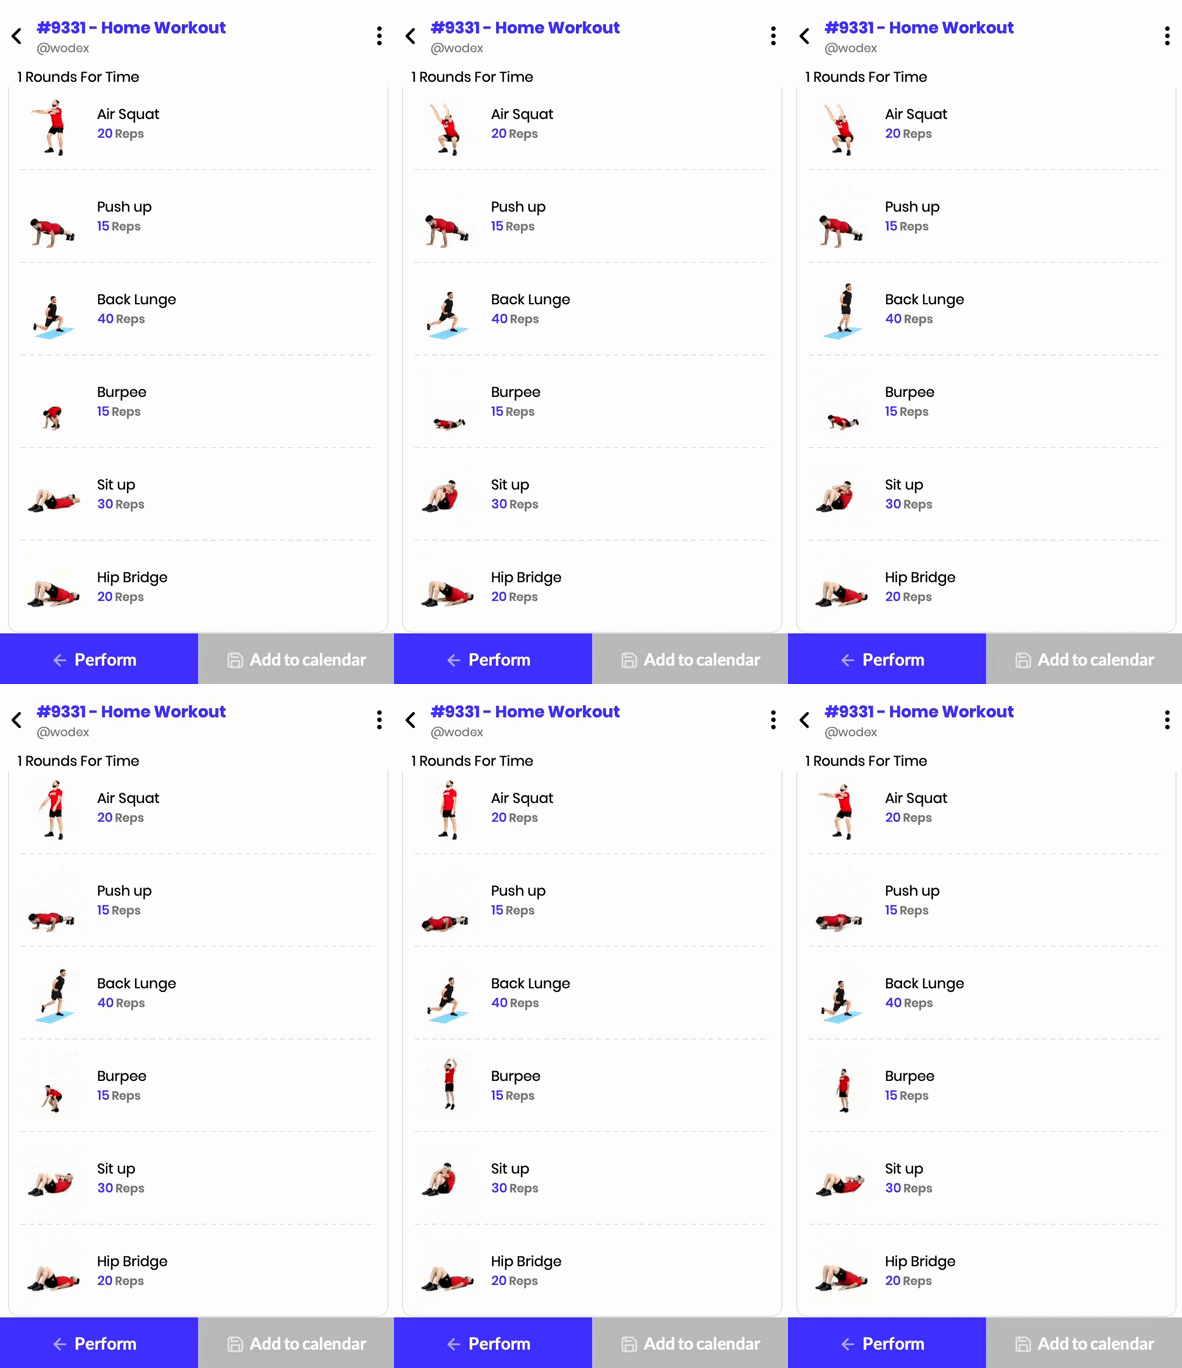
This for-time workout focuses on full-body strength and endurance.
Air squats build lower-body strength and mobility, while push-ups strengthen the upper body and engage the core.
Lunges target the quads, glutes, and hamstrings, improving balance and coordination.
Burpees elevate heart rate and build explosive power, offering a combination of cardio and strength benefits.
Sit-ups focus on core stability and endurance, and hip bridges strengthen the posterior chain.
The for-time structure adds intensity by encouraging participants to maintain a steady pace while prioritizing good form. This format is excellent for increasing workout efficiency and overall conditioning.